
Thank you, thank you...
So today I was buggin' and pulled the lenses off the clearance lights, blew them out with compressed air, siliconed the crap outta them and reassembled. If they still leak I'd be shocked. I used Dow Corning Silicone:
748 Noncorrosive Nonflowable Low Odor—Use with corrosion-sensitive electrical and electronic equipment. Plus, it doesn't have the harsh vinegar smell of other silicones. Bonds metal, plastic, glass, and rigid PVC. Resists moisture and weather. Begins to harden in 30 minutes.
The downside is that it's white, so I needed to be extra careful not to get it all over the lens. The upside is that it's OK for plastics that are susceptible to cracking easily. The Bostitch polyurethane sealant I used on the rest of the roof likes to crack translucent plastics.
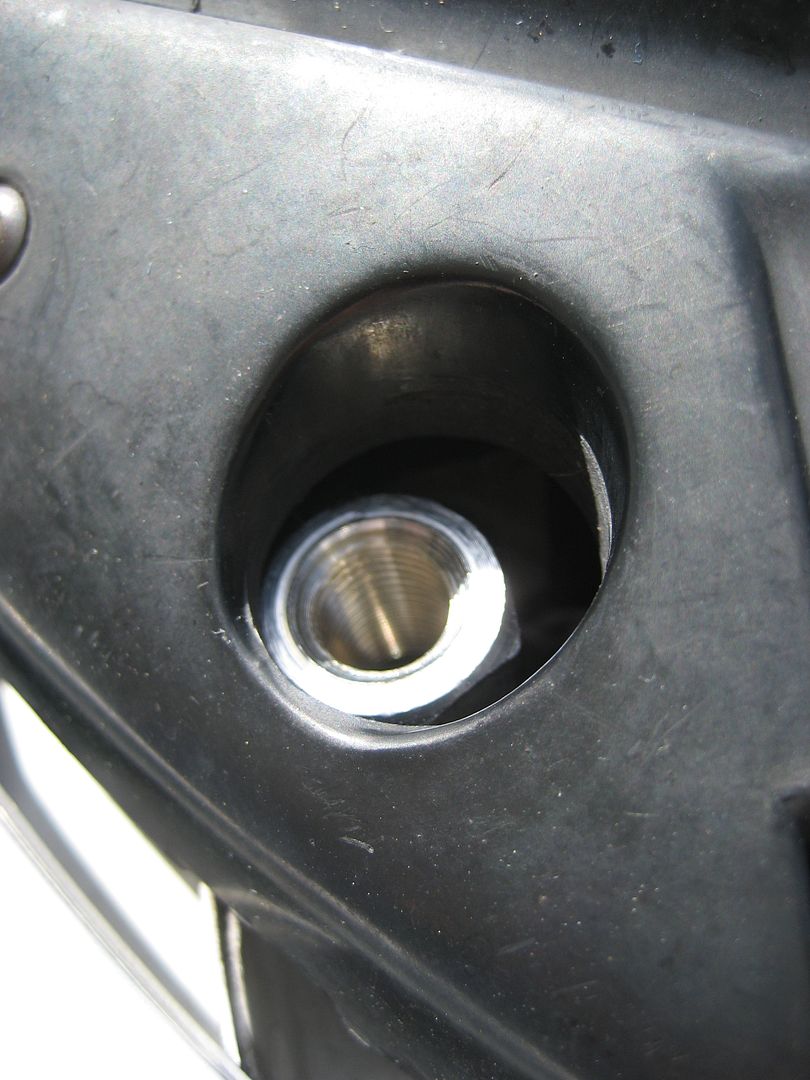
I looked at the bolt that was leaking and could not see why. The rubber o-ring washer under the head of the bolt looks snug and the rubber washer inside does too. I also could not see any break in the polyurethane seal around the foot. So I'm a little puzzled on that one. I guess I will have to pull it and see what's up.
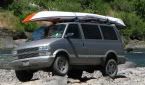
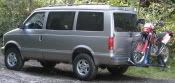
Homebrew Con-Ferr Style Porthole Roof Rack Build
-
97CargoCrawler
Topic author - I sleep in my van
- Posts: 754
- Joined: Thu Jan 24, 2008 11:50 pm
- Location: Near Los Angeles, CA
- Contact:
-
97CargoCrawler
Topic author - I sleep in my van
- Posts: 754
- Joined: Thu Jan 24, 2008 11:50 pm
- Location: Near Los Angeles, CA
- Contact:
Re: Homebrew Con-Ferr Style Porthole Roof Rack Build
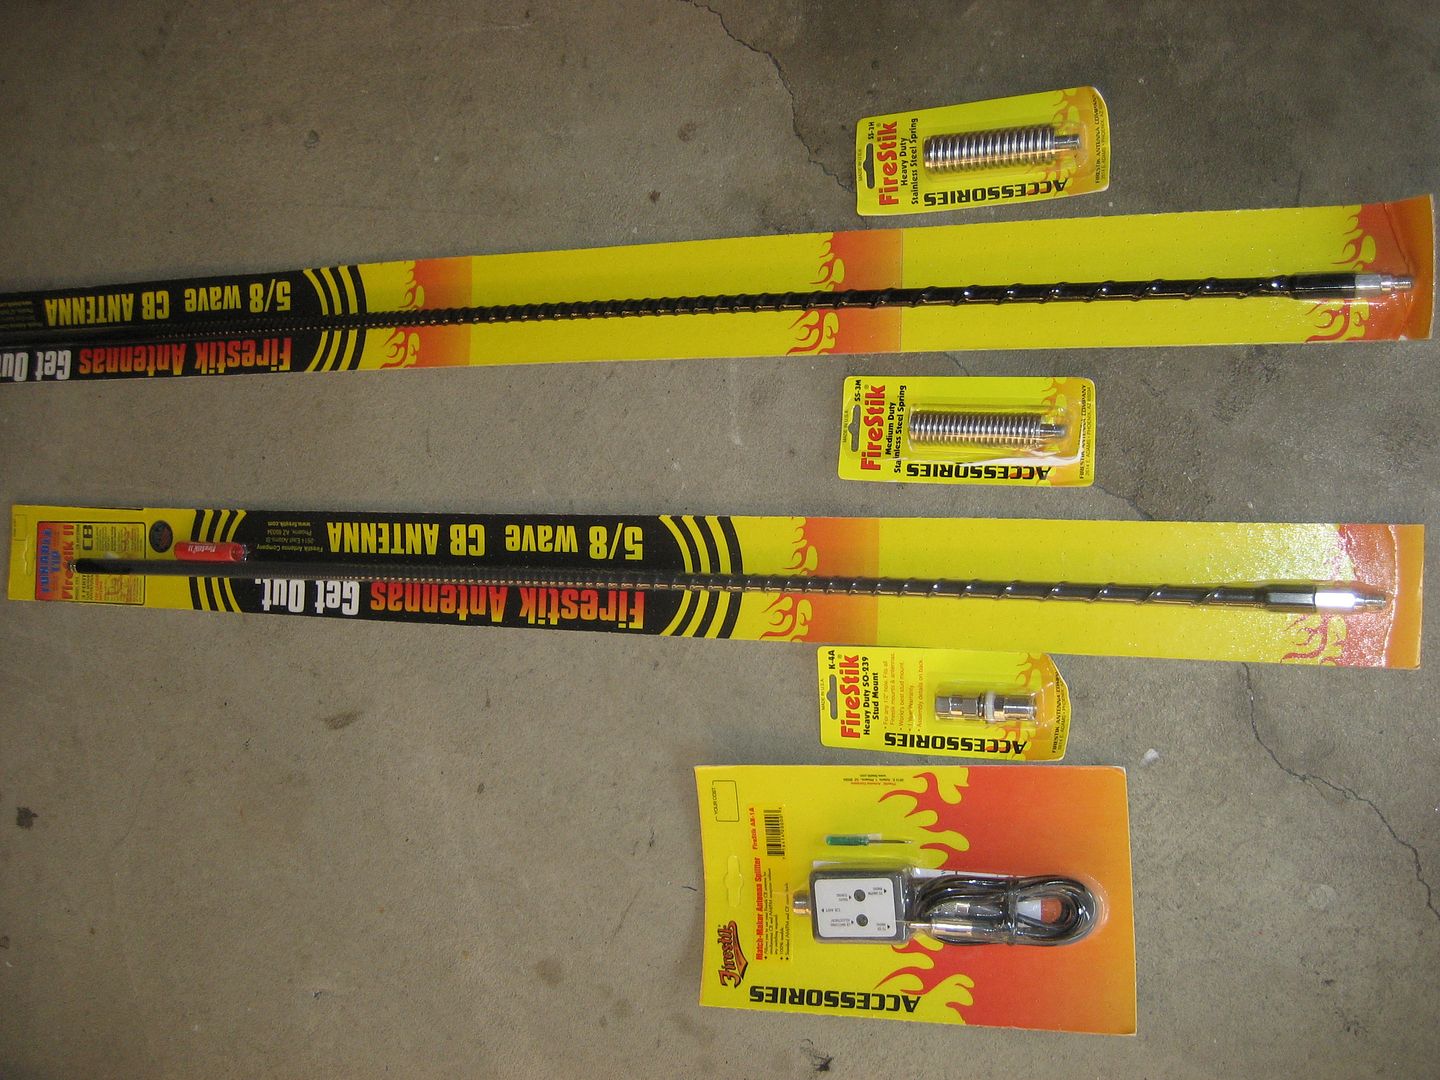
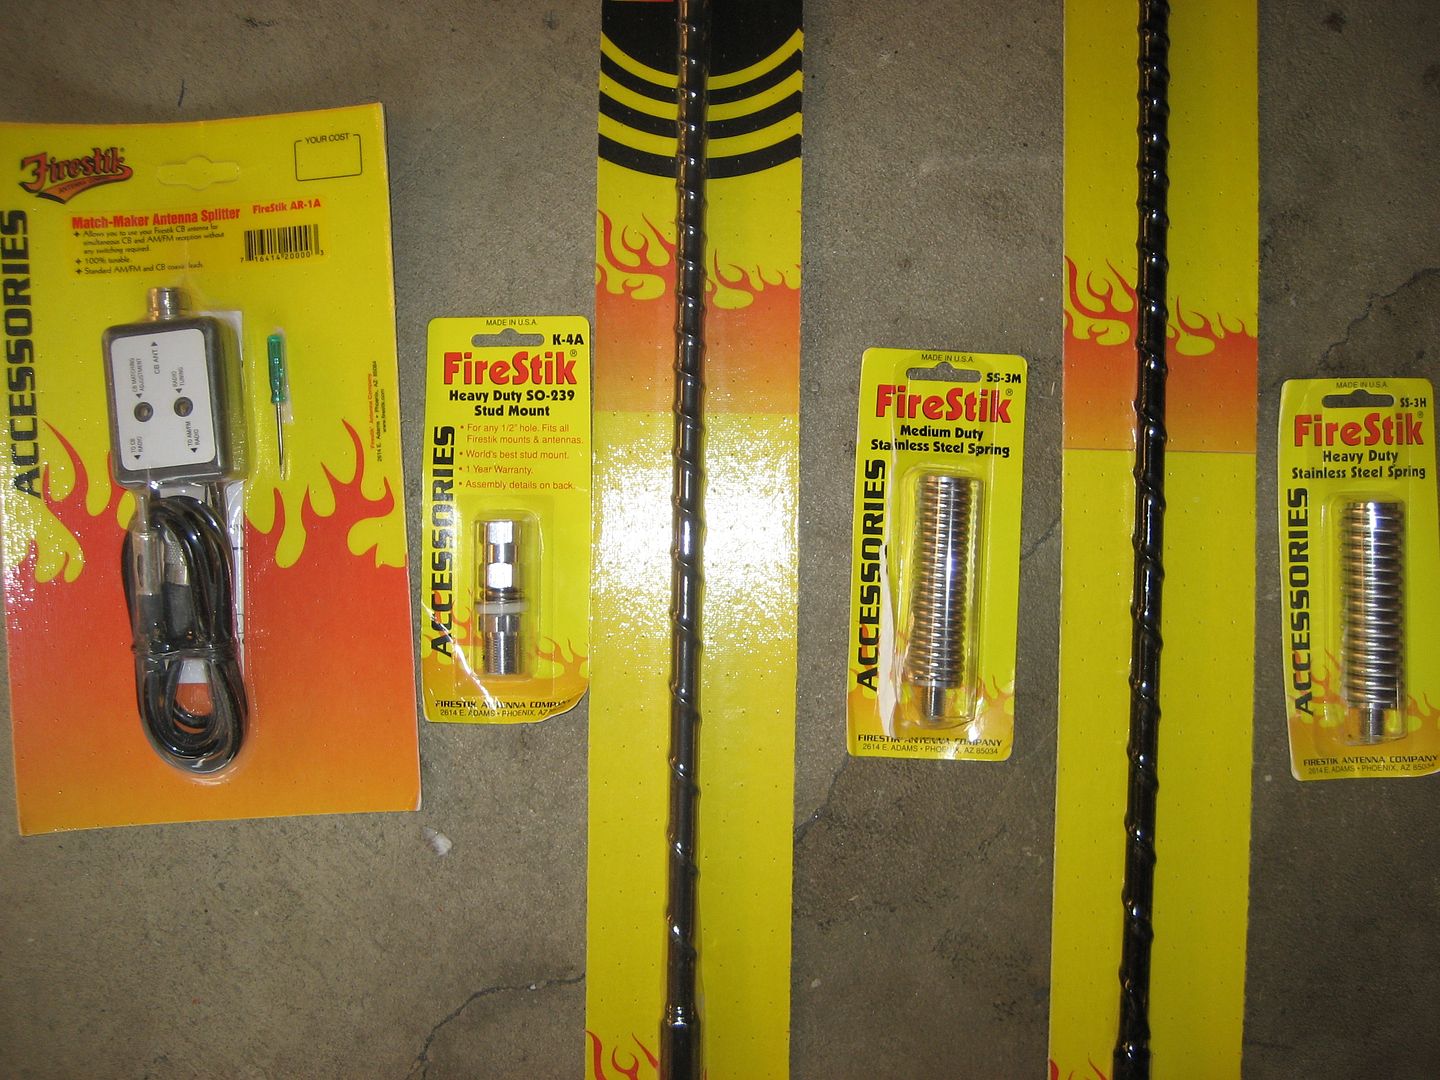
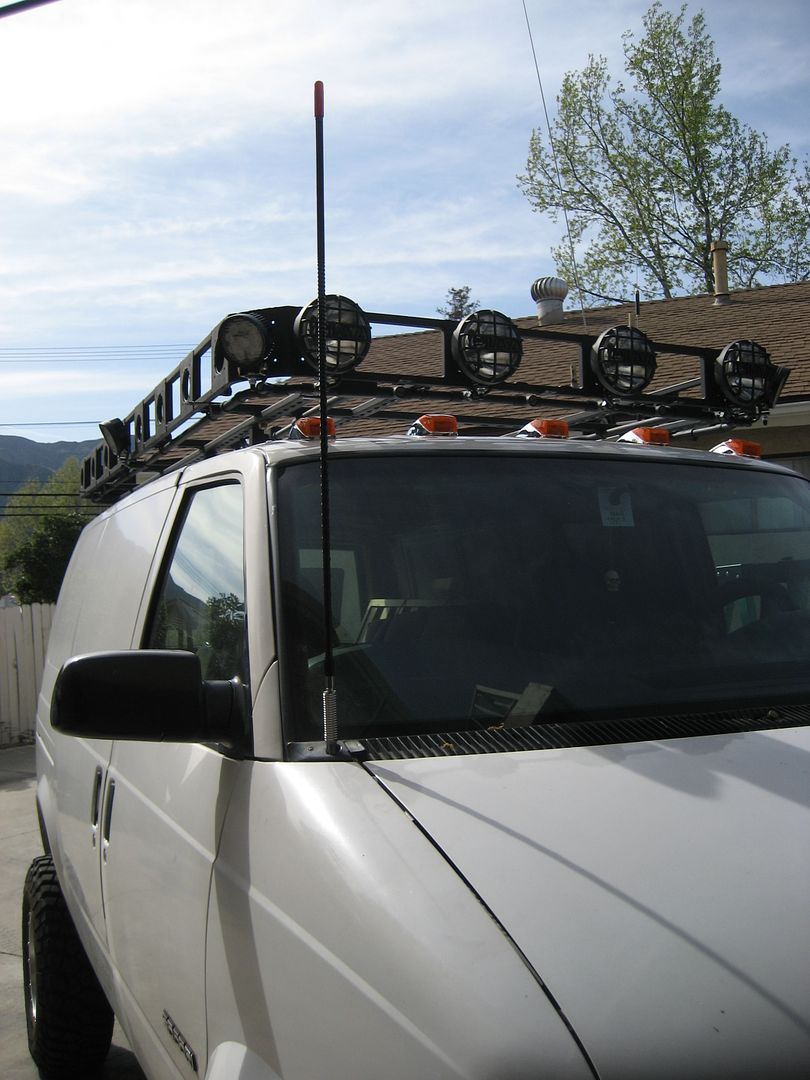
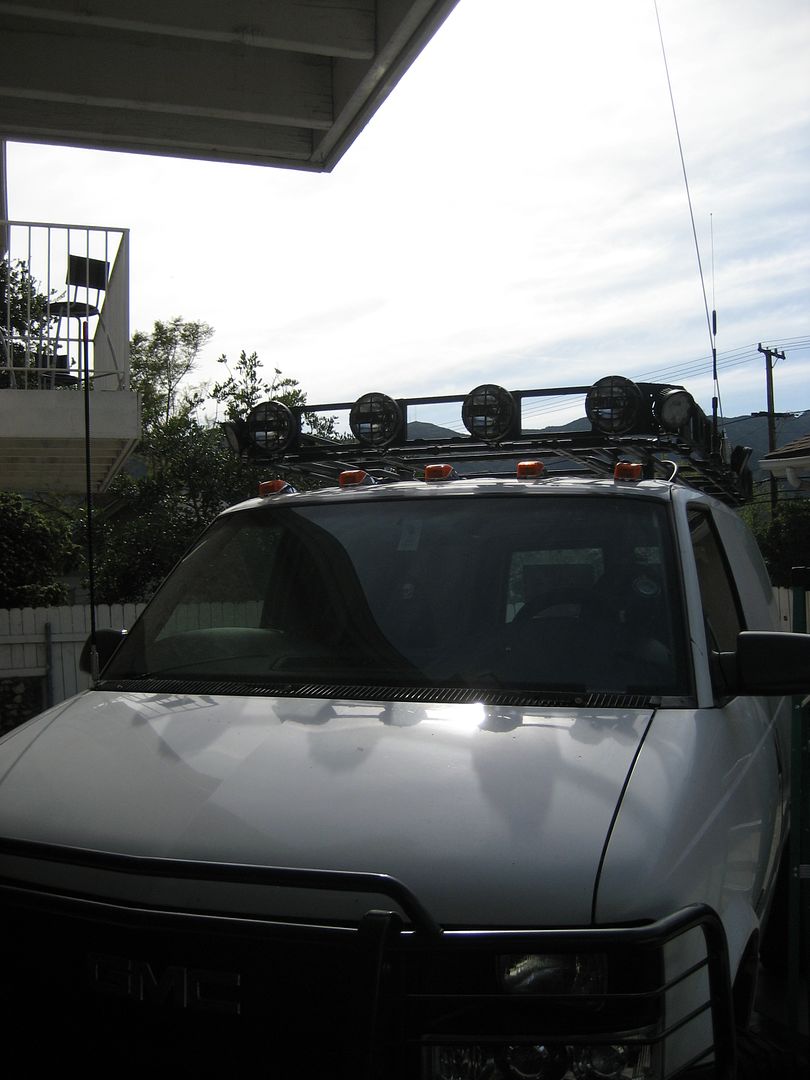
The idea here is to use a CB antenna as a clearance gauge for the rack. I bought a splitter that lets use use the antenna for CB and AM/FM radio. I'm going to install it in the factory antenna hole.
I bought a 3' and a 4' antenna because I wasn't sure just how much clearance I want. I got a medium duty and heavy duty spring mount too:
Proposed location:
Hopefully I will have install pix soon. I'm gonna need to run some RG58 coax through the firewall and crimp some connectors on.
I bought a 3' and a 4' antenna because I wasn't sure just how much clearance I want. I got a medium duty and heavy duty spring mount too:
Proposed location:
Hopefully I will have install pix soon. I'm gonna need to run some RG58 coax through the firewall and crimp some connectors on.
1997 SAFARI 2WD CARGO

"I do not think there is any thrill that can go through the human heart like that felt by the inventor as he sees some creation of the brain unfolding to success... Such emotions make a man forget food, sleep, friends, love, everything." Nikola Tesla
"I do not think there is any thrill that can go through the human heart like that felt by the inventor as he sees some creation of the brain unfolding to success... Such emotions make a man forget food, sleep, friends, love, everything." Nikola Tesla
Re: Homebrew Con-Ferr Style Porthole Roof Rack Build
Dude, This thread just keeps gettin better an better!!!
Rack On Bro...

Jim
Rack On Bro...
Jim
-
97CargoCrawler
Topic author - I sleep in my van
- Posts: 754
- Joined: Thu Jan 24, 2008 11:50 pm
- Location: Near Los Angeles, CA
- Contact:
Re: Homebrew Con-Ferr Style Porthole Roof Rack Build
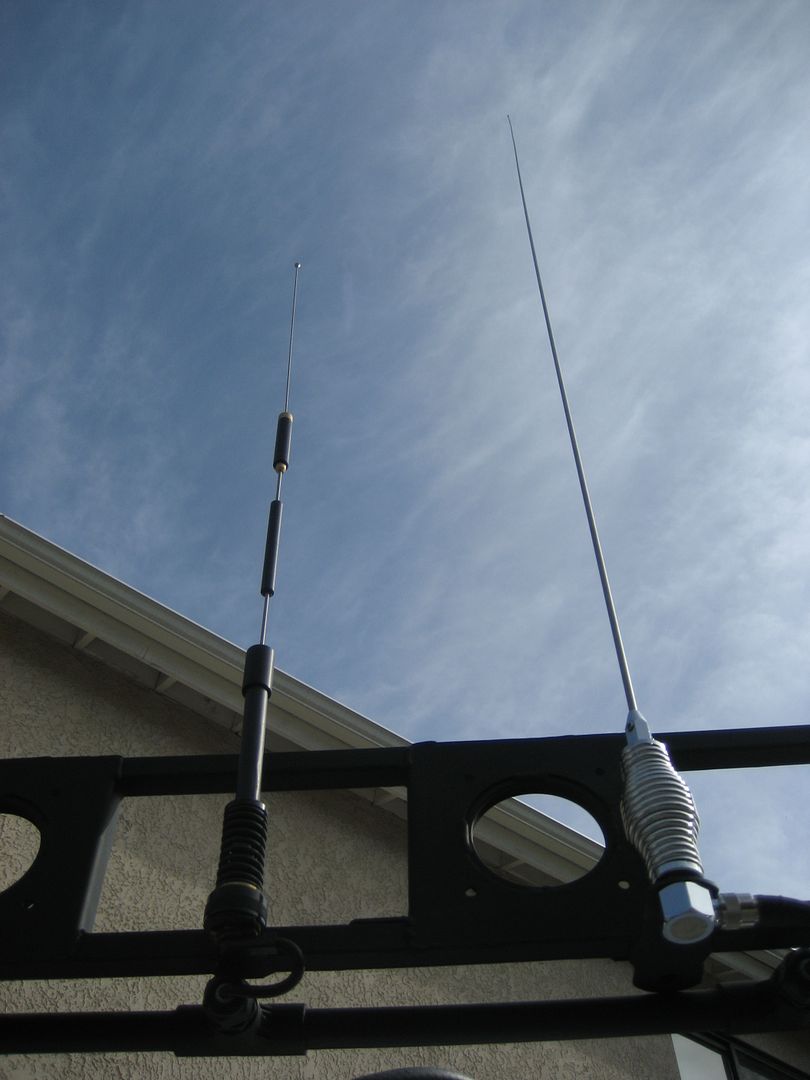
So here's the Firestik mount:

And here's where I wanted it to go. The location for the stock radio antenna:
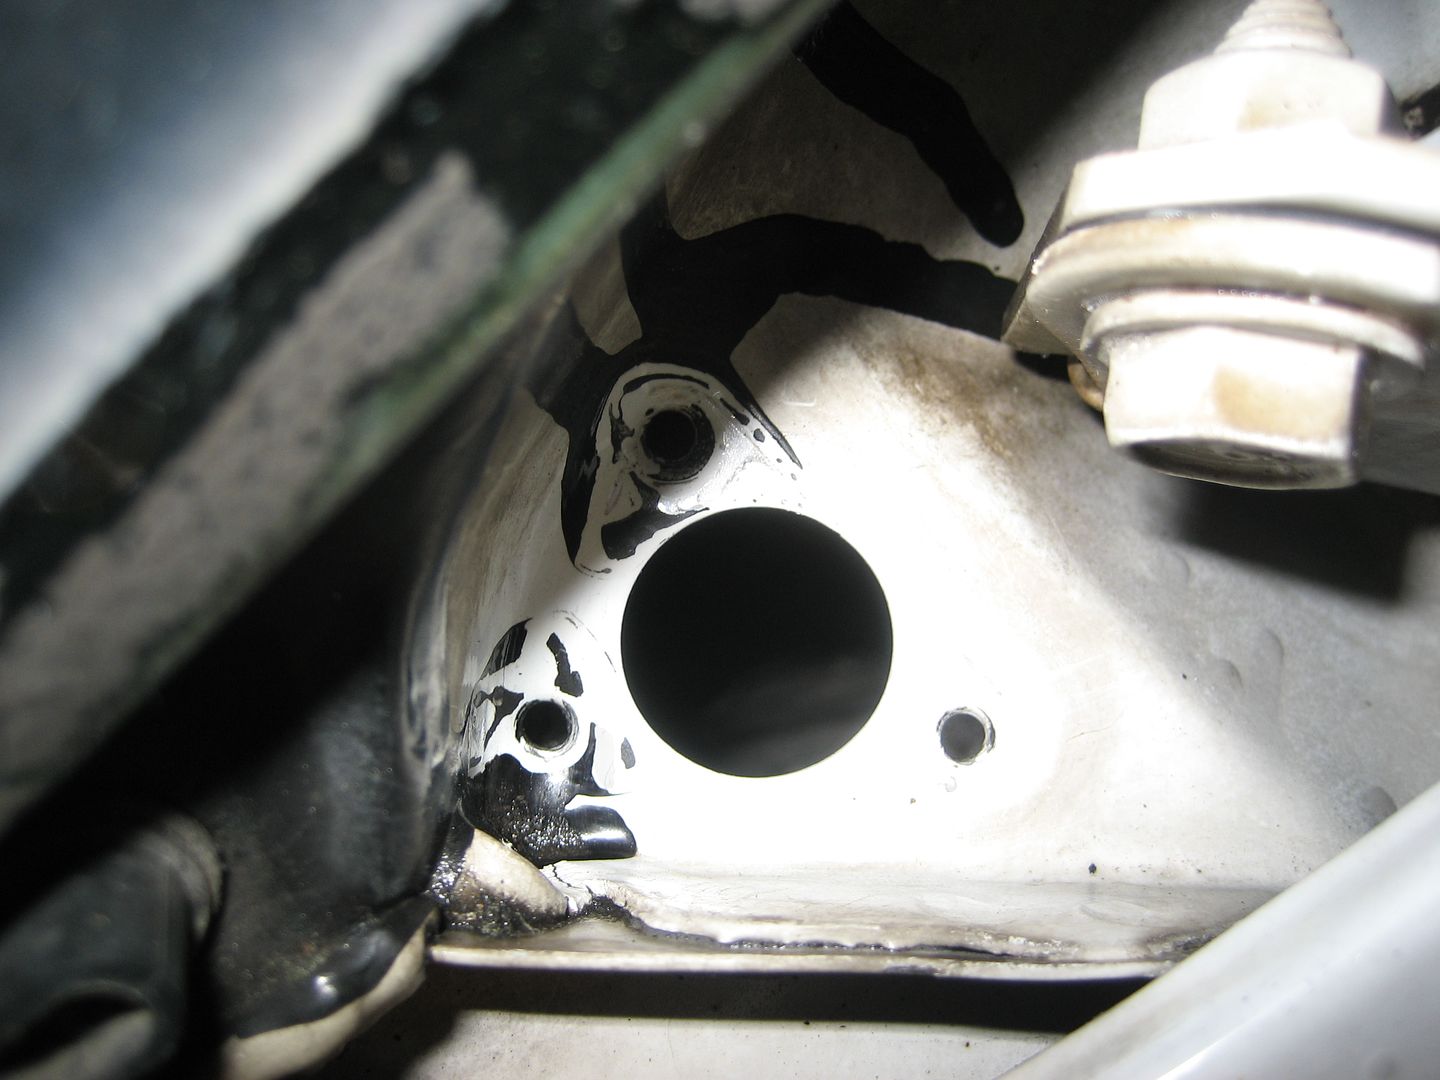
The mount comes with a plastic insulating washer to keep the center stud from touching the chassis ground and shorting the connection. The sheet metal is pretty thin in the stock radio mount location so I decided I needed some hefty washers to help support the mount. I used SAE yellow zinc plated 1/2" washers:
I used a grommet with one end sliced off to take up the added thicknes and provide insulation of the center pin from the chassis:
Installed with some blue Loctite to keep it from rattling loose:
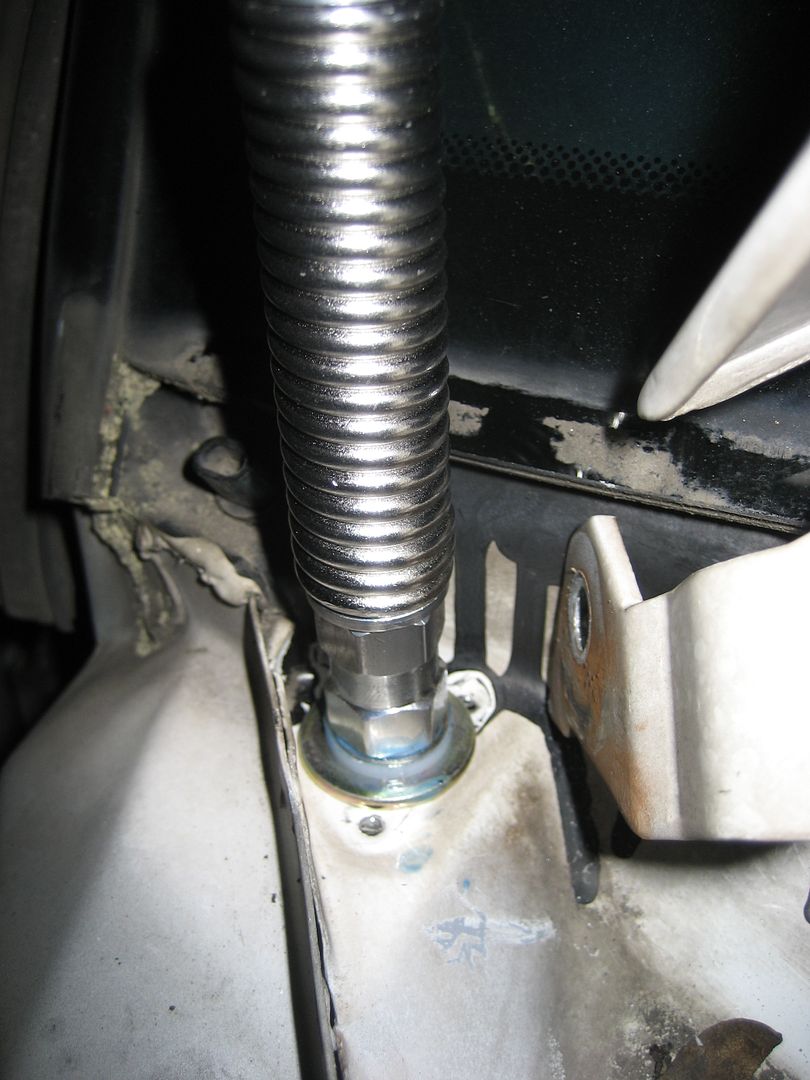
The radio antenna wire feeds down into the gutter below the hood cowl at the base of the windshield. From there it penetrates the firewall through a grommet and snakes back behind the AC. I wanted to route the CB antenna wire the same way. I tied a string to the original radio antenna wire and pulled out the cable. This left me with an original cable removed and a string coming through the firewall ready to feed my CB cable back through. Here you can see both the string and the 90* connector I put on the base of the antenna mount to simplify the attachment of the cable. It's way back in the gutter and it's really hard for a grown man to get an arm back in there so I tried my best to make it easy (view from inside the gutter):
Once the cable was fed back through the firewall I repaired a few cracks in the cowl, washed all the accumulated dirt out of the gutter and re-installed the cowl. For some reason the hole in the cowl doesn't align properly with the hole for the antenna. It must have been like that with the stock antenna too, but I didn't notice it before. Anyway, I cut out the lip inside that cylindrical tube in the cowl and added a short extension to bring up the mount a bit. Hopefully I can still tune my antenna properly with that little extension added (extension not shown in these pix):
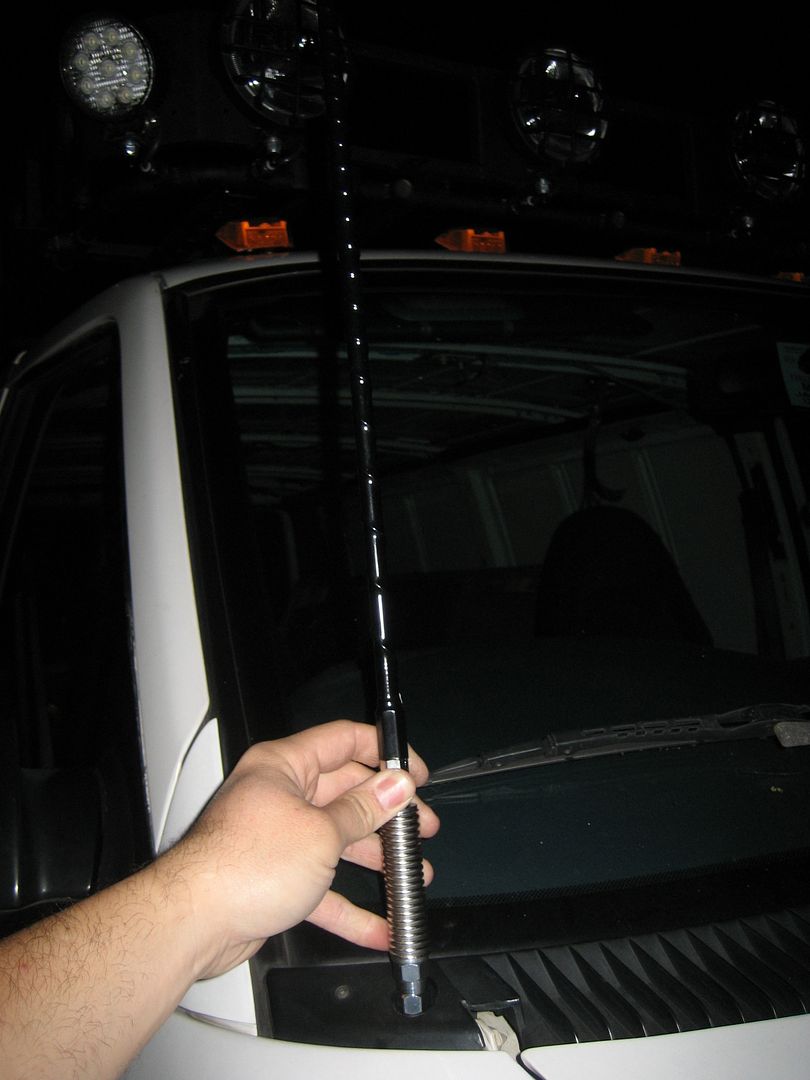
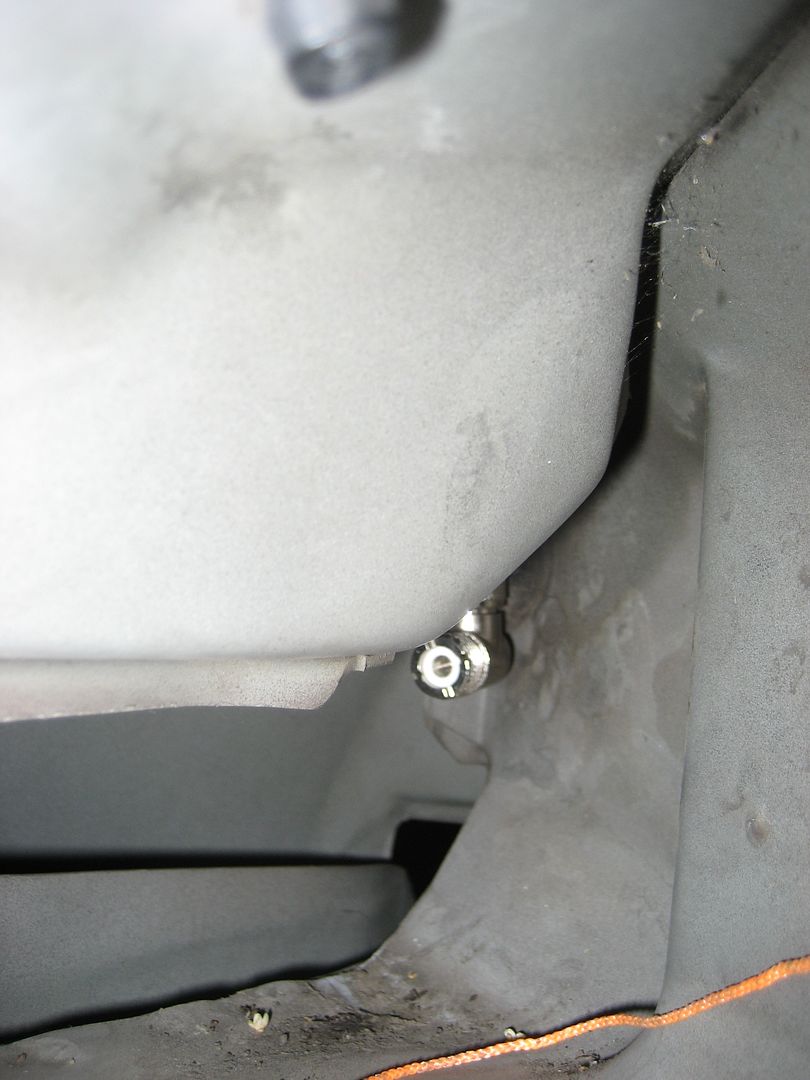
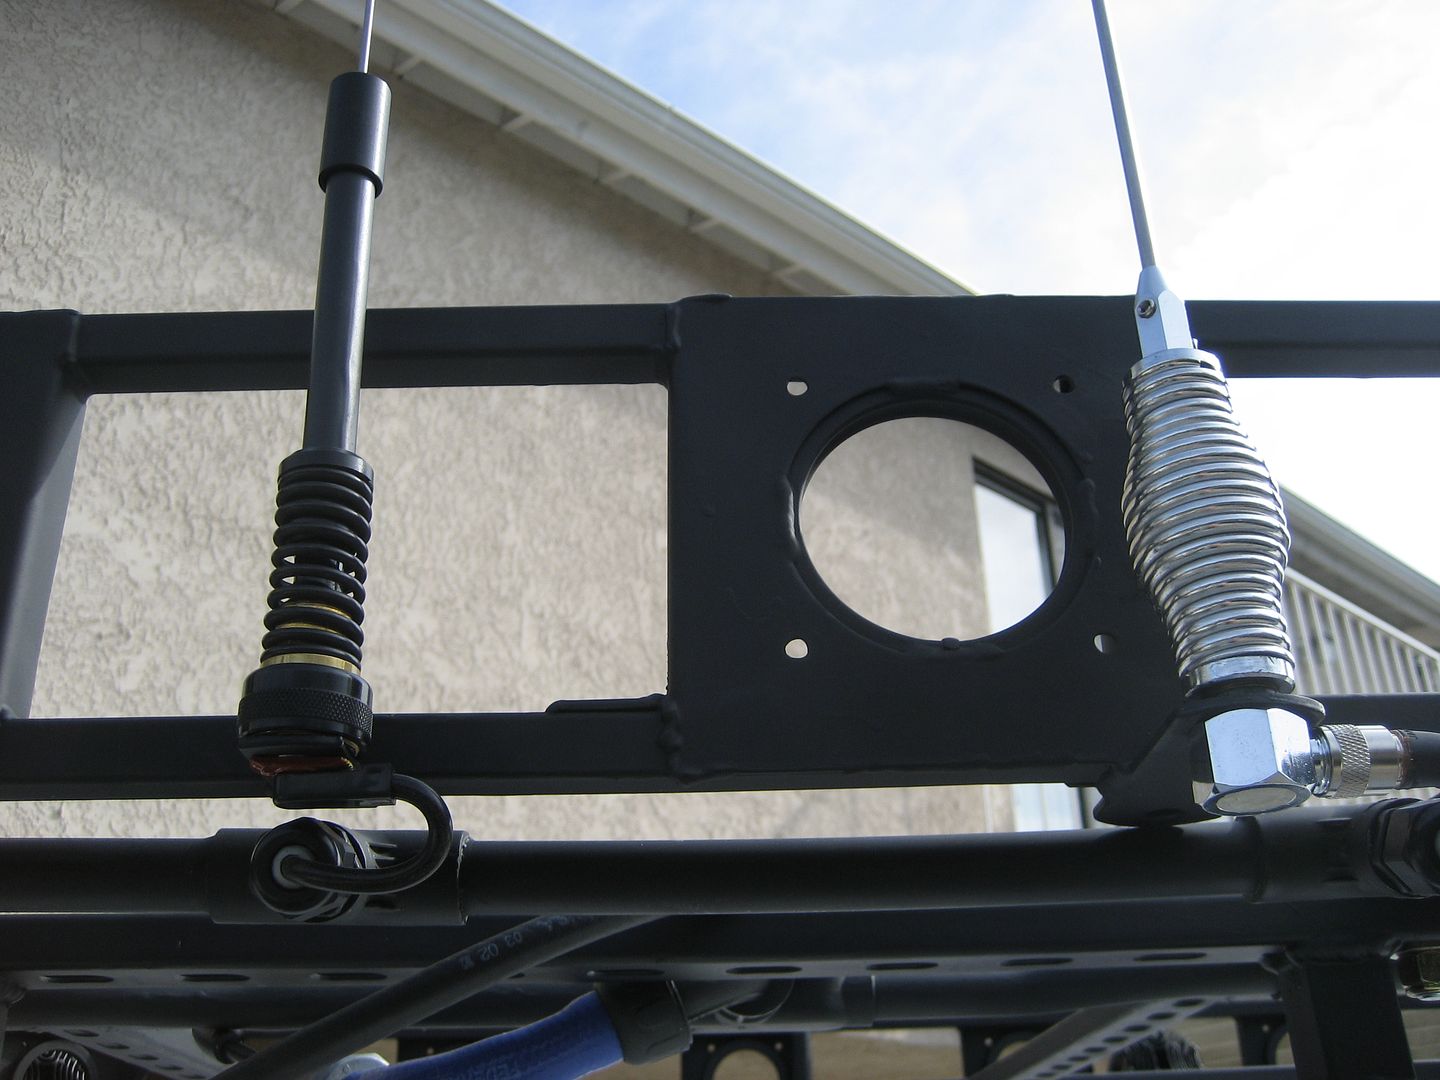
Antenna installed:
It won't be connected to anything for quite some time. Not until after the overhead console is done.
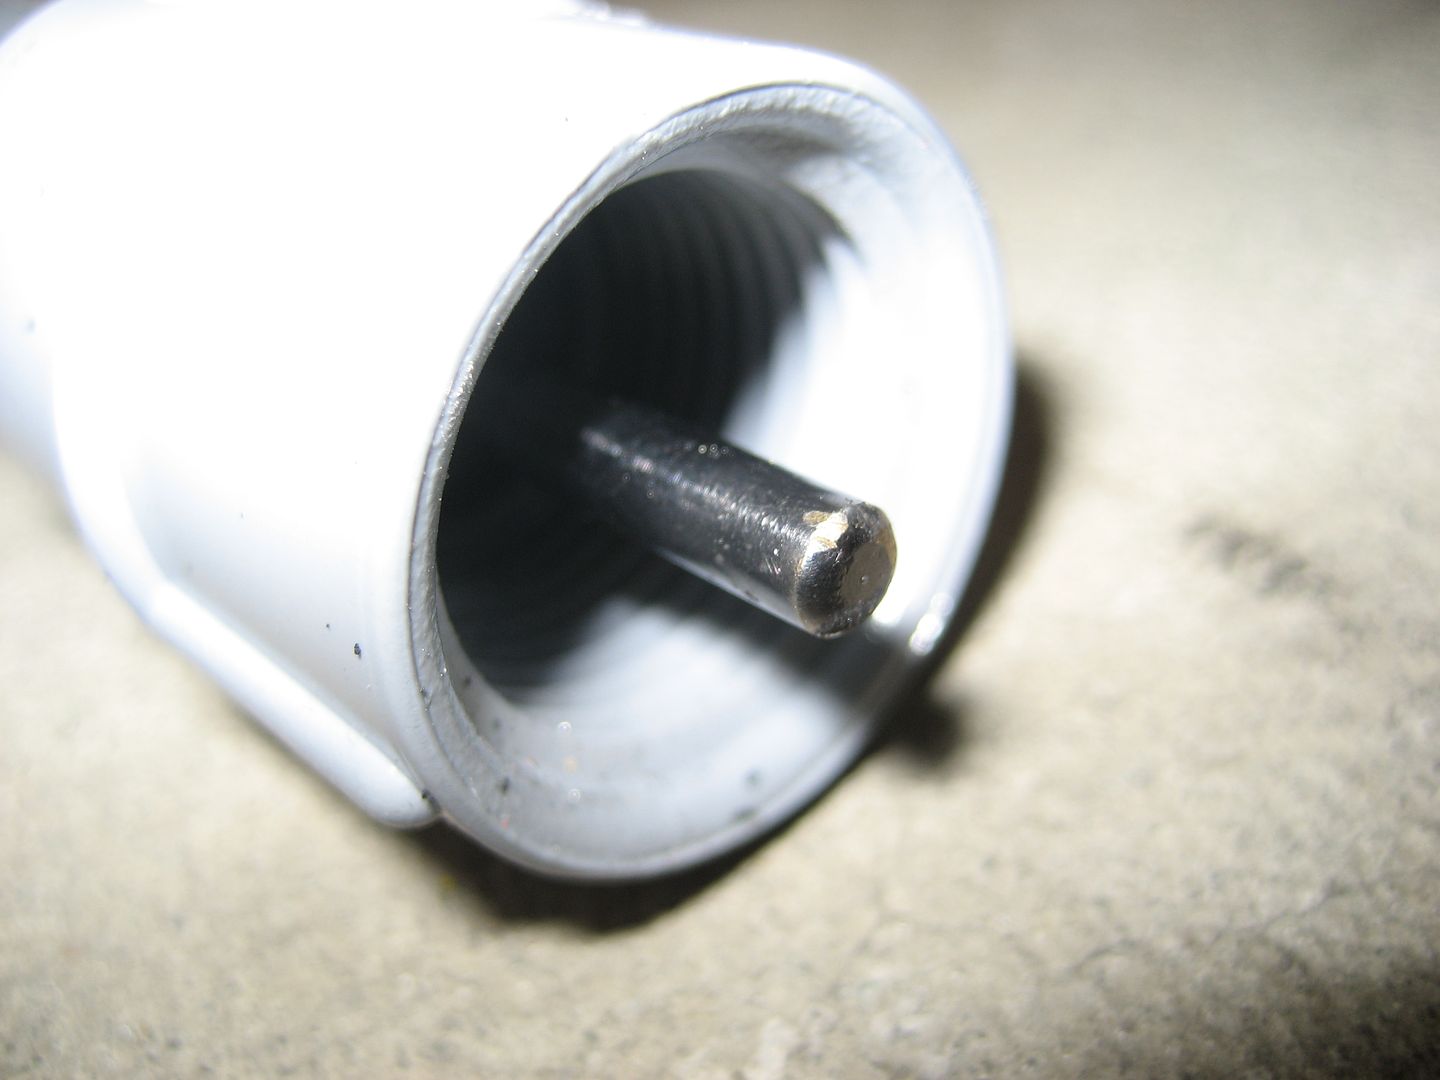
I also cut a length of PVC conduit for my 102" CB antenna:
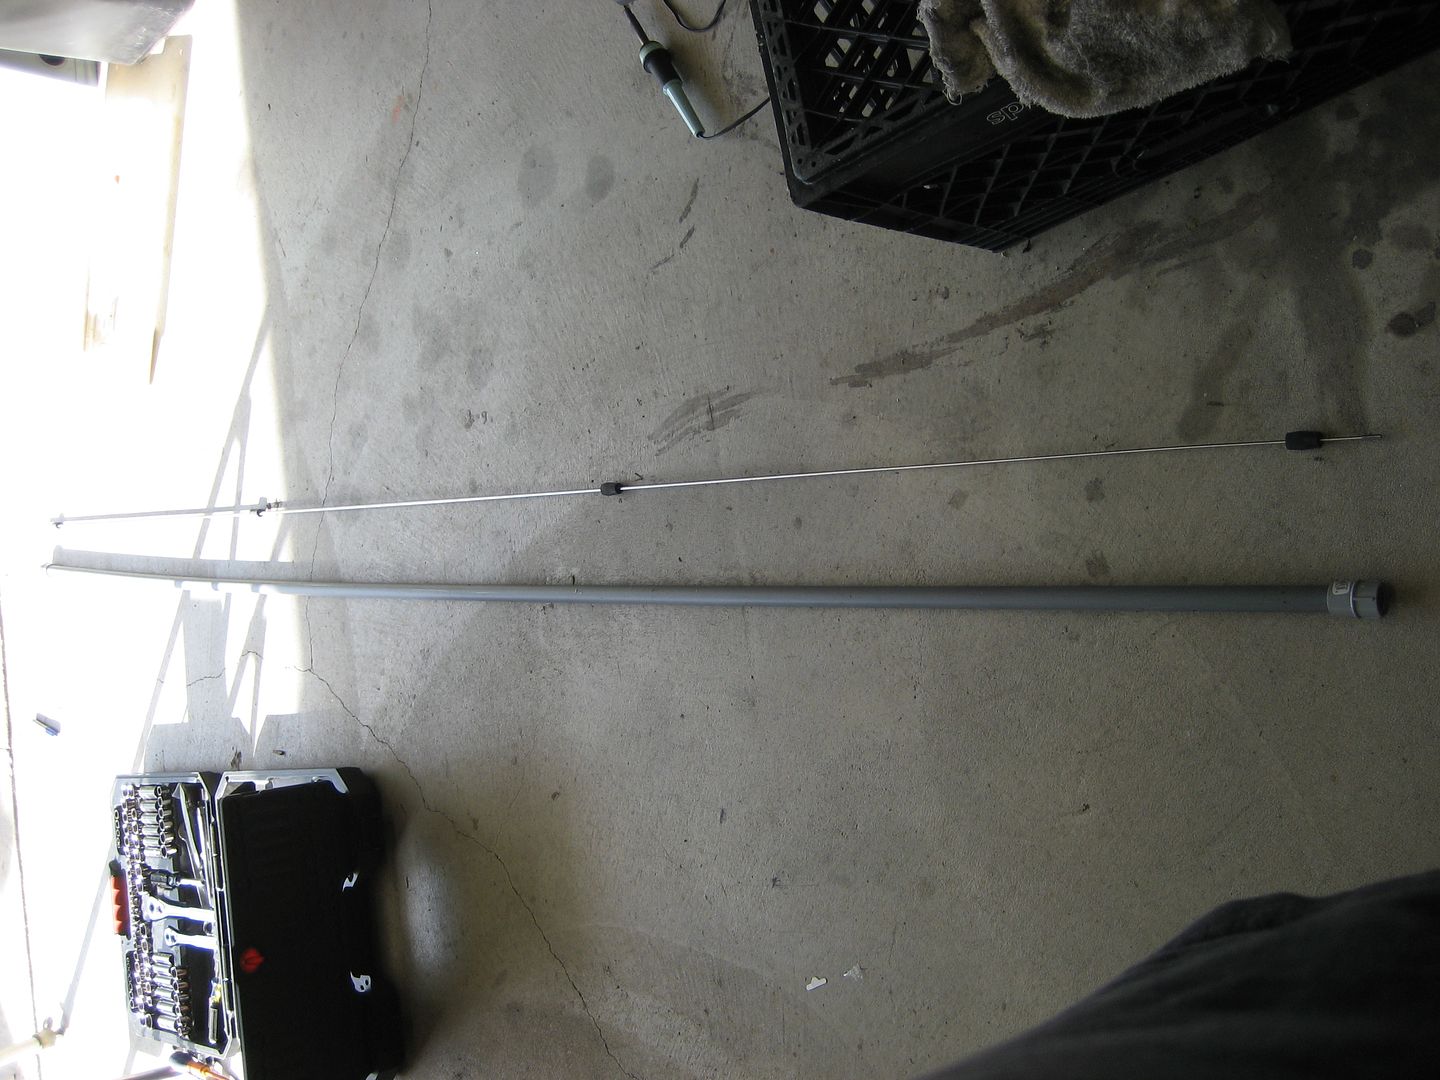
I cut the pipe to just the right length to allow the very tip of the antenna to protrude just enough from the end so I could easily pull it out:
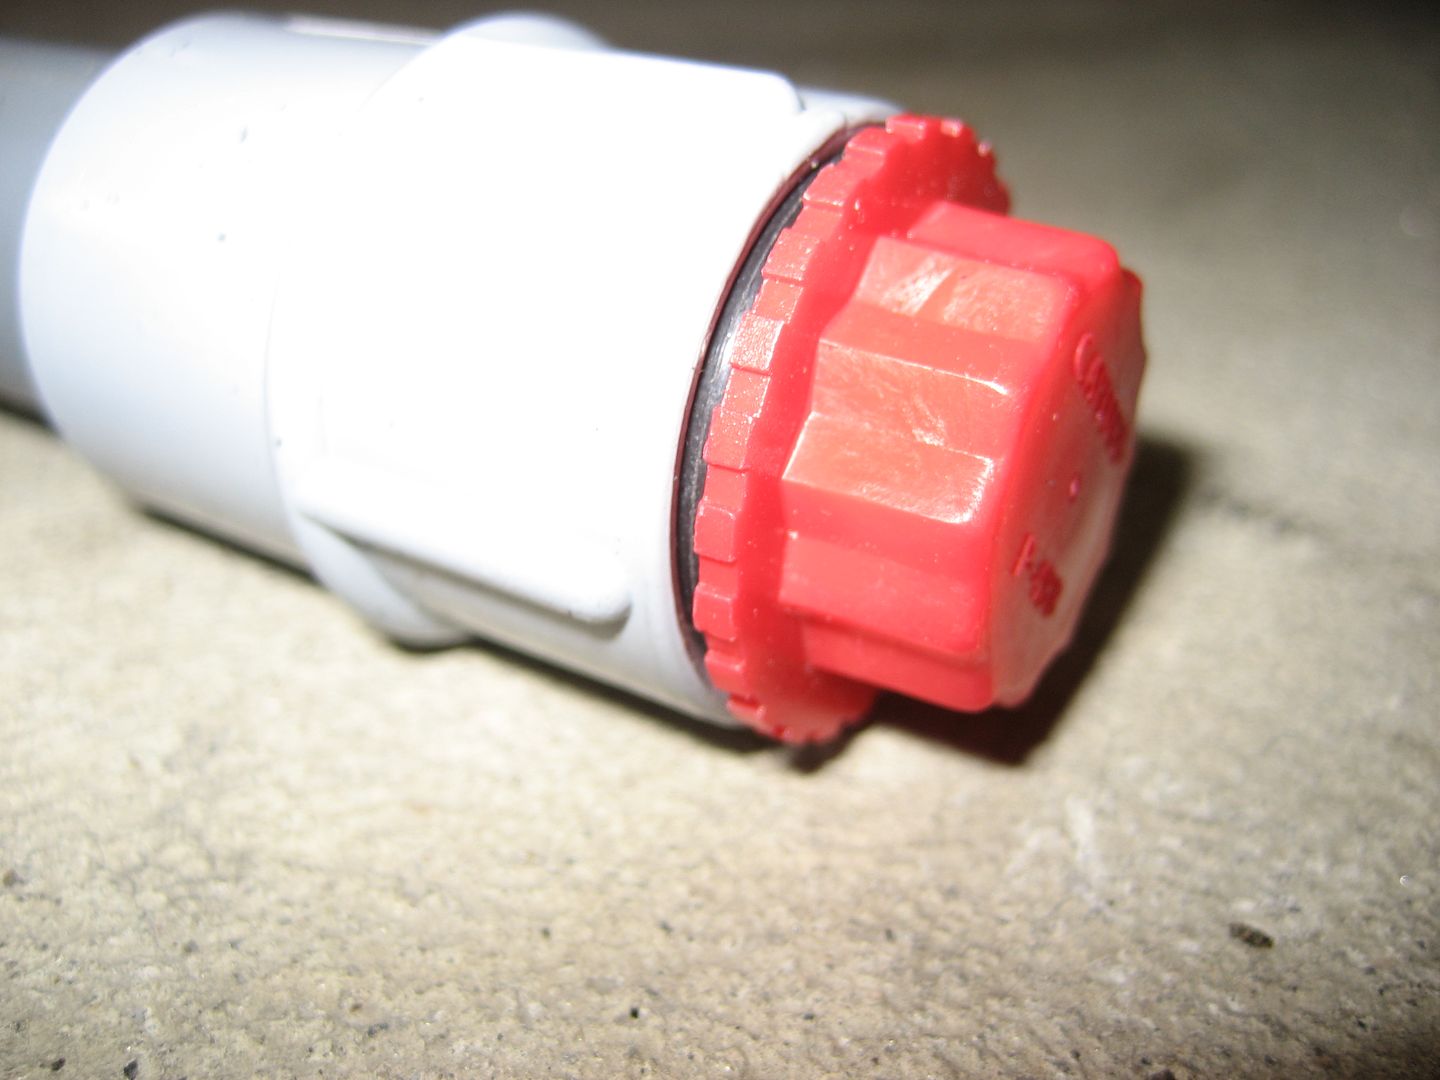
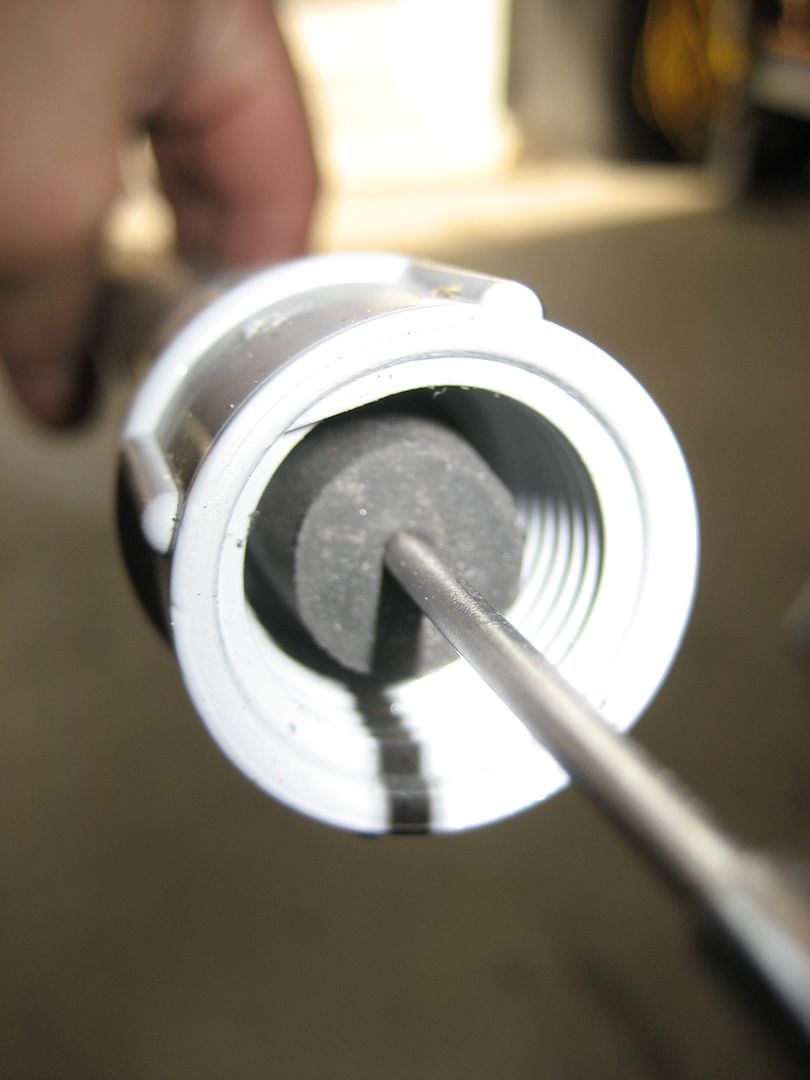
I have an extended cap that threads onto the end of the pipe with an o-ring to keep the pipe waterproof:
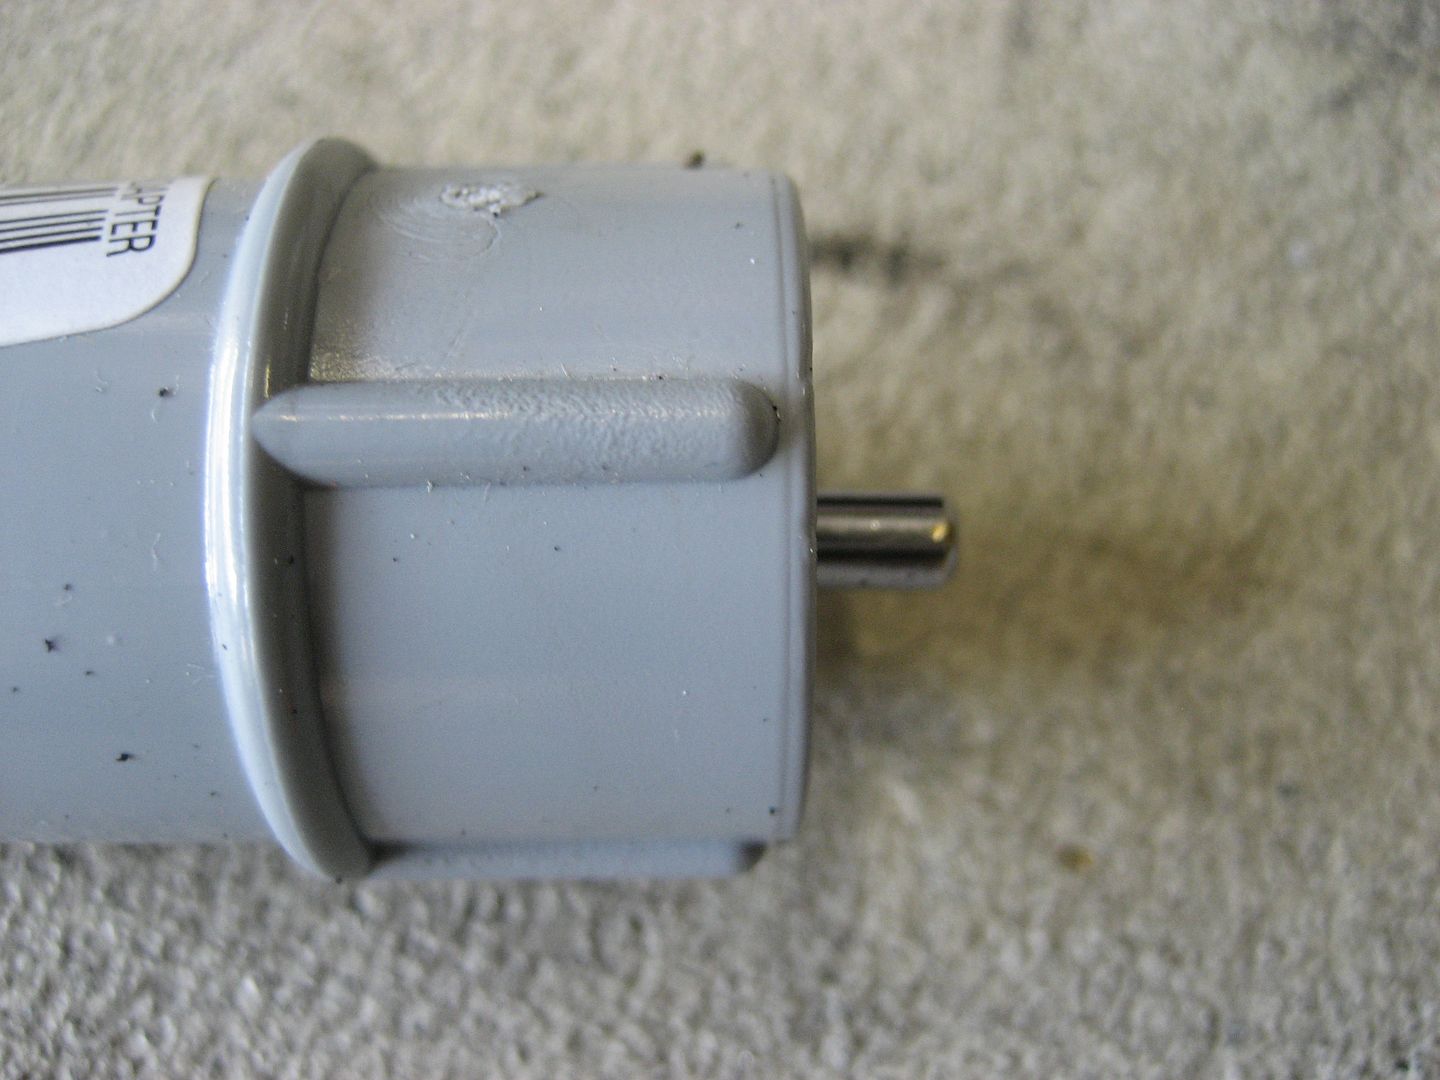
The antenna can make a lot of noise rattling against the walls of the pipe so I added these rubber plugs:
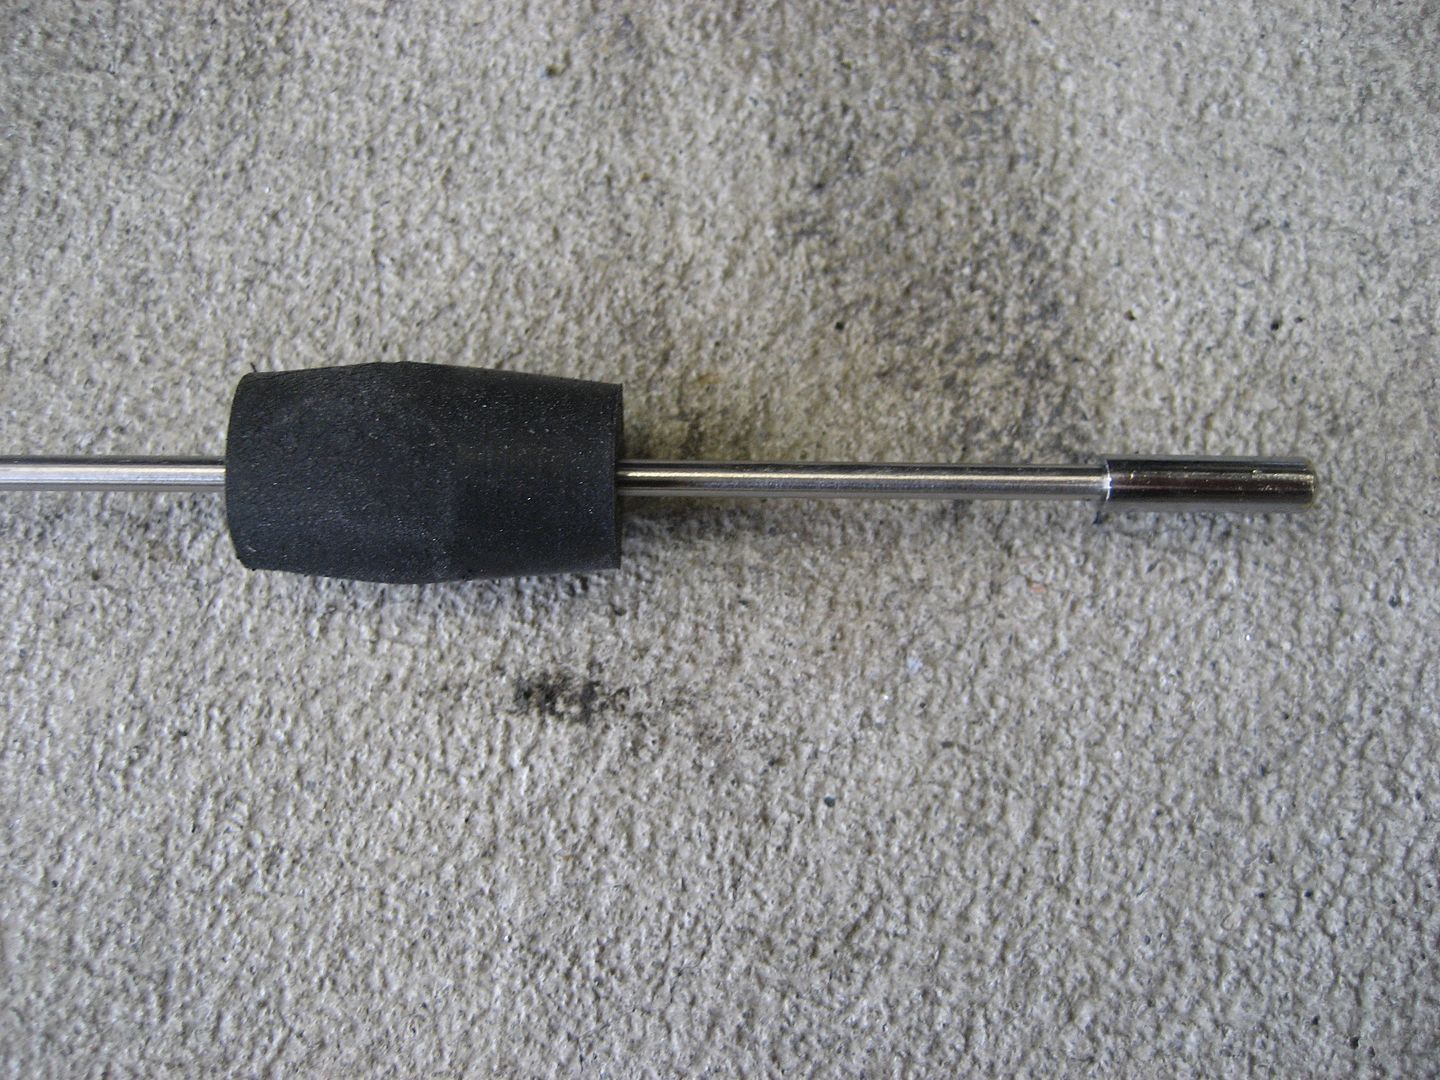
I made them double cone shaped so that the would easily slide in and out of the pipe but the center would be somewhat snug against the inner wall. This keeps the antenna concentric and suspended in the pipe and eliminates any rattling:
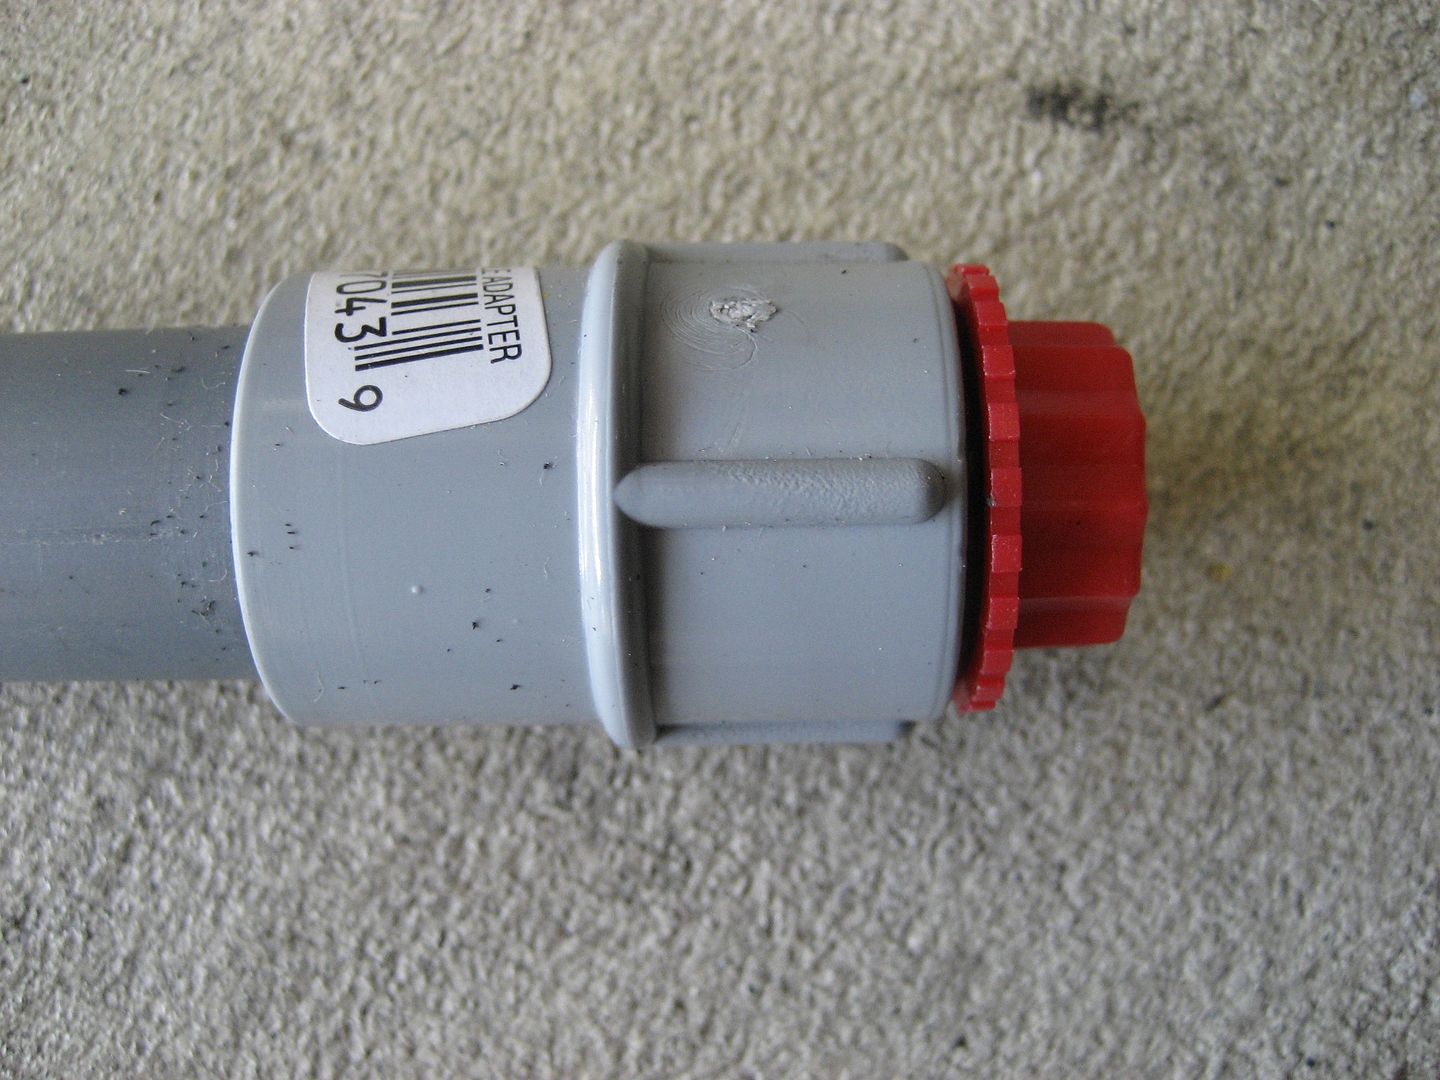
The entire pipe will be painted flat black and bolted to the underside of the rack. All I need to do to get the antenna out is unscrew the cap by hand and pull it out. Since the conduit will match the rack I don't think anyone will even realize that it is a container for the antenna. So potential thieves won't even see it.
Here's a shot of the Austin Spectra mobile scanner antenna and the 102" CB antenna installed:
I have not made any progress on the rack wiring inside the van. I need to buy a bunch of stuff but I'm trying to save some cash to buy another car at the moment. I want another vehicle to drive so I can start ripping my van apart and get going on the lift. So it may be a while before I make any progress in that direction.
And here's where I wanted it to go. The location for the stock radio antenna:
The mount comes with a plastic insulating washer to keep the center stud from touching the chassis ground and shorting the connection. The sheet metal is pretty thin in the stock radio mount location so I decided I needed some hefty washers to help support the mount. I used SAE yellow zinc plated 1/2" washers:
I used a grommet with one end sliced off to take up the added thicknes and provide insulation of the center pin from the chassis:
Installed with some blue Loctite to keep it from rattling loose:
The radio antenna wire feeds down into the gutter below the hood cowl at the base of the windshield. From there it penetrates the firewall through a grommet and snakes back behind the AC. I wanted to route the CB antenna wire the same way. I tied a string to the original radio antenna wire and pulled out the cable. This left me with an original cable removed and a string coming through the firewall ready to feed my CB cable back through. Here you can see both the string and the 90* connector I put on the base of the antenna mount to simplify the attachment of the cable. It's way back in the gutter and it's really hard for a grown man to get an arm back in there so I tried my best to make it easy (view from inside the gutter):
Once the cable was fed back through the firewall I repaired a few cracks in the cowl, washed all the accumulated dirt out of the gutter and re-installed the cowl. For some reason the hole in the cowl doesn't align properly with the hole for the antenna. It must have been like that with the stock antenna too, but I didn't notice it before. Anyway, I cut out the lip inside that cylindrical tube in the cowl and added a short extension to bring up the mount a bit. Hopefully I can still tune my antenna properly with that little extension added (extension not shown in these pix):
Antenna installed:
It won't be connected to anything for quite some time. Not until after the overhead console is done.
I also cut a length of PVC conduit for my 102" CB antenna:
I cut the pipe to just the right length to allow the very tip of the antenna to protrude just enough from the end so I could easily pull it out:
I have an extended cap that threads onto the end of the pipe with an o-ring to keep the pipe waterproof:
The antenna can make a lot of noise rattling against the walls of the pipe so I added these rubber plugs:
I made them double cone shaped so that the would easily slide in and out of the pipe but the center would be somewhat snug against the inner wall. This keeps the antenna concentric and suspended in the pipe and eliminates any rattling:
The entire pipe will be painted flat black and bolted to the underside of the rack. All I need to do to get the antenna out is unscrew the cap by hand and pull it out. Since the conduit will match the rack I don't think anyone will even realize that it is a container for the antenna. So potential thieves won't even see it.
Here's a shot of the Austin Spectra mobile scanner antenna and the 102" CB antenna installed:
I have not made any progress on the rack wiring inside the van. I need to buy a bunch of stuff but I'm trying to save some cash to buy another car at the moment. I want another vehicle to drive so I can start ripping my van apart and get going on the lift. So it may be a while before I make any progress in that direction.
1997 SAFARI 2WD CARGO
"I do not think there is any thrill that can go through the human heart like that felt by the inventor as he sees some creation of the brain unfolding to success... Such emotions make a man forget food, sleep, friends, love, everything." Nikola Tesla
"I do not think there is any thrill that can go through the human heart like that felt by the inventor as he sees some creation of the brain unfolding to success... Such emotions make a man forget food, sleep, friends, love, everything." Nikola Tesla
-
6spd_monte
- I sleep in my van
- Posts: 431
- Joined: Fri Jun 08, 2007 11:50 pm
- Location: Orange County, CA
Re: Homebrew Con-Ferr Style Porthole Roof Rack Build
If I haven't mentioned it before I'll say it now (or again if I have before), this is an awesome project! The rack you built looks great, and very functional as well. The amount of wiring you've done is amazing and your attention to detail is top notch. Good Job! 
-James
1987 LT
249,000 miles
1987 LT
249,000 miles
-
 MountainManJoe
- I have my van tatooed on my cheeks
- Posts: 3117
- Joined: Fri Aug 08, 2008 12:55 pm
- Location: The Pacific North Wet
- Has thanked: 47 times
- Been thanked: 25 times
Re: Homebrew Con-Ferr Style Porthole Roof Rack Build
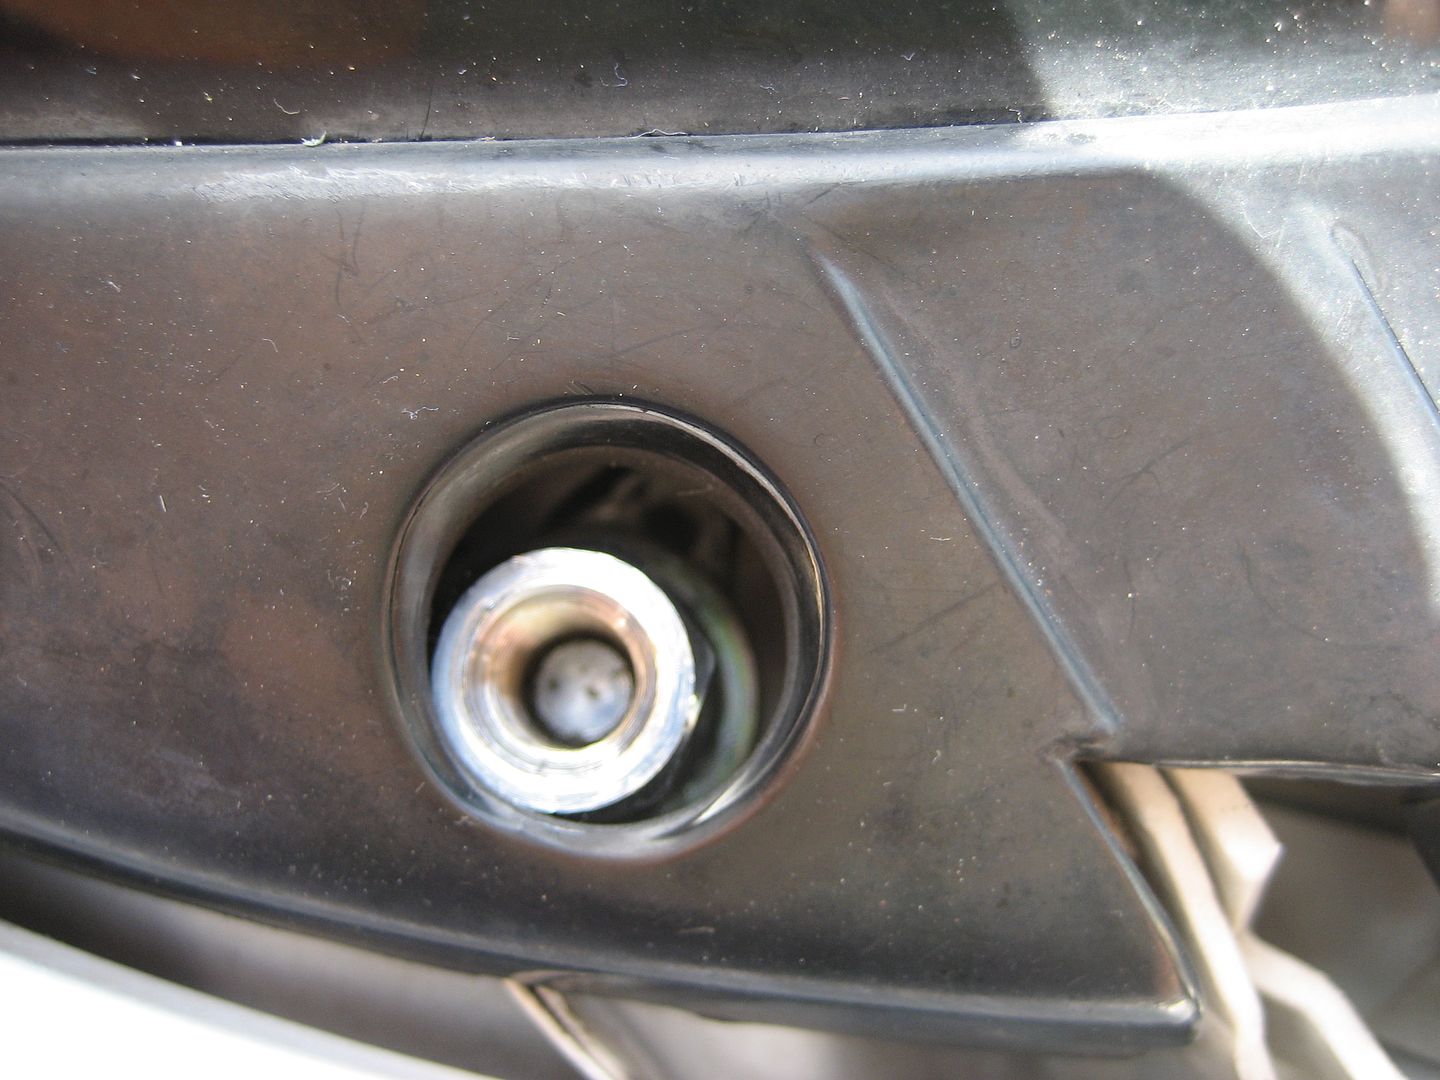
Maybe I missed something, but did you use anything to prevent water ingress under the bolt heads?
-
97CargoCrawler
Topic author - I sleep in my van
- Posts: 754
- Joined: Thu Jan 24, 2008 11:50 pm
- Location: Near Los Angeles, CA
- Contact:
Re: Homebrew Con-Ferr Style Porthole Roof Rack Build
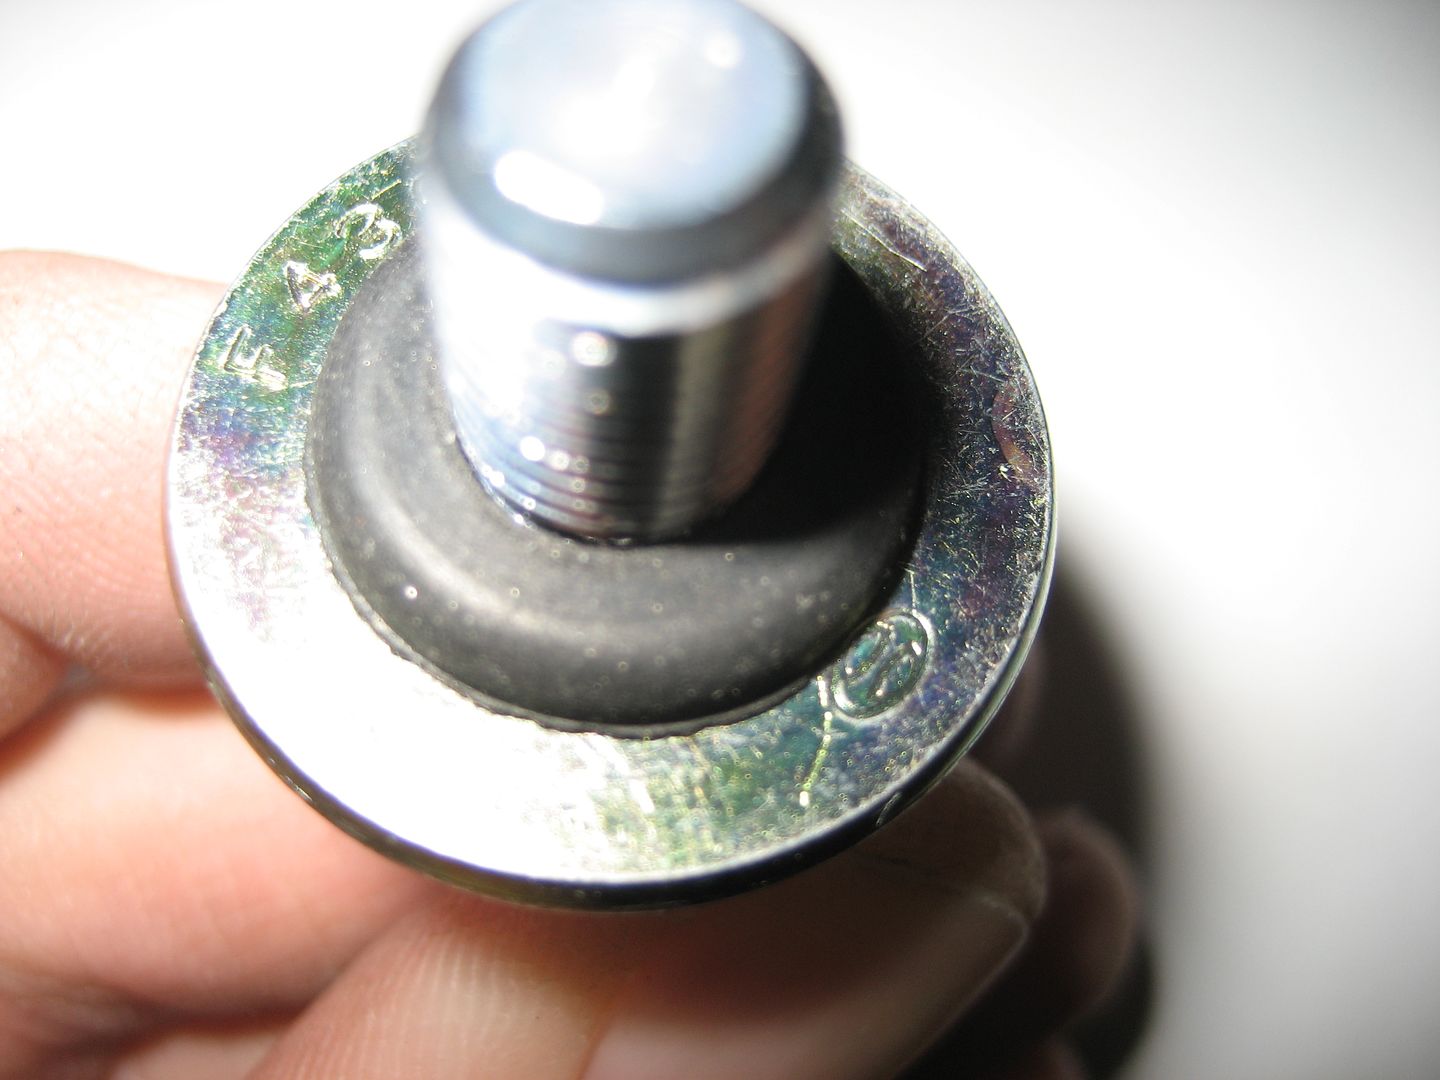
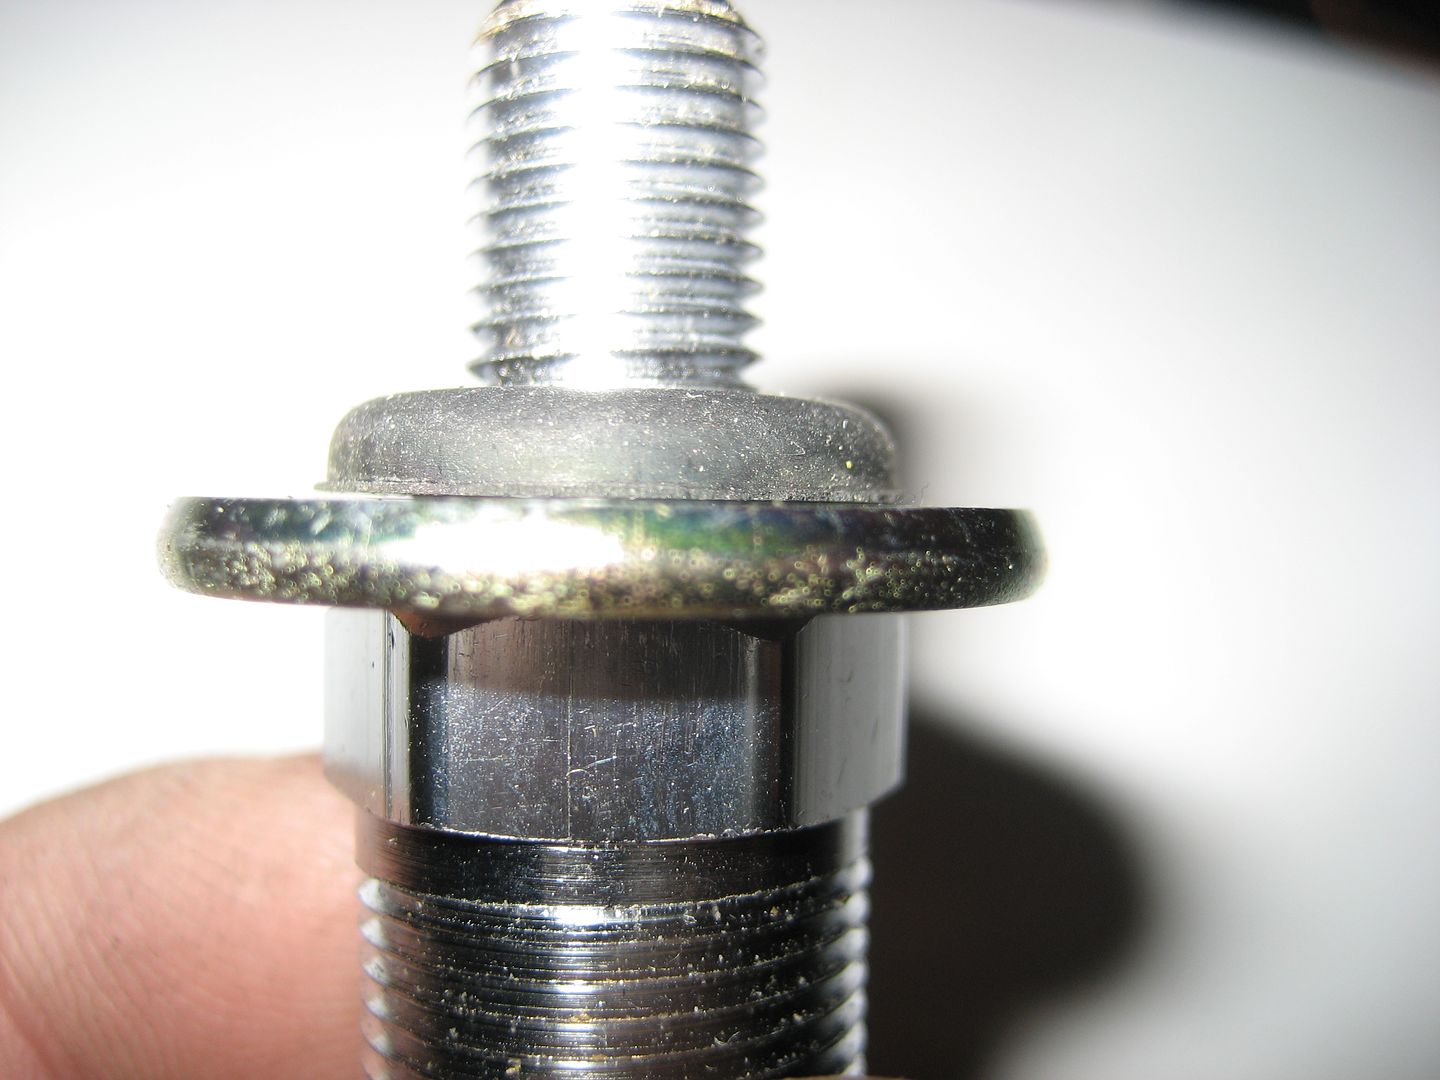
I used some very expensive steel washers that had rubber seals molded into them. They were like $1.48 each. Kinda expensive when you need like 60 of them (rack mounts and wire feed thru plates).timelessbeing wrote:Maybe I missed something, but did you use anything to prevent water ingress under the bolt heads?
http://www.mcmaster.com/#standard-seali ... rs/=inmmt6
So far they work great.


Re: Homebrew Con-Ferr Style Porthole Roof Rack Build
Brilliant work. Makes me feel much better about my van OCD and grand schemes. I'm interested in seeing what you do with the overhead console. Any progress with that?

-
 WoodButcher
- ASV Supporter

- Posts: 418
- Joined: Wed Apr 06, 2011 7:01 pm
- Location: Woodbury, CT.
- Has thanked: 1 time
- Been thanked: 18 times
Re: Homebrew Con-Ferr Style Porthole Roof Rack Build
97CargoCrawler wrote:I used some very expensive steel washers that had rubber seals molded into them. They were like $1.48 each. Kinda expensive when you need like 60 of them (rack mounts and wire feed thru plates).timelessbeing wrote:Maybe I missed something, but did you use anything to prevent water ingress under the bolt heads?
http://www.mcmaster.com/#standard-seali ... rs/=inmmt6
So far they work great.
raSafari wrote:Brilliant work. Makes me feel much better about my van OCD and grand schemes. I'm interested in seeing what you do with the overhead console. Any progress with that?
OCD???
not so much,
Had I used a washer like CC did I may not have had to lift my rack after 10 yrs to find a leak I blamed on the windsheild guy...
My van had roof mounts for an aftermarket rack when I bought it but the PO took the racks. I took them off for paint and re-used them when I built my rack. It had a moulded rubber seat that dried and cracked over the years causing my leak. The rubber in those washers being encased in steel will take much longer to dry and leak.
'93 Safari shorty, 350 swap
'05 Astro AWD, lifted, 6 liter, cammed, ported and programmed for fast.
'93 cargo, work in progress
'05 Astro AWD, lifted, 6 liter, cammed, ported and programmed for fast.
'93 cargo, work in progress
-
97CargoCrawler
Topic author - I sleep in my van
- Posts: 754
- Joined: Thu Jan 24, 2008 11:50 pm
- Location: Near Los Angeles, CA
- Contact:
Re: Homebrew Con-Ferr Style Porthole Roof Rack Build
Work on the overhead console should begin in the next few weeks. I have not even sketched up a design yet. All I know for sure is that it will have a lot of switches, hold a CB and a scanner as well as a double DIN stereo. Yes, remove the headliner and there's plenty of depth for a double DIN. Until then...
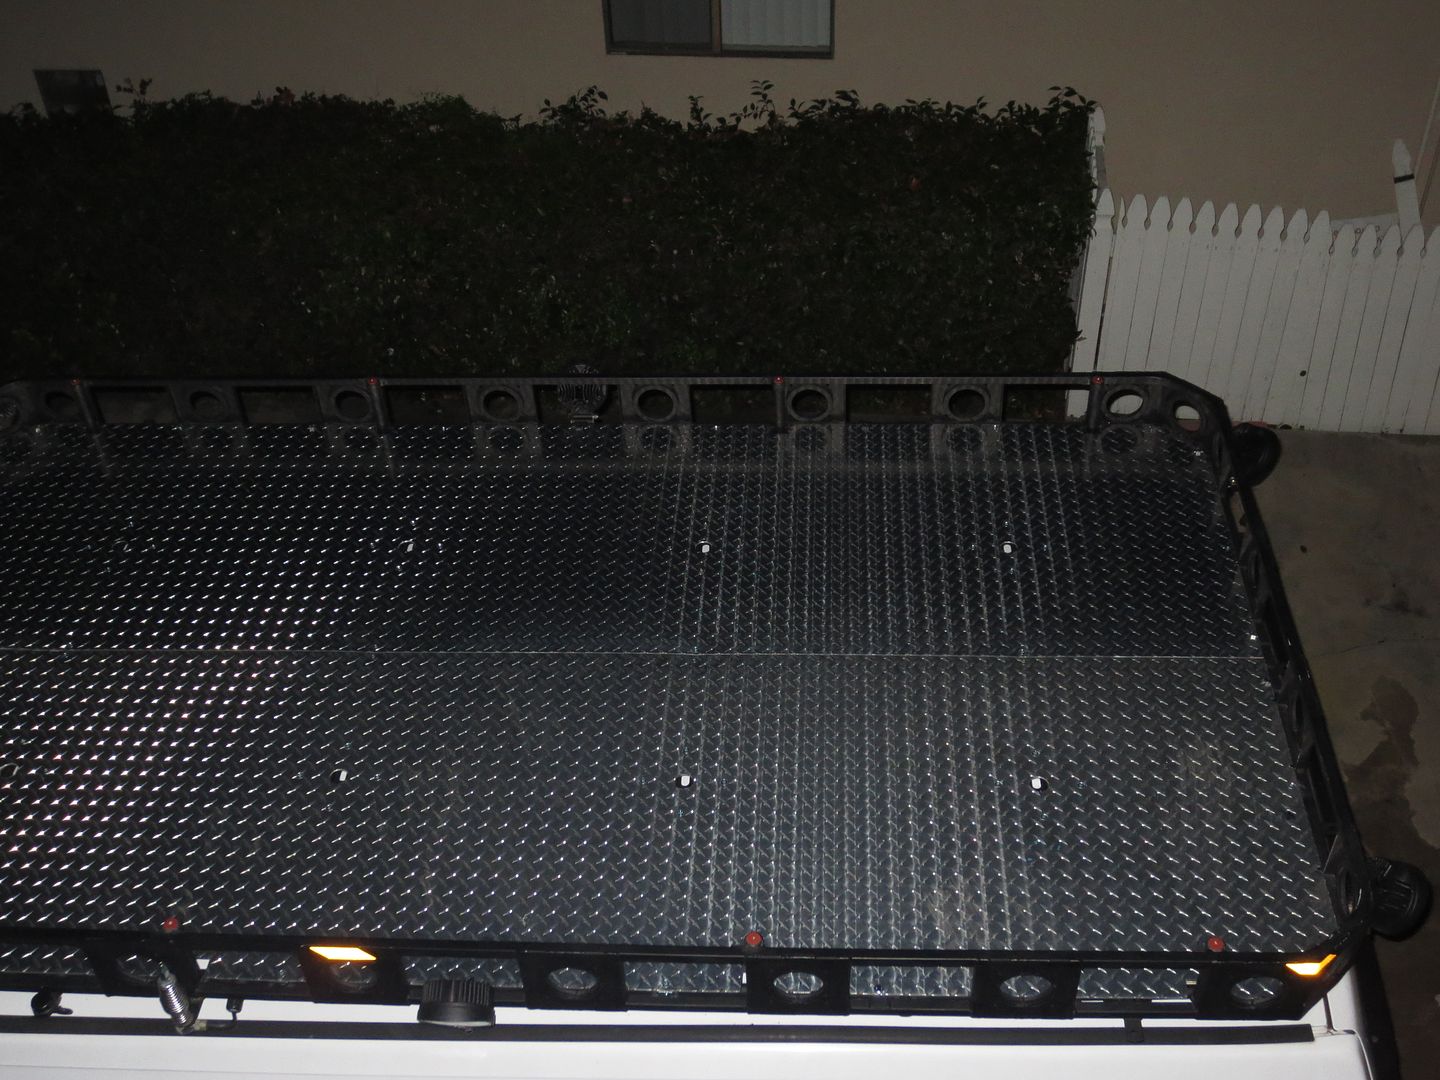
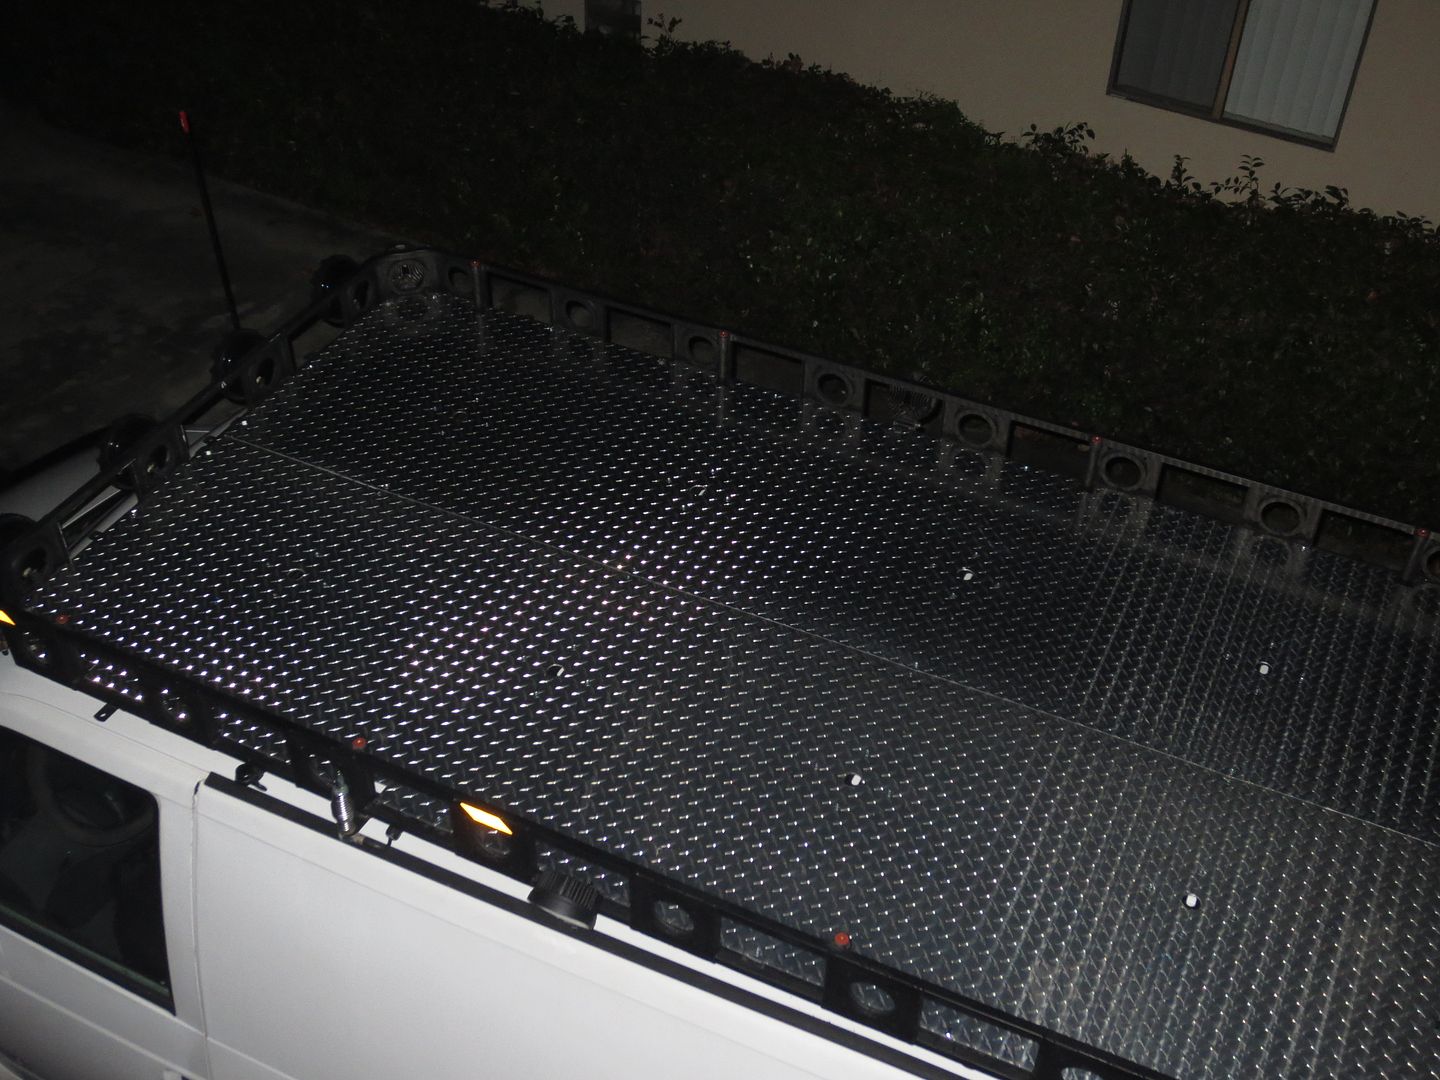
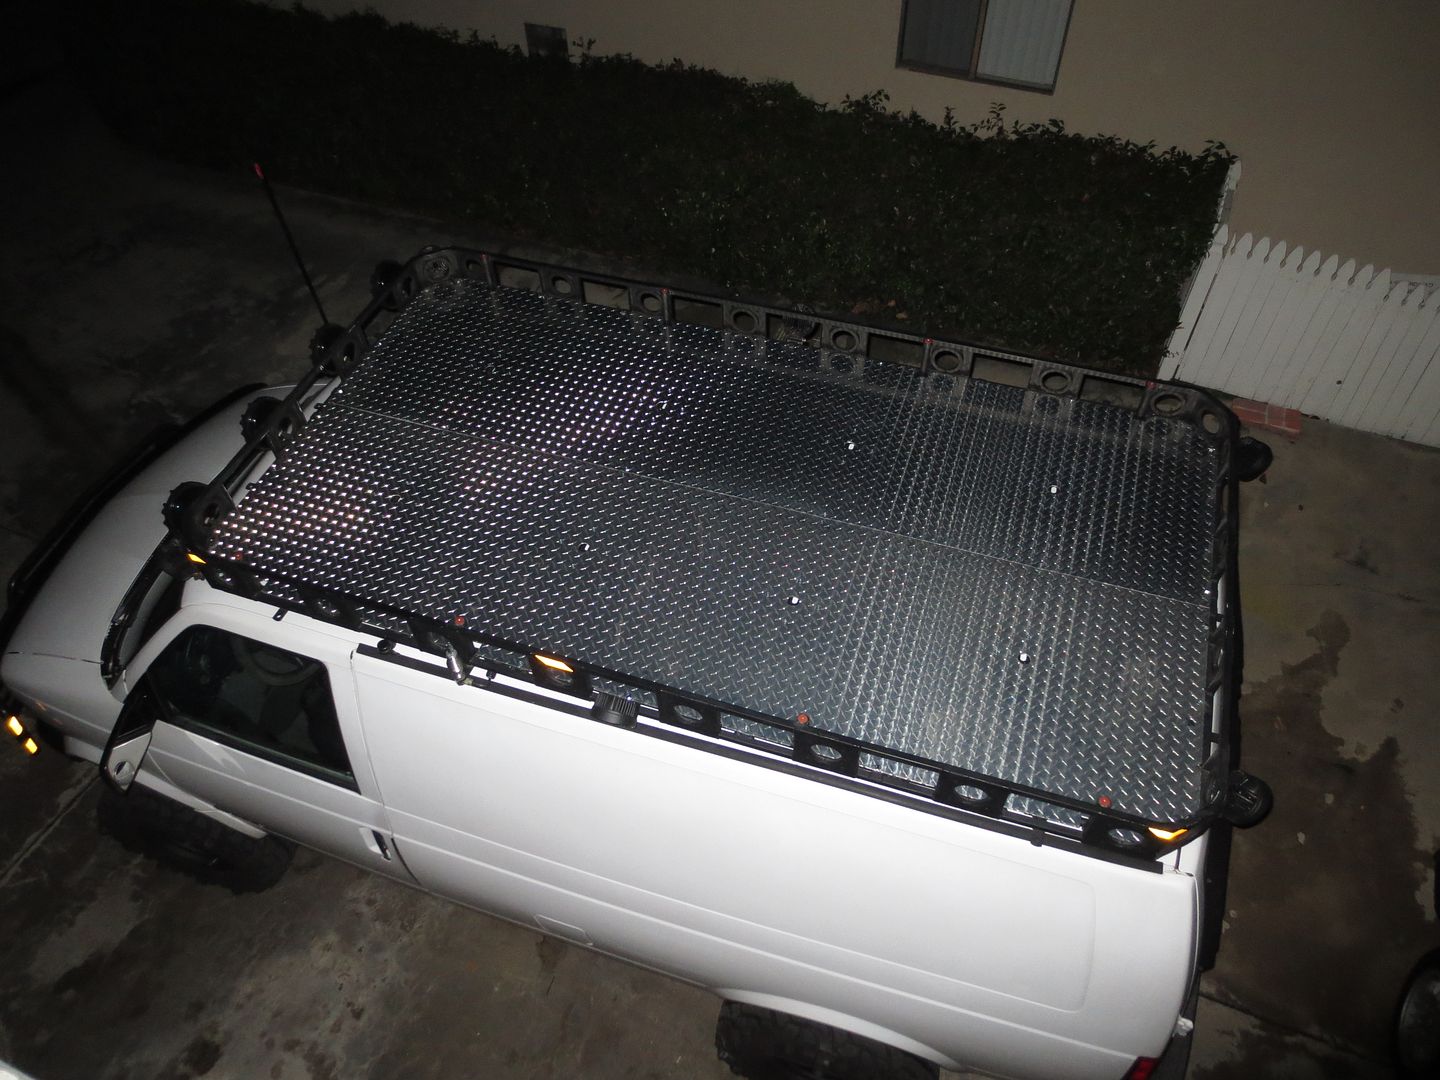
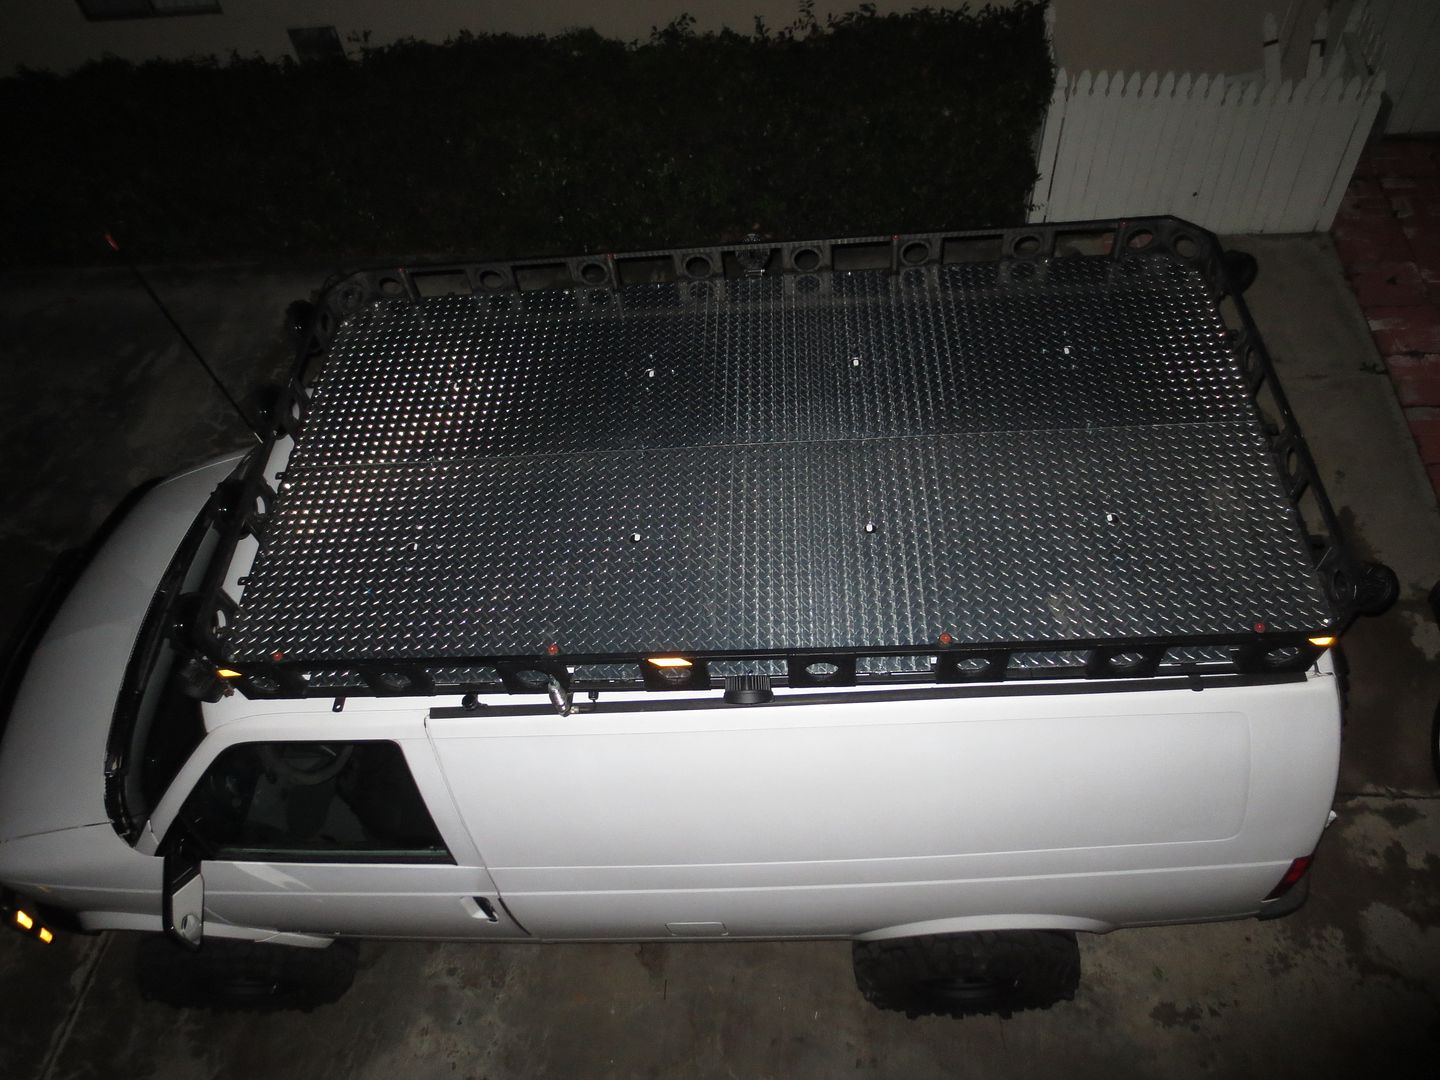
Today I was finally ready to install the floor in the rack. I have just spent the past three months shoring up my suspension to withstand the additional weight of the floor.....and so I could also slap on my 33" tires.
It was a cold but pretty day to work on the van:
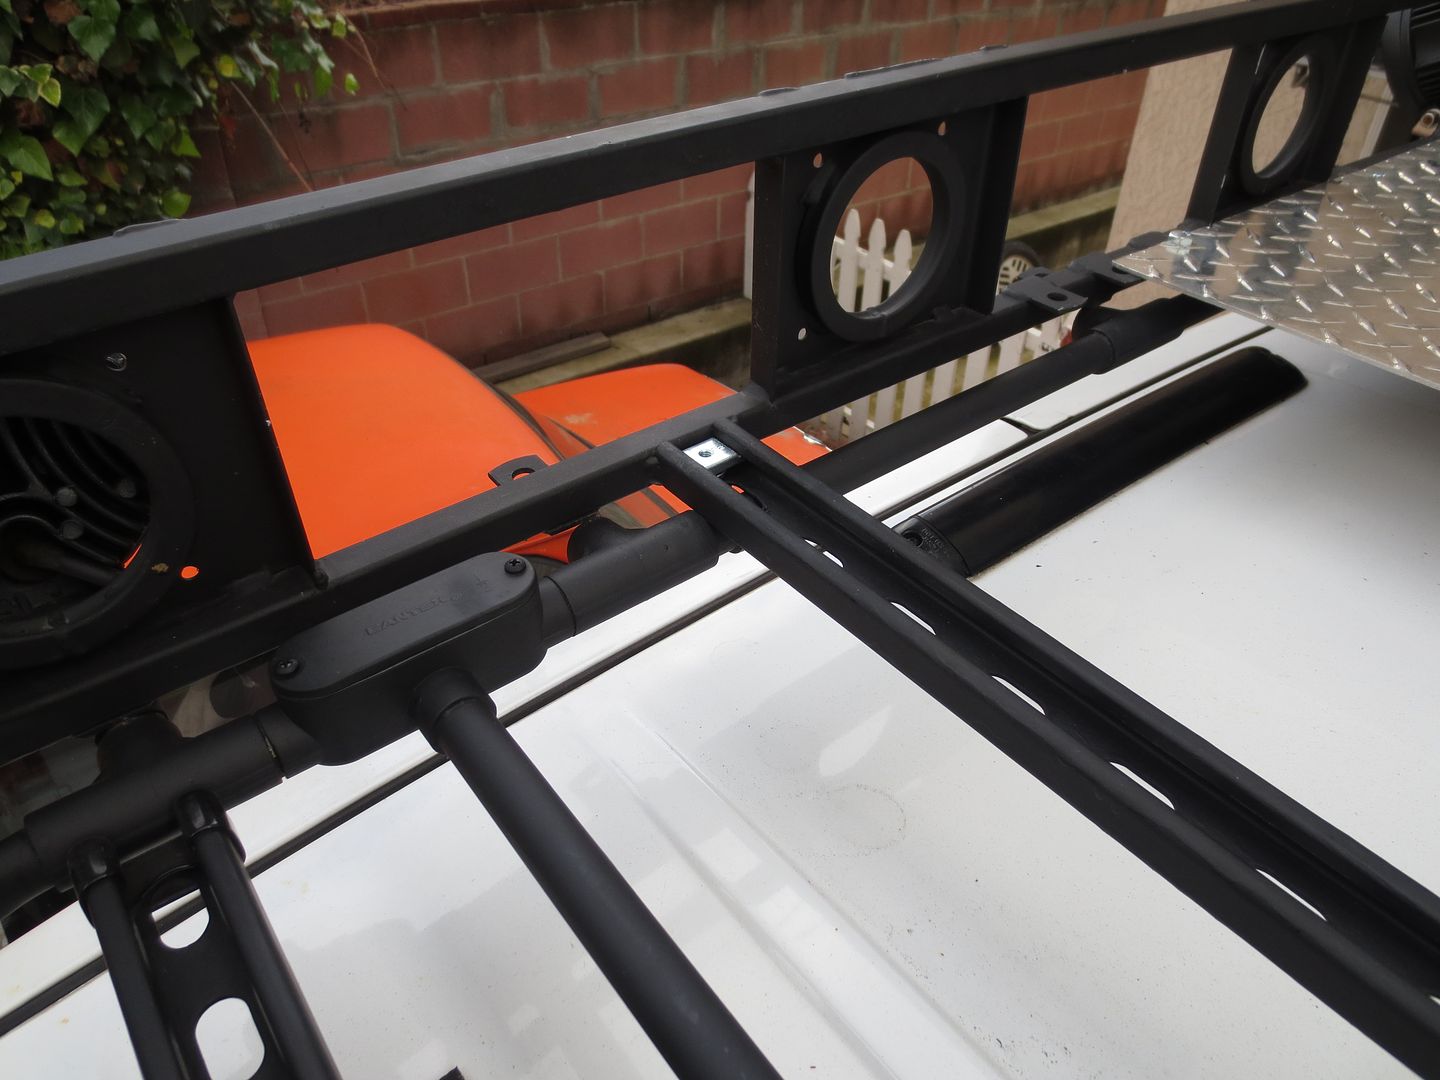
These floor plates have been taking up space in my shop for over a year! The floor is 1/8" thick aluminum tread plate. Each side weighs about 45 pounds. All of the holes for the fasteners were drilled months ago before I installed the rack. The outer perimeter is bolted down with 3/8" bolts. The fasteners in the center of the floor are countersunk 1/4" phillips head screws that thread into strut nuts placed inside the electrical strut channel cross braces. Pix of all that can be found earlier in this thread.
I braved the cold atop my ladder and got to work despite frozen hands:
Here you can see the strut nuts:


I scuffed up the paint on the rack pretty good sliding these plates around, but you can see that my flat black rattle can paint job has held up quite well over the past several months since the rack has been exposed.
3/8" bolts through the floor and tabs welded to the outer perimeter:
There are also 1/4" countersunk screws along the perimeter wherever there is a strut crossing:
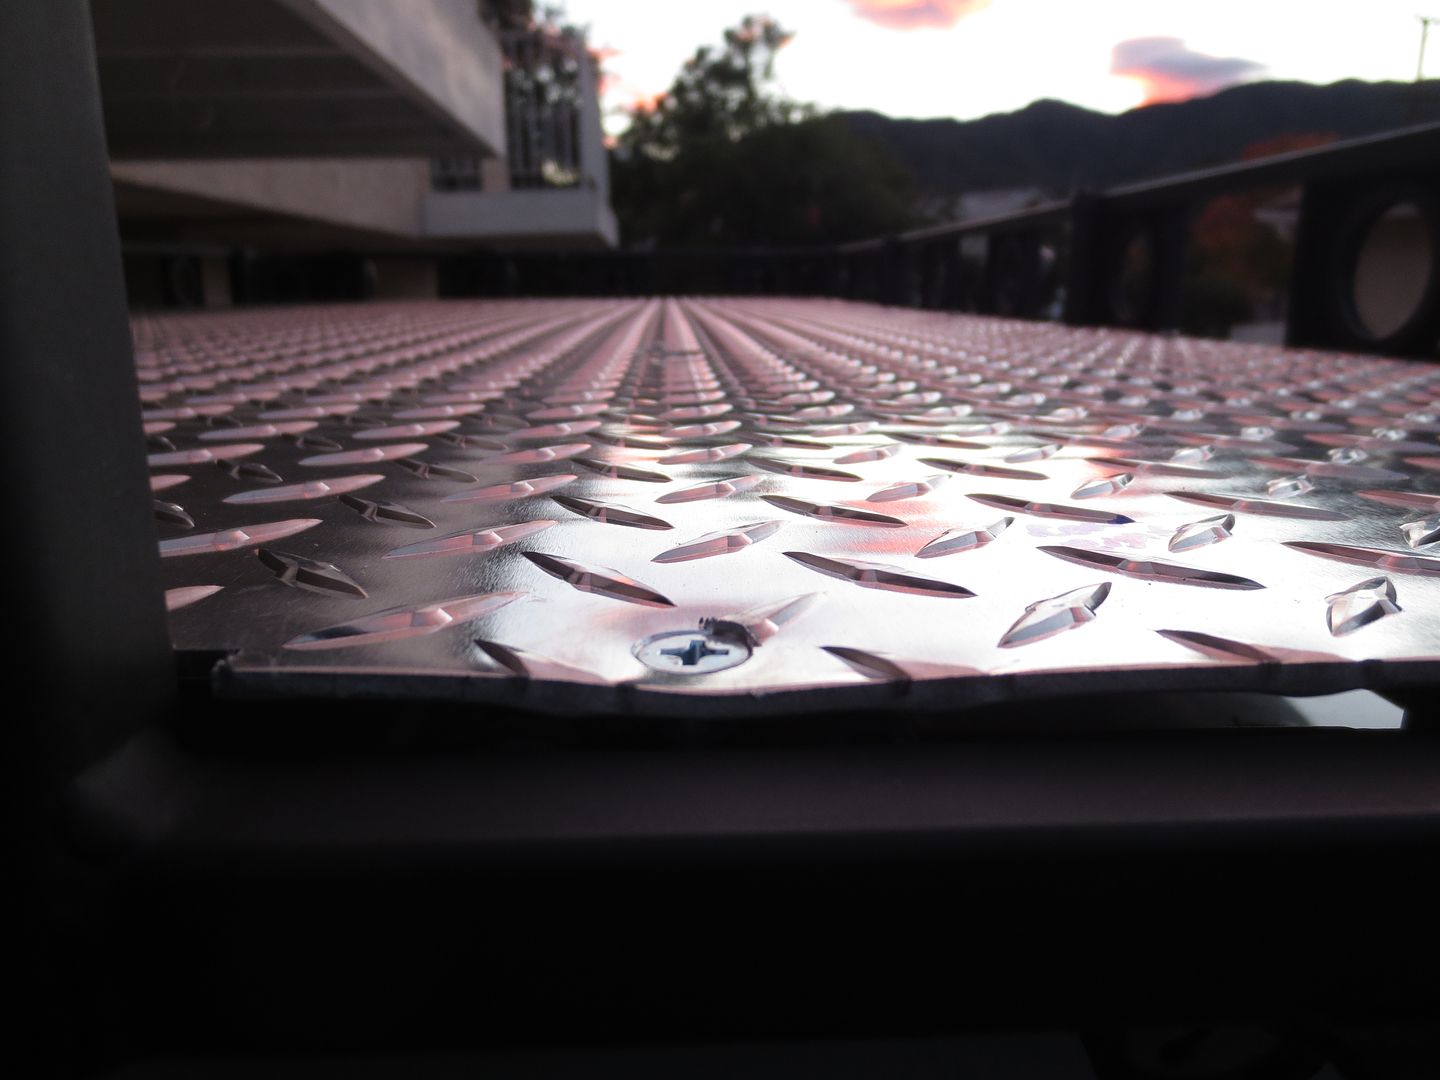
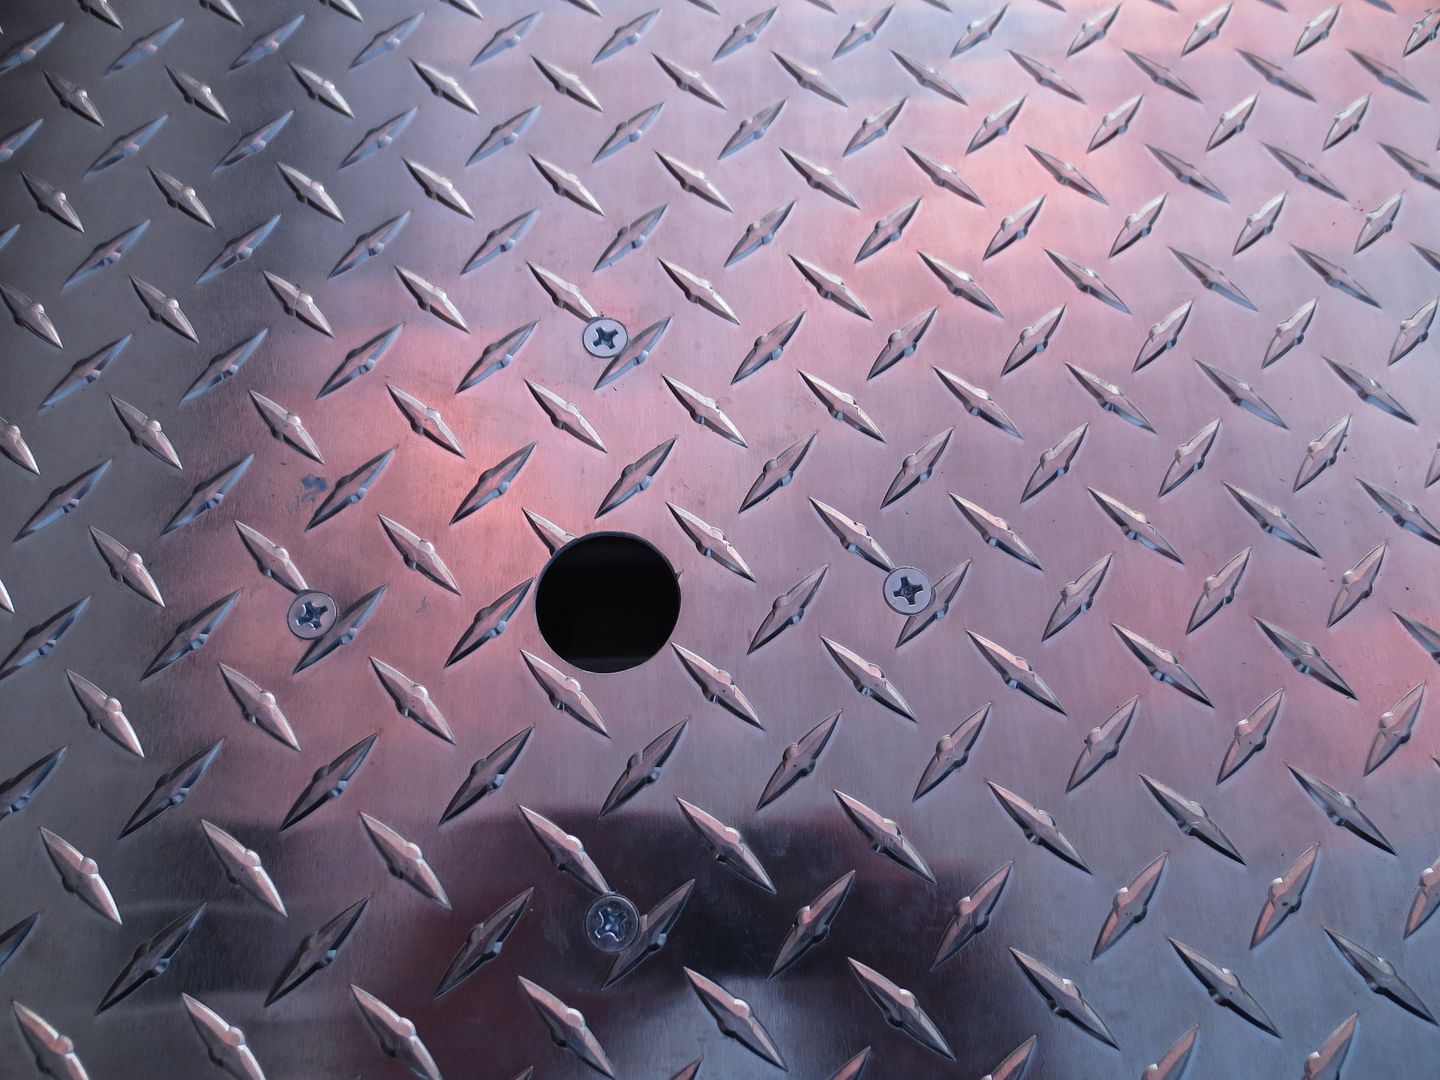
There are 8 holes across the floor that serve as anchor points. Several types of strut nuts can be inserted into those holes to provide a threaded anchor point for securing loads, ordinance, etc. They also serve as drainage holes.
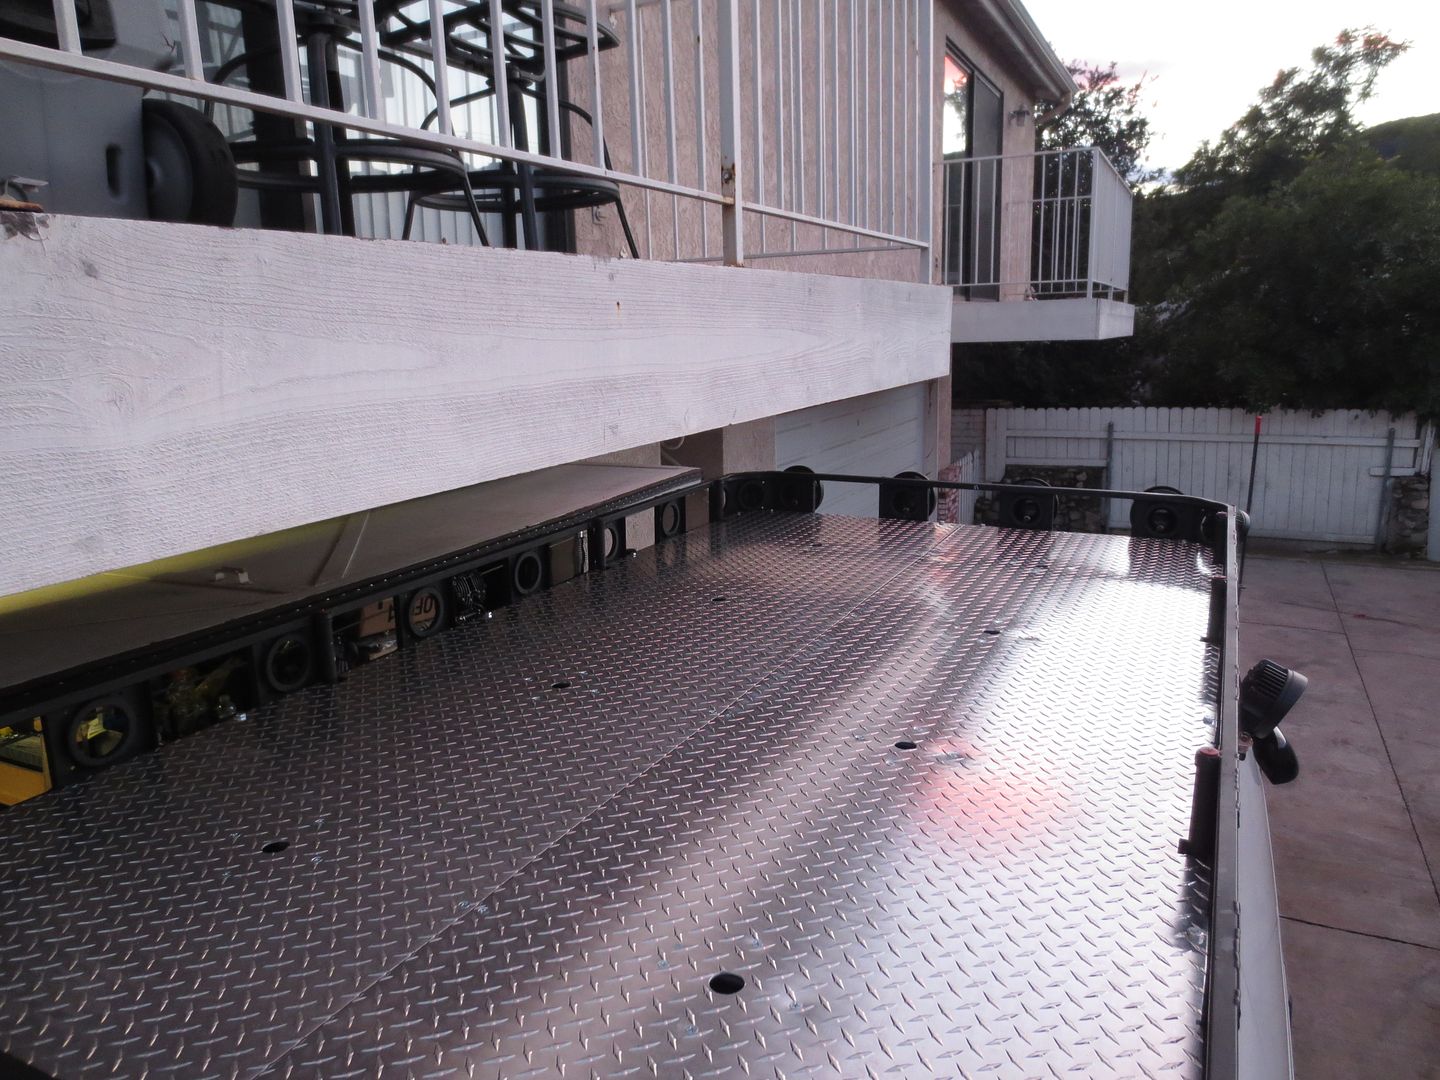
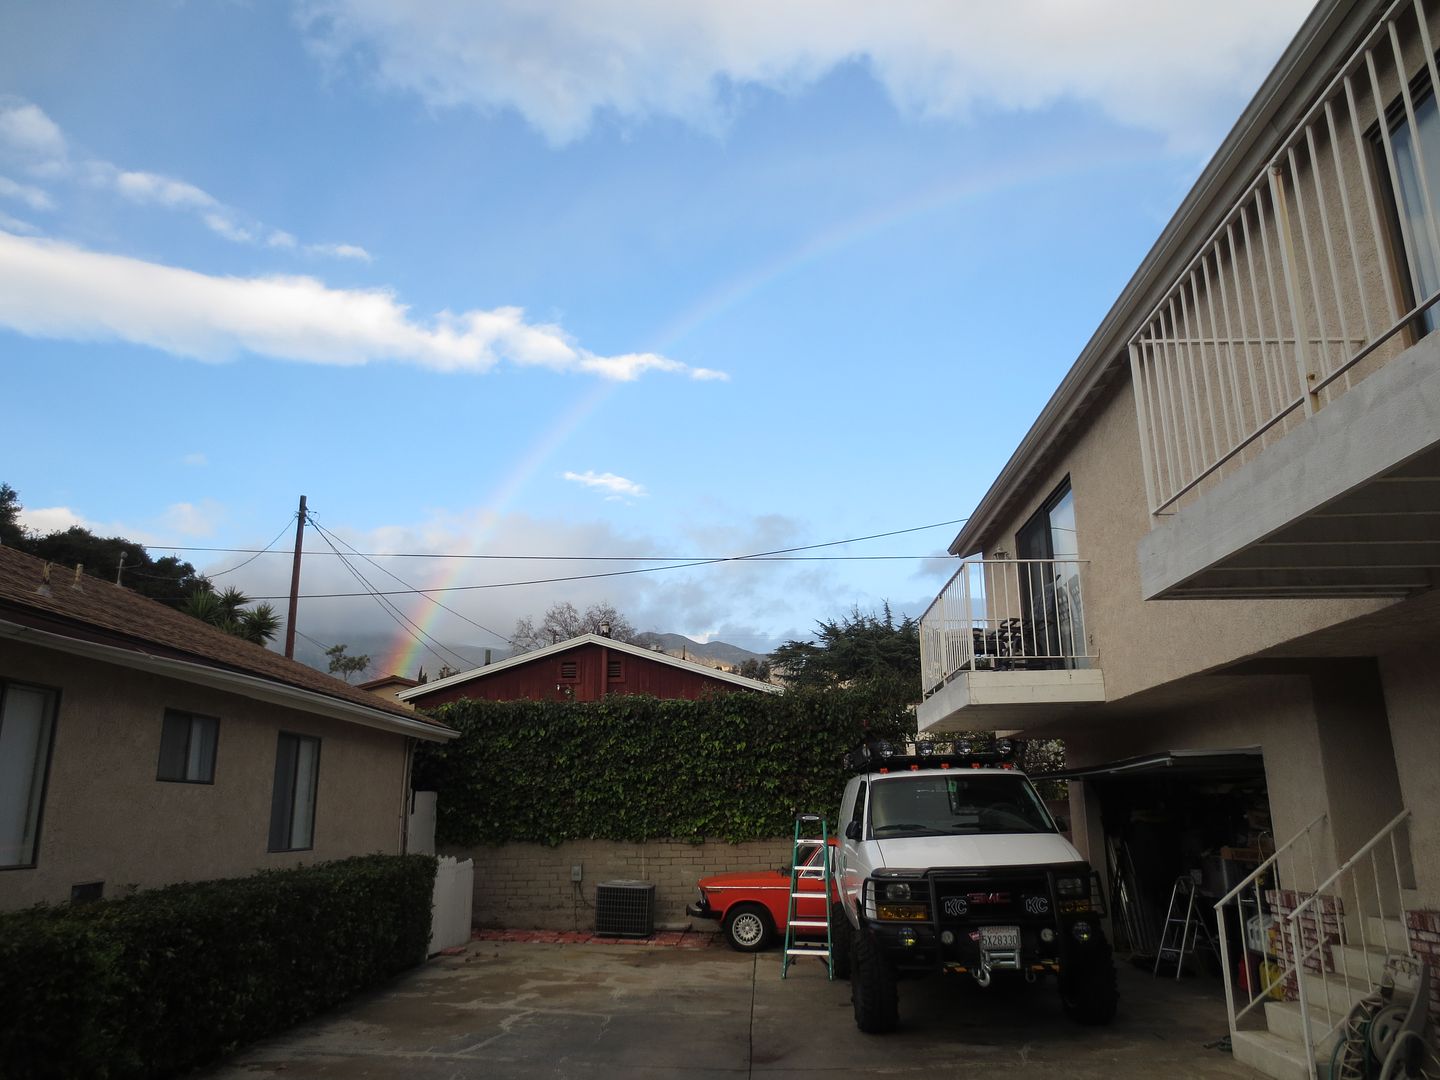
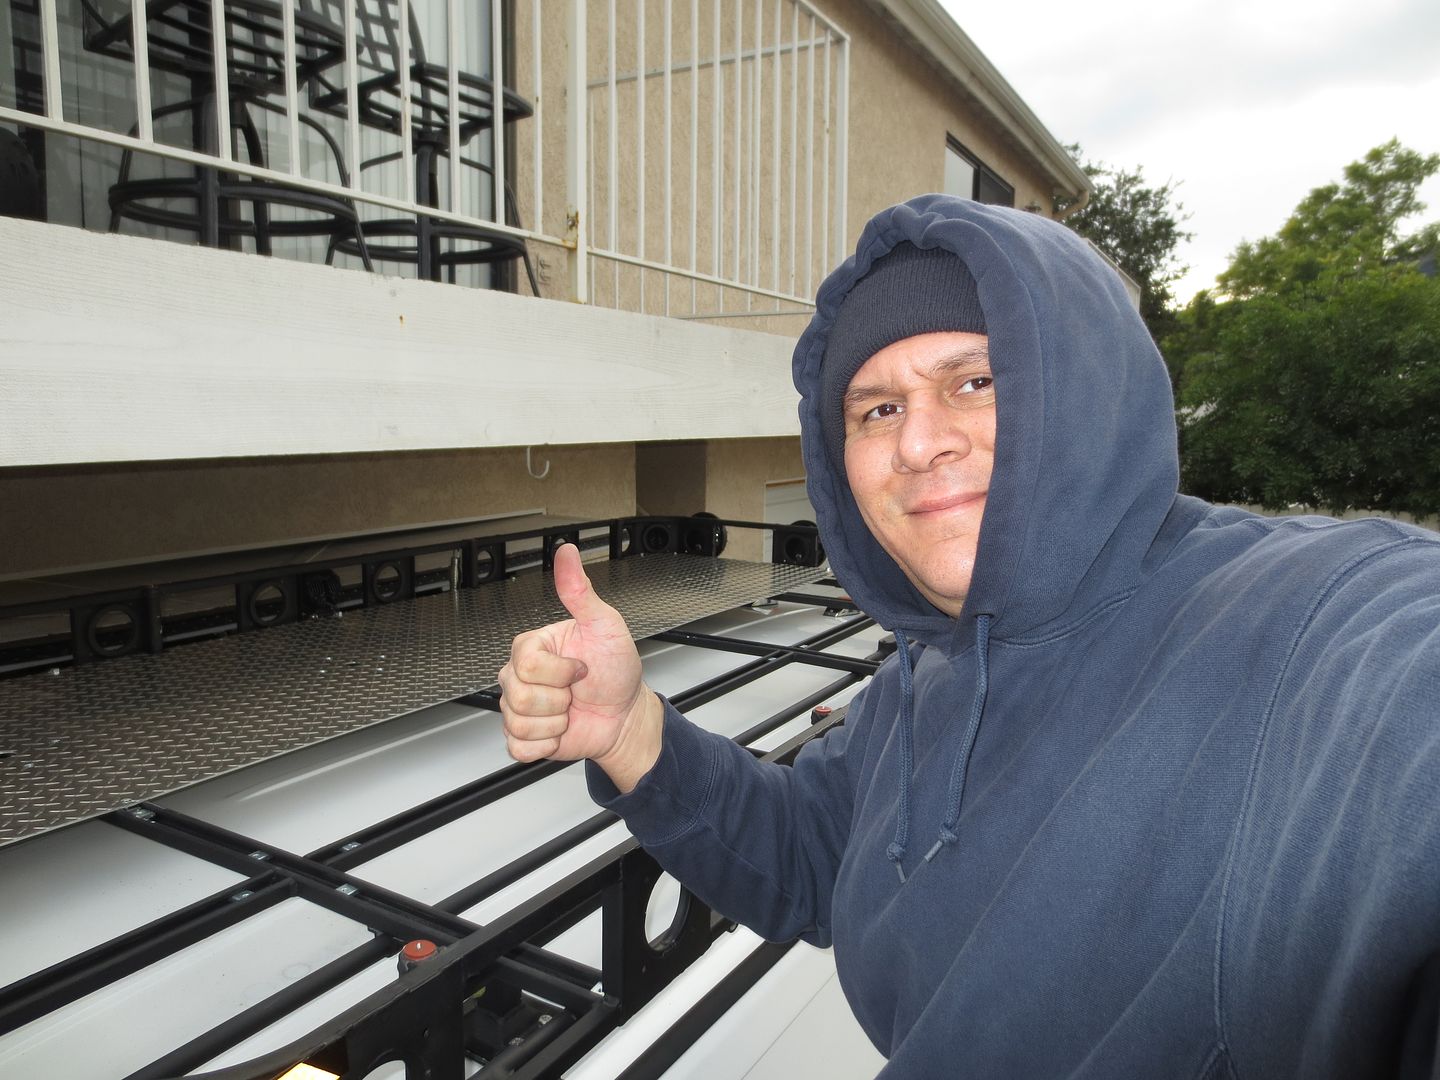
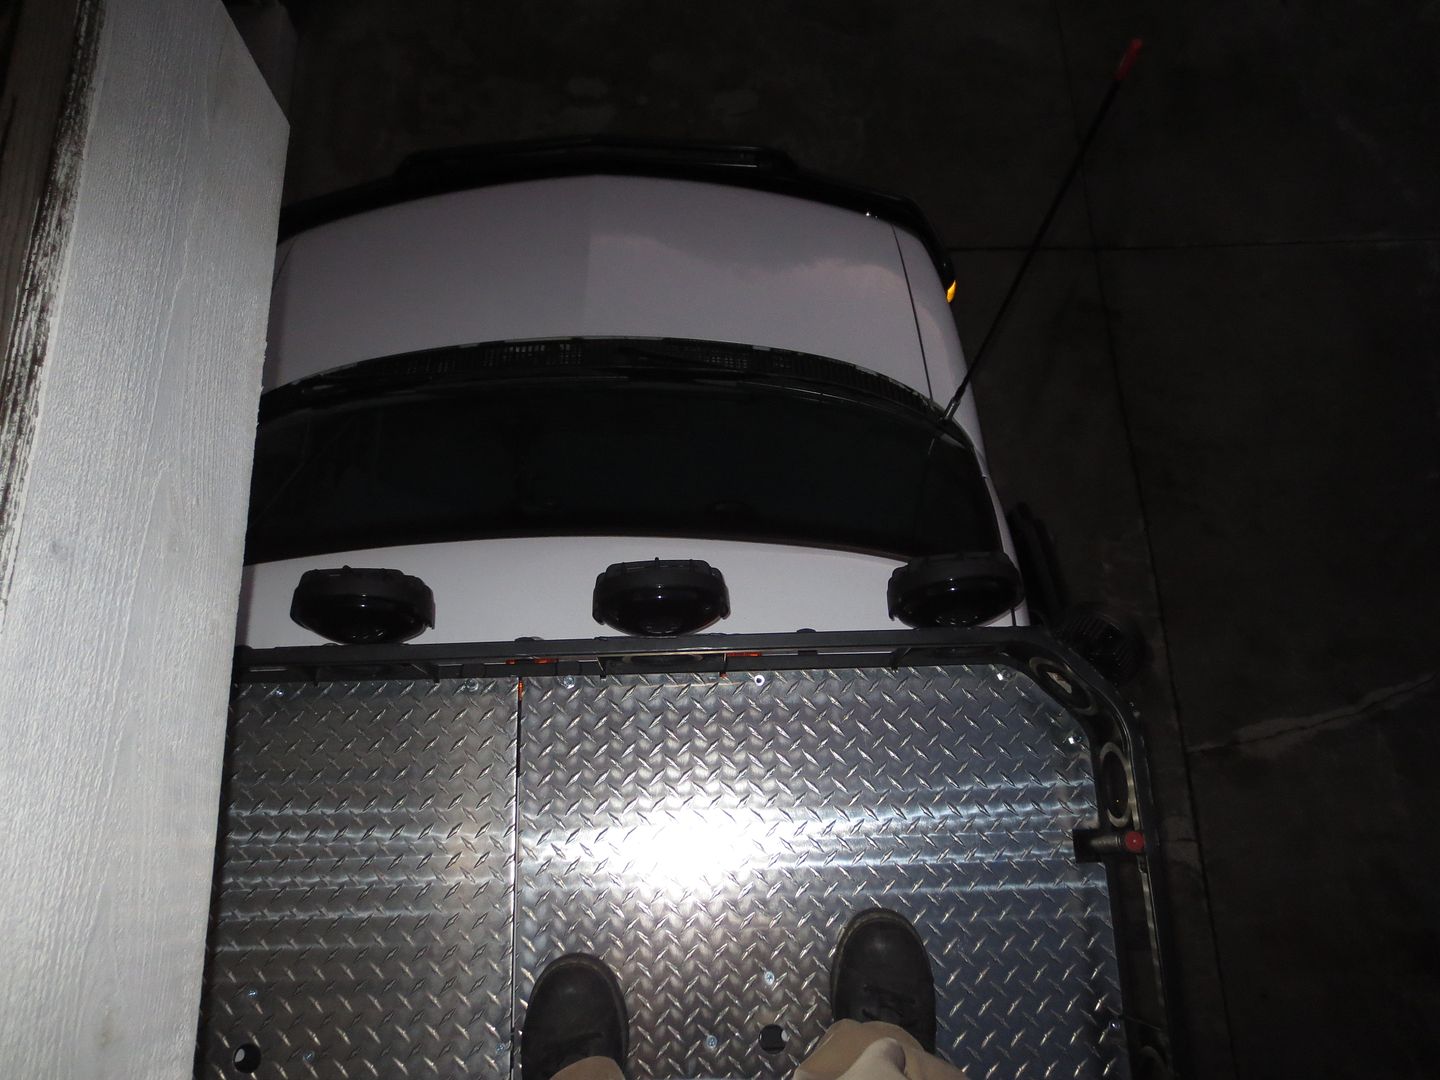
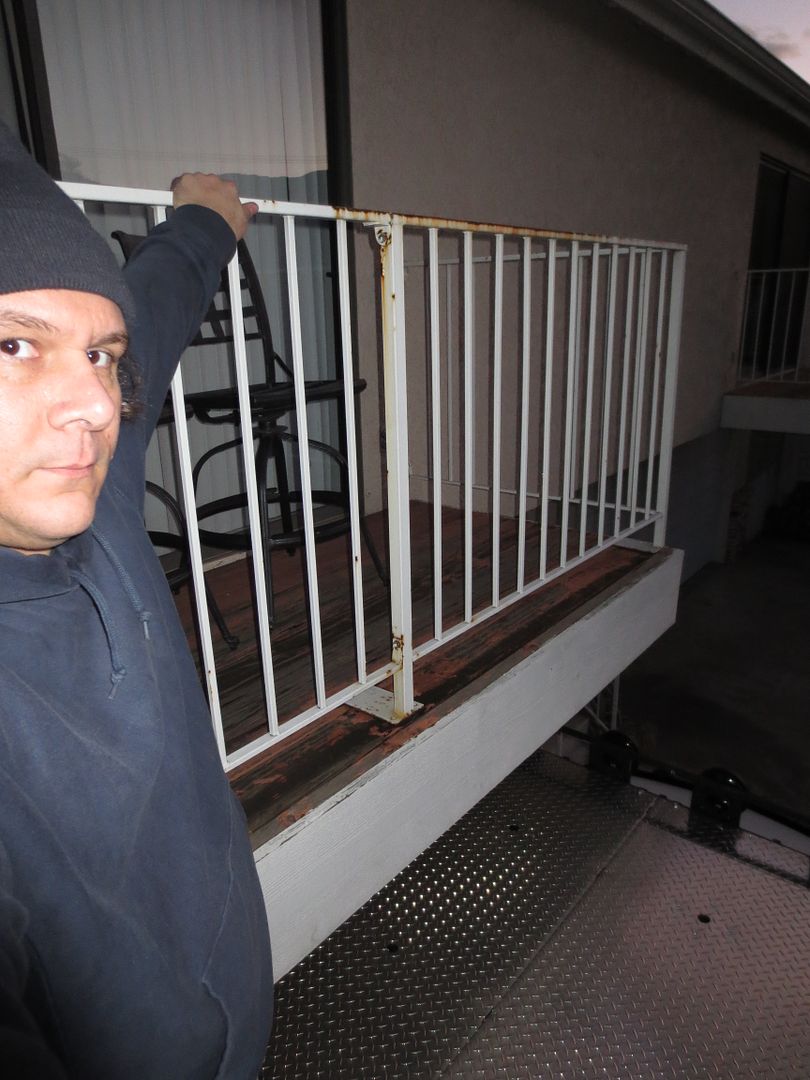
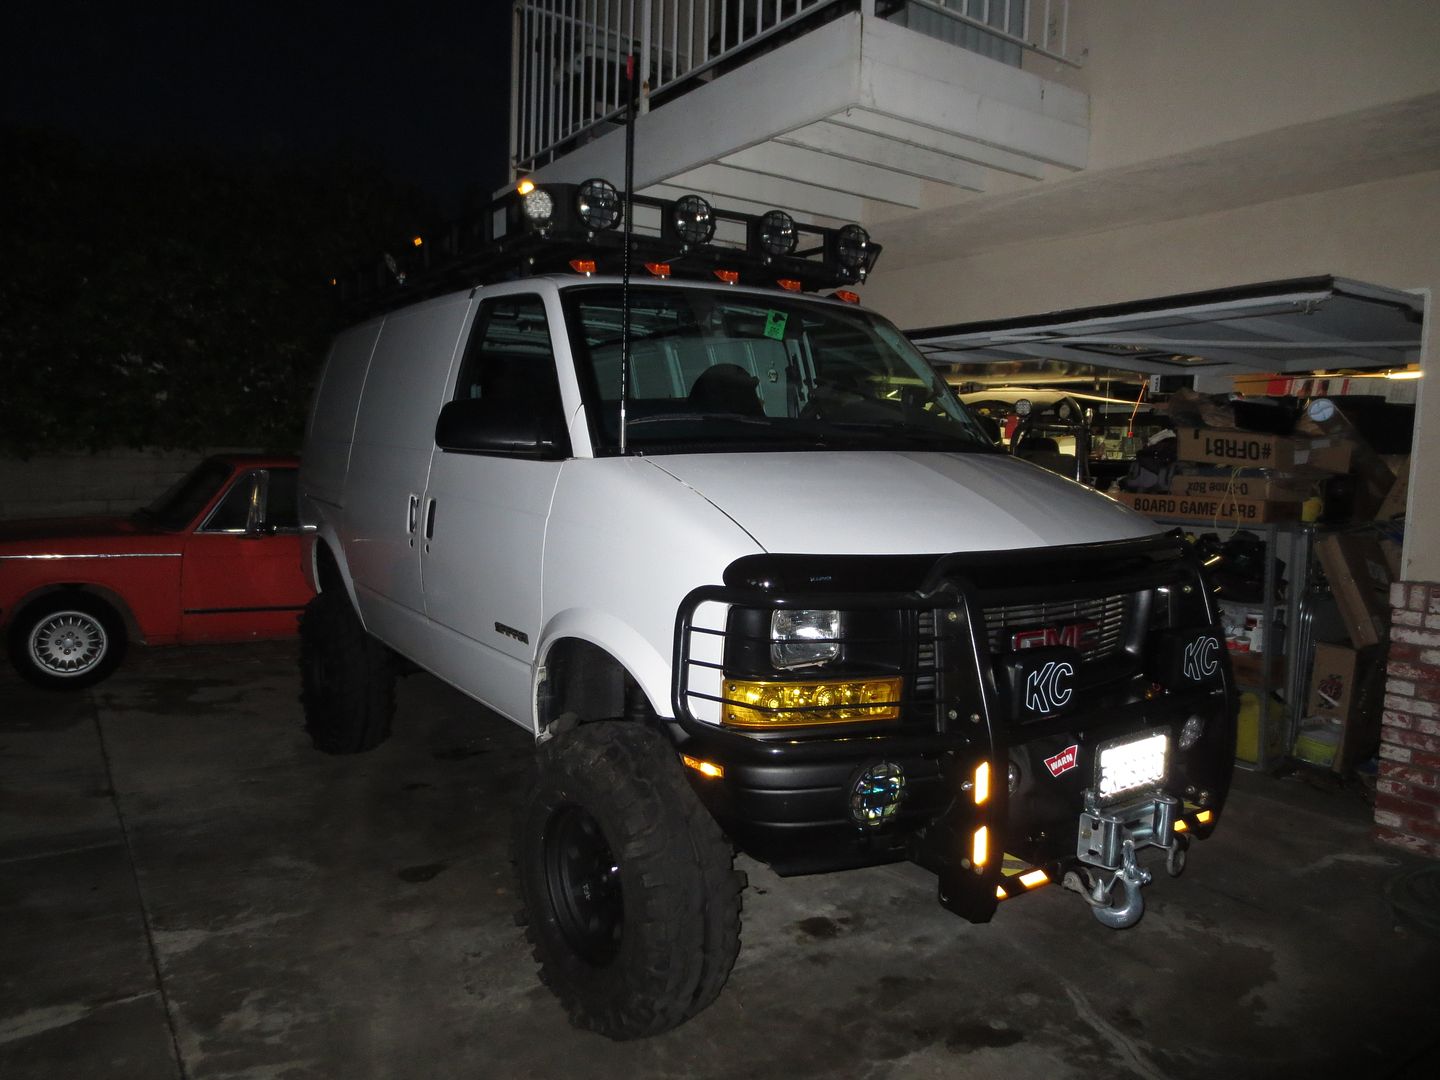
As you can see my van is VERY tall. There's only about 10" of space between the top of the rack and the bottom of my balcony.
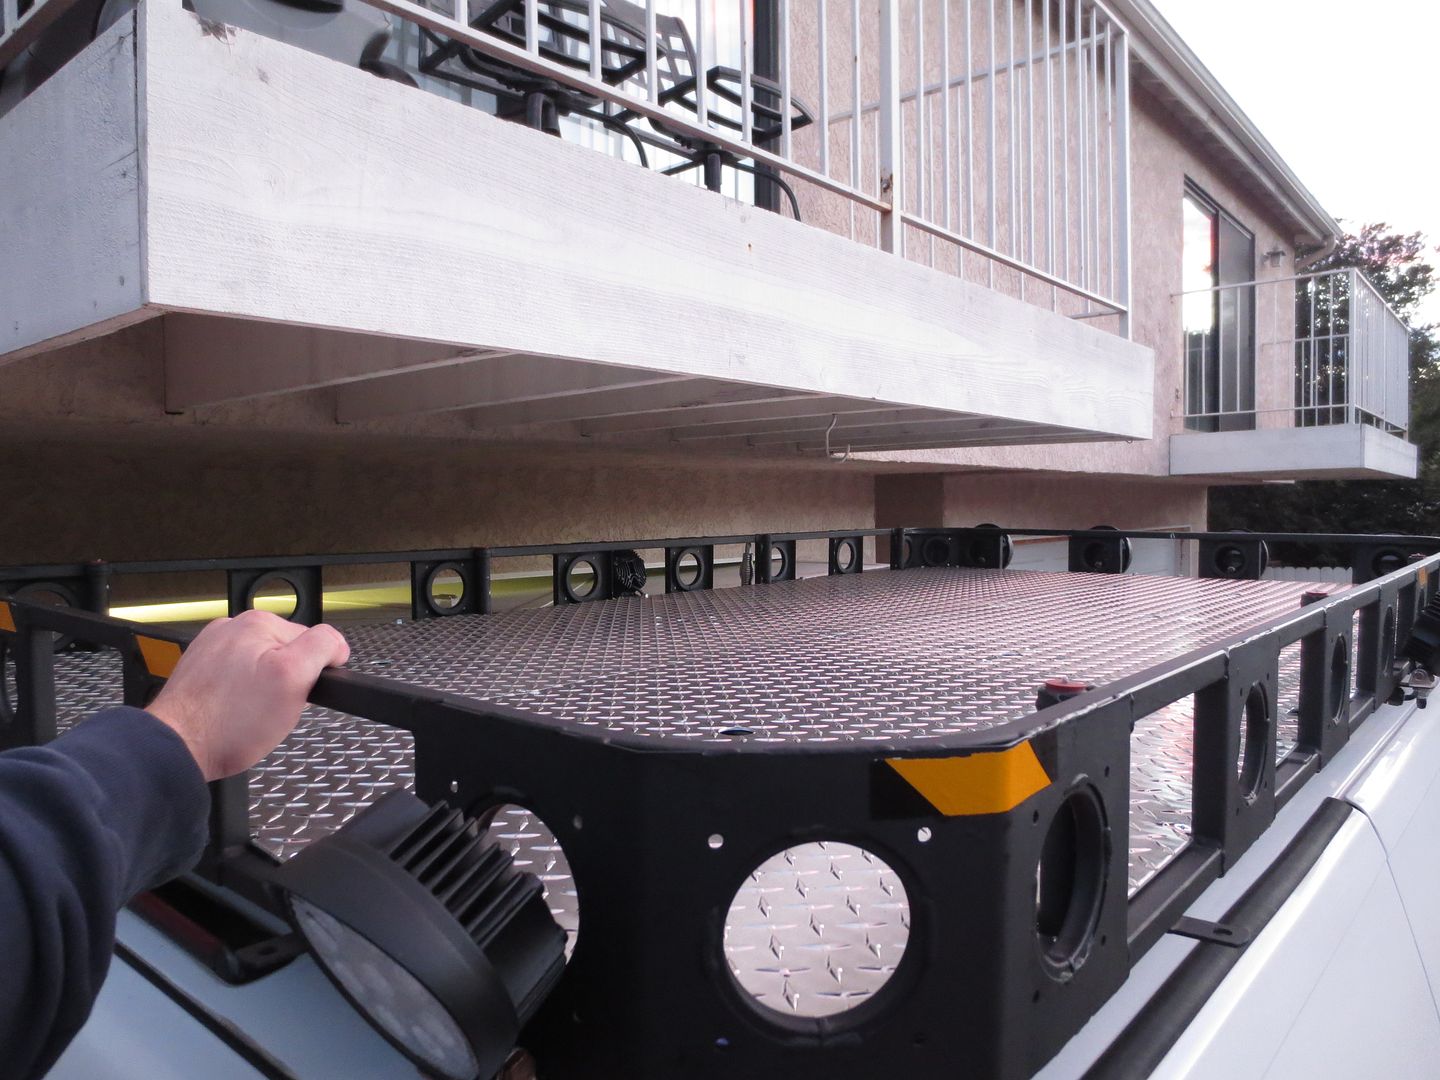
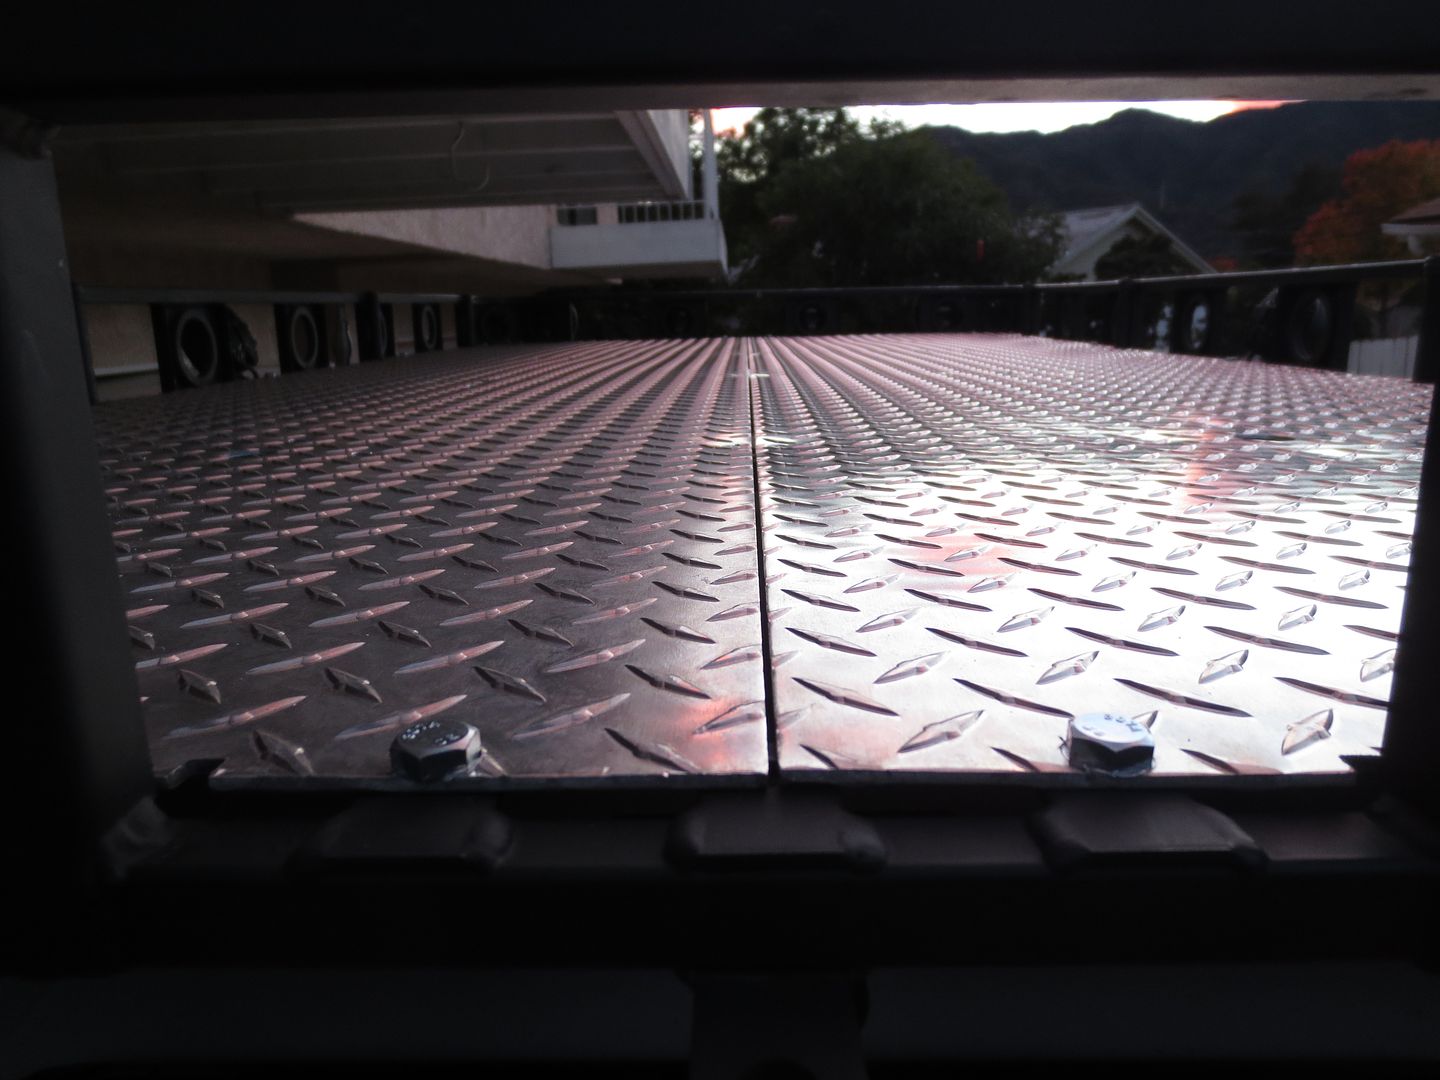
I don't have the ladder on the door finalized yet but I managed to get up top. The floor is slightly flexible between the struts, but not as much as you would expect for a 220lb guy standing on 1/8" thick aluminum. The abundance and placemment of the fasteners keep the aluminum held taught so deflection is minimized.

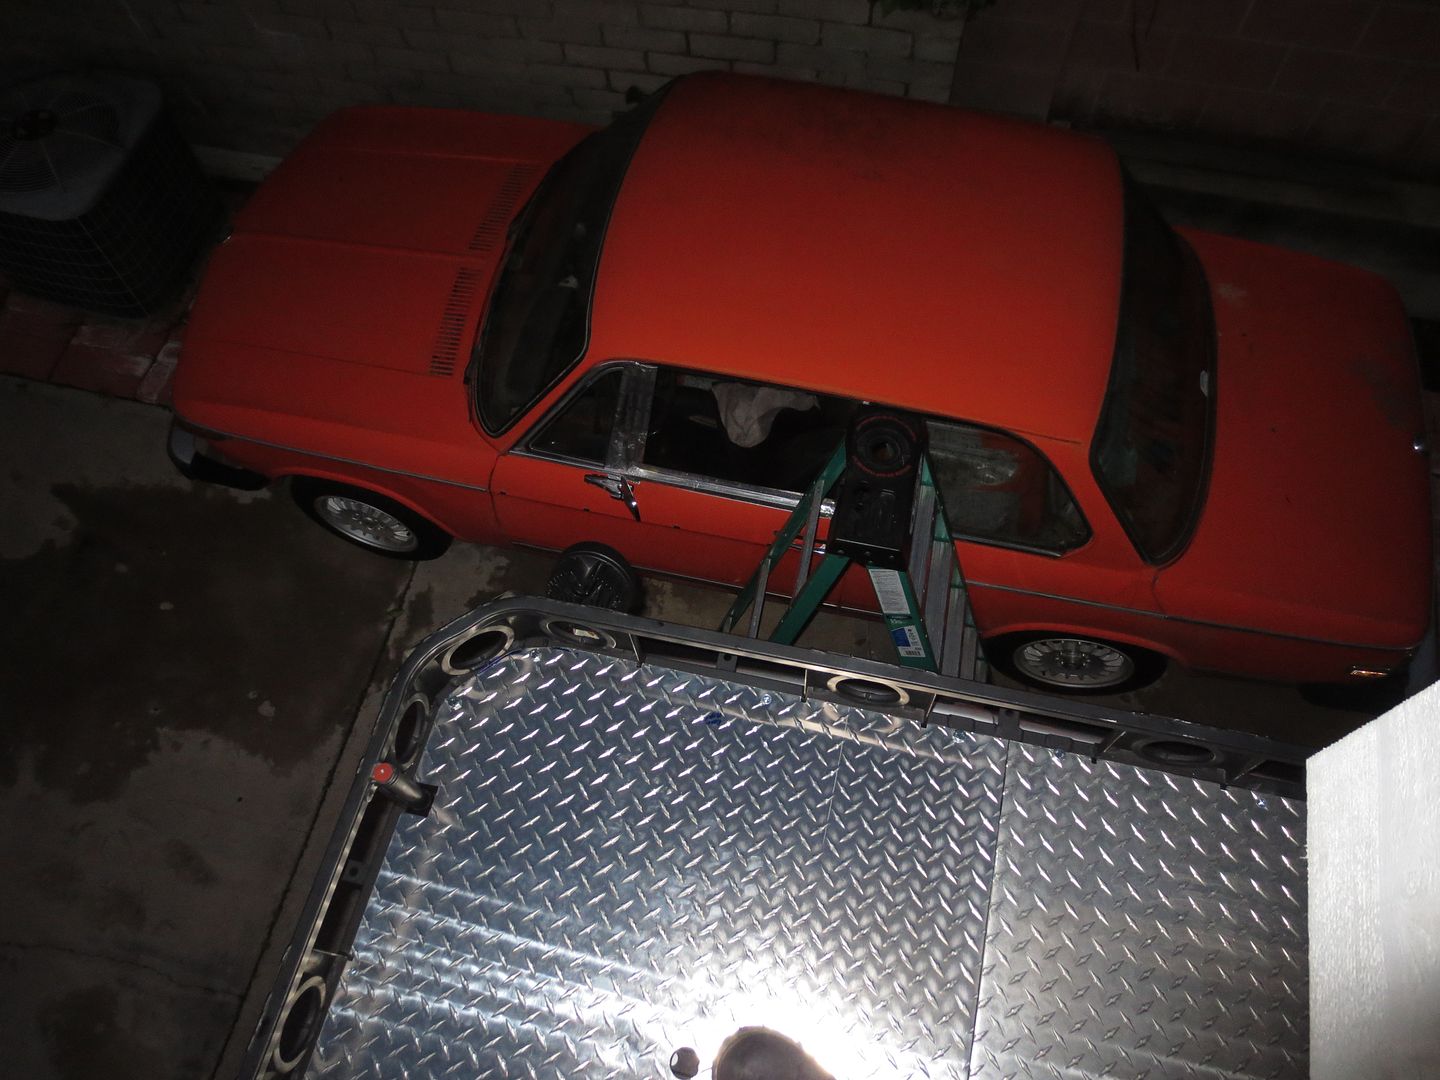
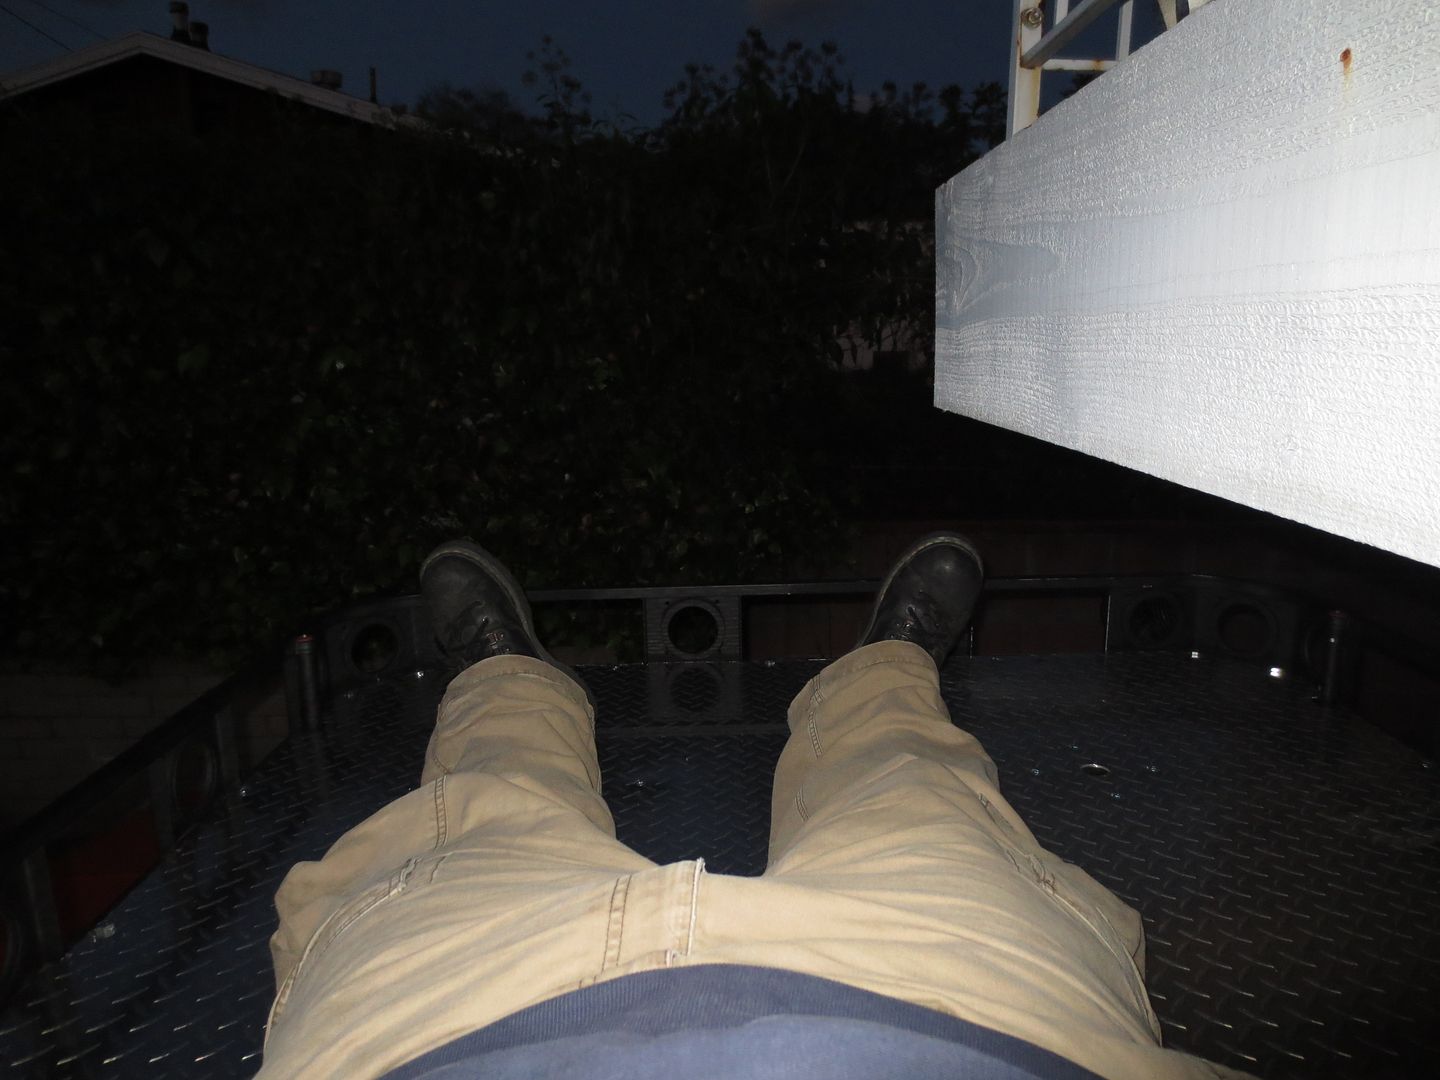
If i lay on the rack with my feet all the way at the bottom....
And reach my arm all the way towards the front...
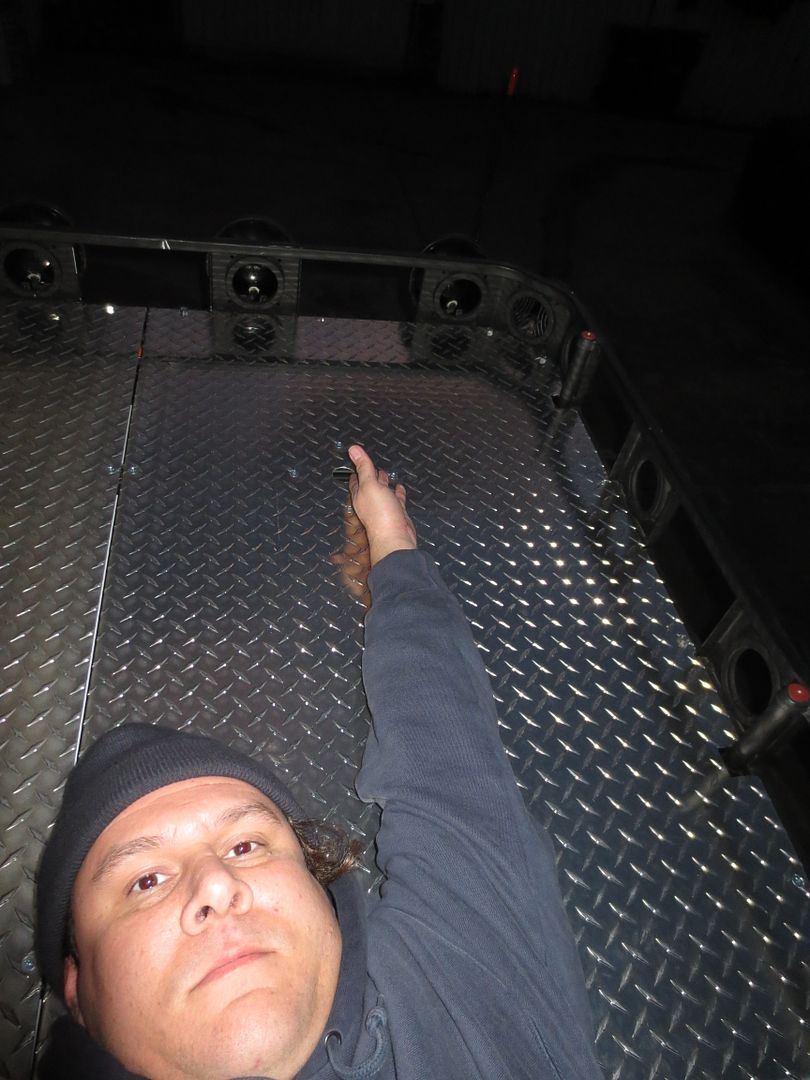
I still have about a foot and a half to go. The rack is about 9' long.
Did I mention my van is tall?
Eventually I will paint the floor a light gray color. I don't want it to have a mirror reflection and I don't want it to retain heat either. I figure gray is pretty neutral.
I can't wait to finalize my tent design and sleep up there!
Suspension-wise.....I barely noticed the additional weigh and higher CG. I designed my new suspension to hold a lot of weight and still ride smooth. I also used a lot of thin rubber shims under the floor to suppress vibration. I took a drive on a particularly nasty stretch of highway and I did not hear one squeak from the rack. When I pound on the floor with my fists it sounds very solid. Everything seems to have worked out exactly as I planned!
Today I was finally ready to install the floor in the rack. I have just spent the past three months shoring up my suspension to withstand the additional weight of the floor.....and so I could also slap on my 33" tires.
It was a cold but pretty day to work on the van:
These floor plates have been taking up space in my shop for over a year! The floor is 1/8" thick aluminum tread plate. Each side weighs about 45 pounds. All of the holes for the fasteners were drilled months ago before I installed the rack. The outer perimeter is bolted down with 3/8" bolts. The fasteners in the center of the floor are countersunk 1/4" phillips head screws that thread into strut nuts placed inside the electrical strut channel cross braces. Pix of all that can be found earlier in this thread.
I braved the cold atop my ladder and got to work despite frozen hands:
Here you can see the strut nuts:
I scuffed up the paint on the rack pretty good sliding these plates around, but you can see that my flat black rattle can paint job has held up quite well over the past several months since the rack has been exposed.
3/8" bolts through the floor and tabs welded to the outer perimeter:
There are also 1/4" countersunk screws along the perimeter wherever there is a strut crossing:
There are 8 holes across the floor that serve as anchor points. Several types of strut nuts can be inserted into those holes to provide a threaded anchor point for securing loads, ordinance, etc. They also serve as drainage holes.
As you can see my van is VERY tall. There's only about 10" of space between the top of the rack and the bottom of my balcony.
I don't have the ladder on the door finalized yet but I managed to get up top. The floor is slightly flexible between the struts, but not as much as you would expect for a 220lb guy standing on 1/8" thick aluminum. The abundance and placemment of the fasteners keep the aluminum held taught so deflection is minimized.
If i lay on the rack with my feet all the way at the bottom....
And reach my arm all the way towards the front...
I still have about a foot and a half to go. The rack is about 9' long.
Did I mention my van is tall?
Eventually I will paint the floor a light gray color. I don't want it to have a mirror reflection and I don't want it to retain heat either. I figure gray is pretty neutral.
I can't wait to finalize my tent design and sleep up there!
Suspension-wise.....I barely noticed the additional weigh and higher CG. I designed my new suspension to hold a lot of weight and still ride smooth. I also used a lot of thin rubber shims under the floor to suppress vibration. I took a drive on a particularly nasty stretch of highway and I did not hear one squeak from the rack. When I pound on the floor with my fists it sounds very solid. Everything seems to have worked out exactly as I planned!
1997 SAFARI 2WD CARGO
"I do not think there is any thrill that can go through the human heart like that felt by the inventor as he sees some creation of the brain unfolding to success... Such emotions make a man forget food, sleep, friends, love, everything." Nikola Tesla
"I do not think there is any thrill that can go through the human heart like that felt by the inventor as he sees some creation of the brain unfolding to success... Such emotions make a man forget food, sleep, friends, love, everything." Nikola Tesla
-
WoodButcher
- ASV Supporter
- Posts: 418
- Joined: Wed Apr 06, 2011 7:01 pm
- Location: Woodbury, CT.
- Has thanked: 1 time
- Been thanked: 18 times
Re: Homebrew Con-Ferr Style Porthole Roof Rack Build
Nice CC, pull the van up to the patio and you'll have plenty of room for the surprise BBQ on your B-Day!

Aren't you in SO-CAL? I should think the bright alum would be better for heat reflection, no?
Aren't you in SO-CAL? I should think the bright alum would be better for heat reflection, no?
'93 Safari shorty, 350 swap
'05 Astro AWD, lifted, 6 liter, cammed, ported and programmed for fast.
'93 cargo, work in progress
'05 Astro AWD, lifted, 6 liter, cammed, ported and programmed for fast.
'93 cargo, work in progress
-
97CargoCrawler
Topic author - I sleep in my van
- Posts: 754
- Joined: Thu Jan 24, 2008 11:50 pm
- Location: Near Los Angeles, CA
- Contact:
Re: Homebrew Con-Ferr Style Porthole Roof Rack Build
Thank you! I drove 300 miles today through The Grapevine twice on the 5 FWY. If you are familiar with the 5 FWY in CA you know it's pretty much THE WORSE potholed, lumpy and grooved FWY in the USA. And the "grapevine" is a seriously nasty pass through the mountains with very long steep grades.
The van handled awesome and I still did not hear any vibration, rattling or squeaking coming from the penthouse upstairs. I did notice some increased wind resistance. I was flying along at 75mph most of the time and I could hear a little wind above the cab. I don't have the headliner in place anymore so that surely has an effect. Either way, I will be dynamatting the cab soon and adding the console so I doubt I will hear any wind. But, being that my MPG's are also suffering from it I might construct some sort of inconspicuous deflector to help. Wind resistance wasn't noticeable before the floor installation.
The van handled awesome and I still did not hear any vibration, rattling or squeaking coming from the penthouse upstairs. I did notice some increased wind resistance. I was flying along at 75mph most of the time and I could hear a little wind above the cab. I don't have the headliner in place anymore so that surely has an effect. Either way, I will be dynamatting the cab soon and adding the console so I doubt I will hear any wind. But, being that my MPG's are also suffering from it I might construct some sort of inconspicuous deflector to help. Wind resistance wasn't noticeable before the floor installation.

Re: Homebrew Con-Ferr Style Porthole Roof Rack Build
Man I'd starve in that thing. Looks like drive up windows are out. Nice job man on a more serious note.
'04 White AWD Astro cargo
'00 Astro / El Camino
'61 BSA Super Rocket
'71 BSA B50 engine in a '67 C25 250 chassis
Impossible is just a degree of difficulty....
'00 Astro / El Camino
'61 BSA Super Rocket
'71 BSA B50 engine in a '67 C25 250 chassis
Impossible is just a degree of difficulty....