
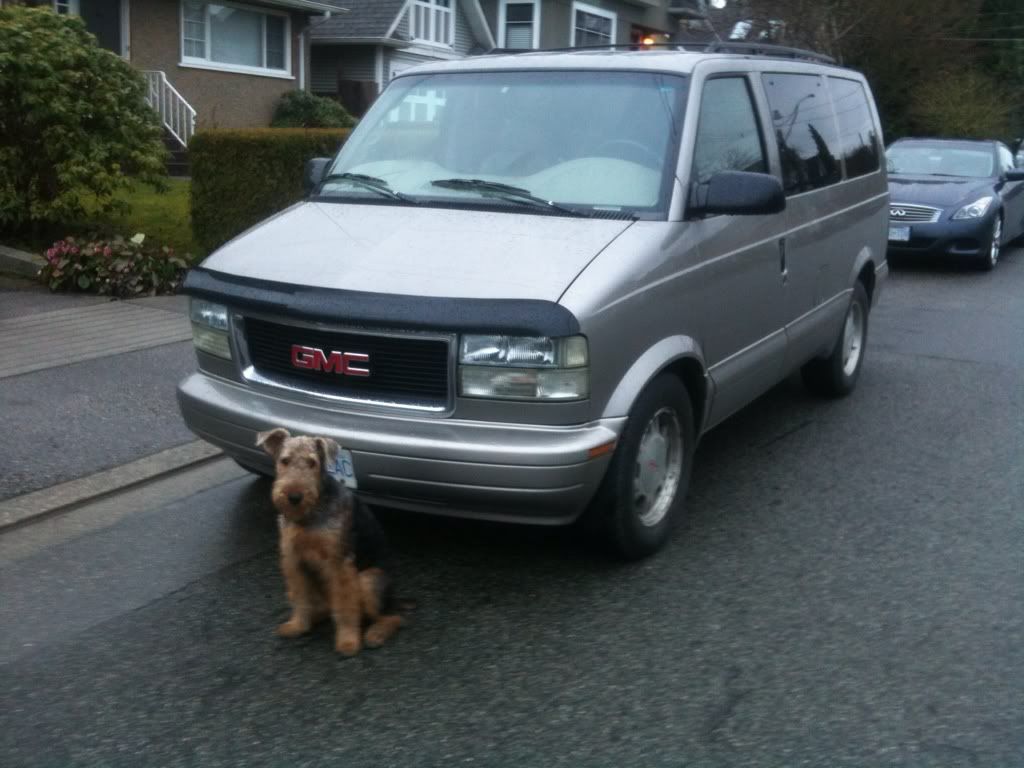
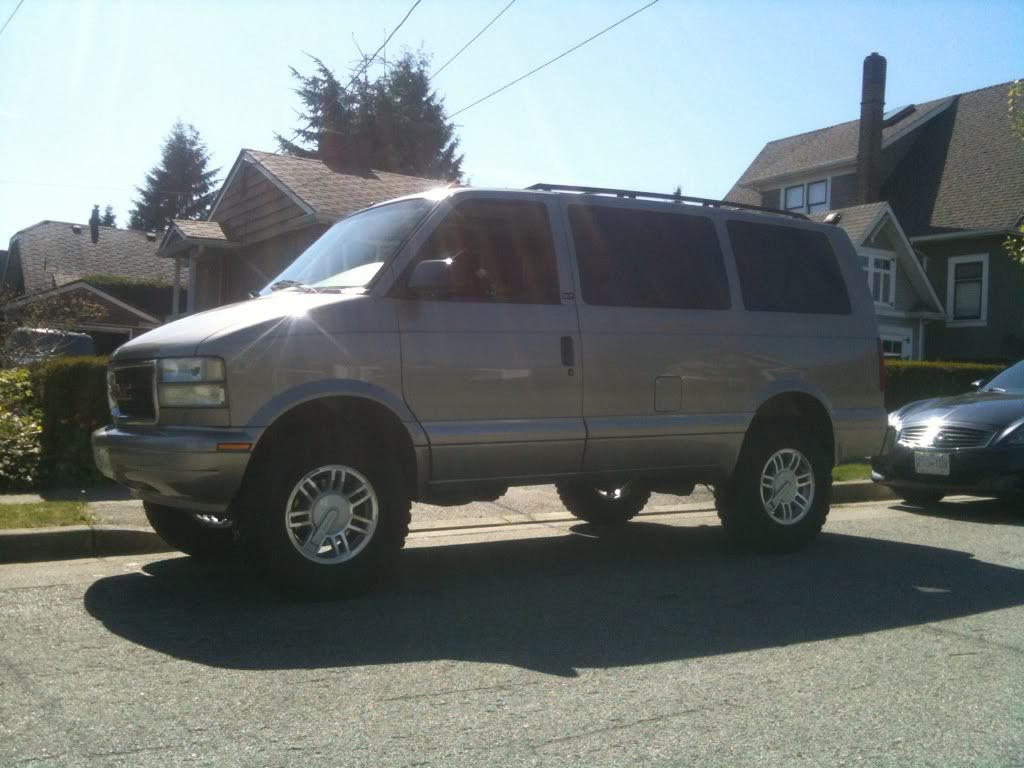
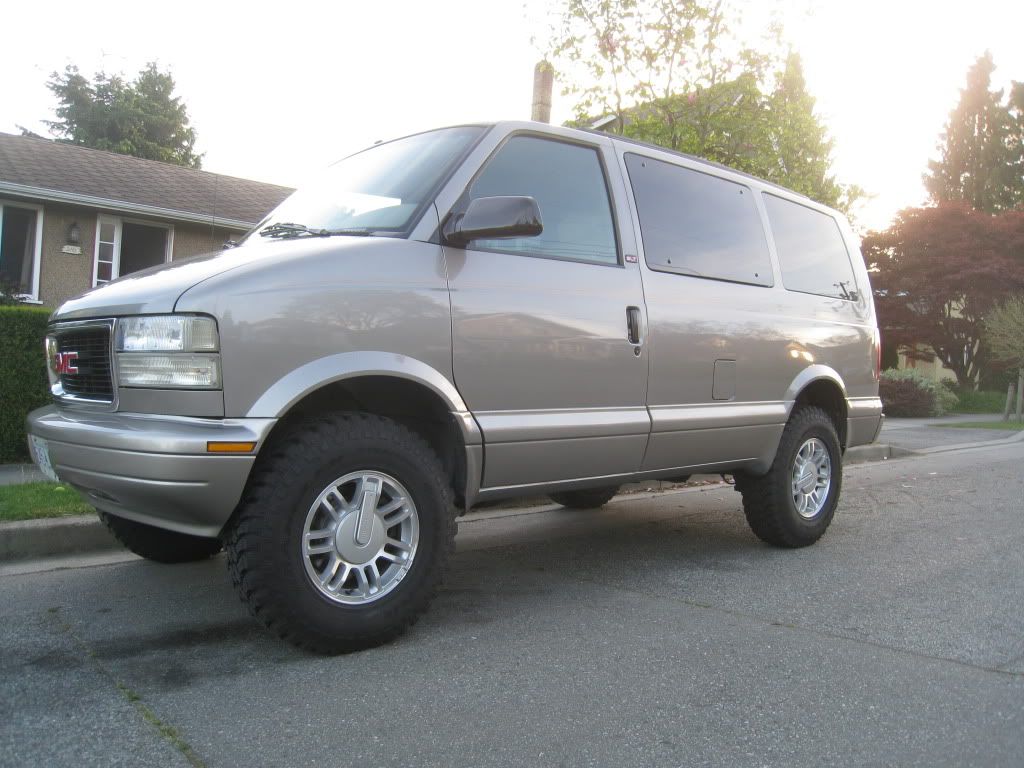
When you get an uneasy feeling before you place an order from a retail supplier sometimes it's better to do more research and do it yourself. Result? Almost 5 inches of lift all around for just over $300 plus my own labour.
I'll show you how...
DIY lift kit 2003 Safari
-
Marktainium
Topic author - I am merely driving my van

- Posts: 20
- Joined: Thu Mar 08, 2012 9:14 pm
-
 mdmead
- ASV Supporter

- Posts: 2153
- Joined: Sun Sep 10, 2006 6:45 pm
- Location: Selah, WA
- Been thanked: 1 time
- Contact:
Re: DIY lift kit 2003 Safari
We are waiting....Marktainium wrote:When you get an uneasy feeling before you place an order from a retail supplier sometimes it's better to do more research and do it yourself. Result? Almost 5 inches of lift all around for just over $300 plus my own labour.
I'll show you how...
Matt
Selah, WA
-96 GMC Safari AWD Hi-Top Conversion -->Stalled 5.3L swap & 5" lift
-74 Ford Bronco -->Far from perfect but mine!
-99 V-10 Ford Super Duty Super Cab 4x4 -->Stock with 285 Cooper ATs
-00 Ford Focus Wagon -->The Red Turd
-95 Ford 24' Class C Motorhome -->My big block sleeper
-07 Can-Am Outlander XT -->My yellow 4x4 quad for work & play
-04 Ski Doo REV Summit -->Still several chassis behind!
No new projects until the current ones are done!
-
 MountainManJoe
- I have my van tatooed on my cheeks
- Posts: 3101
- Joined: Fri Aug 08, 2008 12:55 pm
- Location: The Pacific North Wet
- Has thanked: 44 times
- Been thanked: 24 times

-
Marktainium
Topic author - I am merely driving my van
- Posts: 20
- Joined: Thu Mar 08, 2012 9:14 pm
-
 doyoulikeithere
- ASV Supporter
- Posts: 2060
- Joined: Tue Nov 17, 2009 8:27 pm
- Location: Misty Mountains of Cowichan BC.
Re: DIY lift kit 2003 Safari
looks good.
What tires are they?
What tires are they?
2021 Yamaha Tenere 700 - Blue.
2016 Yamaha XSR900 - Silver.
1990 Astro - AWD - Brown.
1987 Astro - With 5 Speed & 4wd - Silver & Blue.
2016 Yamaha XSR900 - Silver.
1990 Astro - AWD - Brown.
1987 Astro - With 5 Speed & 4wd - Silver & Blue.
-
MountainManJoe
- I have my van tatooed on my cheeks
- Posts: 3101
- Joined: Fri Aug 08, 2008 12:55 pm
- Location: The Pacific North Wet
- Has thanked: 44 times
- Been thanked: 24 times
-
Marktainium
Topic author - I am merely driving my van
- Posts: 20
- Joined: Thu Mar 08, 2012 9:14 pm
Re: DIY lift kit 2003 Safari
I've yet to sit down in front of my computer so here's another post from my phone. I spent probably an honest 10 to 12 hours researching this project before I even bought the van. In fact I bought a transfer case and the related electronics before I found the van....gotta work now, more info tonight!

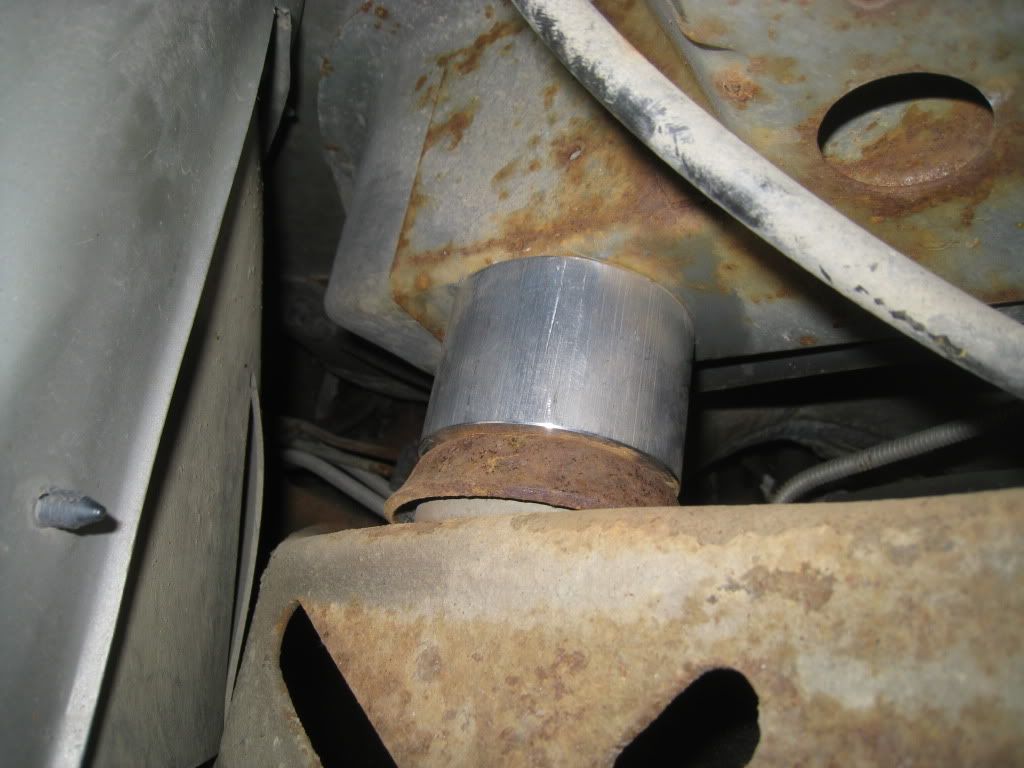
Front subframe spacers underway, 3" aluminum round stock, metal supermarket, gotta check the receipt, but I think it was less than $50.
Front subframe spacers underway, 3" aluminum round stock, metal supermarket, gotta check the receipt, but I think it was less than $50.
-
Marktainium
Topic author - I am merely driving my van
- Posts: 20
- Joined: Thu Mar 08, 2012 9:14 pm
Re: DIY lift kit 2003 Safari
The tires are Canadian Tire Goodyear Wrangler Territories in 235/85-16, $167ea. Wheels are Hummer H3, $200 for 5, Craigslist. Transfer case and electronics $120, craigslist. Airedale, Spencer, 8 months old, Priceless. ;)
-
 justice
- I sleep in my van
- Posts: 875
- Joined: Wed Dec 31, 1969 4:00 pm
- Location: Keeping a good eye on all you yahoos
Re: DIY lift kit 2003 Safari
w00t, another van running the H3 wheels. Gonna have to start a special club or something.
I have a ban hammer and I ain't fraid to use it!
Current - 2004 Astro Cargo
Former
95 Safari (money pit - sold)
93 Astro Cargo (totaled)
85 Astro - (Bought for parts and scrapped)
92 Astro Conversion (sold)
87 Safari Shorty (sold)
Current - 2004 Astro Cargo
Former
95 Safari (money pit - sold)
93 Astro Cargo (totaled)
85 Astro - (Bought for parts and scrapped)
92 Astro Conversion (sold)
87 Safari Shorty (sold)
-
 T.Low
T.Low
- I plan to be buried in my van
- Posts: 1768
- Joined: Wed Jun 06, 2007 7:11 pm
- Location: Bellingham, Wa
- Been thanked: 1 time


-
Marktainium
Topic author - I am merely driving my van
- Posts: 20
- Joined: Thu Mar 08, 2012 9:14 pm
Re: DIY lift kit 2003 Safari
OK... So here's how I did it.
I started off by doing a ton of research on this site and a lift kit retailer and had decided to just buy the kit and call it a day. I didn't want to mess around and thought it would be easier to have a combo that was proven to work all from one supplier. I had observed mixed reactions regarding levels of service and when I e-mailed back and forth with the retailer the communication was a bit inconsistent. I got to the point where I felt my questions were answered so in my last email I said ok I'm ready to do it. Invoice me and I will send you the money. Never got a response and subsequently did it on my own.
First off I'll cover the parts you need to buy...
Front lift. I went to Metal Supermarket and bought 12 3/4" of 3" round 6061 aluminum stock. Price with taxes, $41.62. I cut the stock into 6 pieces of just over 2" long each. I then cleaned them up in a lathe and brought them down to exactly 2" each. I also drilled holes in them on the lathe. 4 of them at 12mm and 2 at 14mm. It's interesting to note here that research had told me these bolts were 10mm and 12mm but being that the internet isn't iron clad, I pulled out the 3 bolts from one side and measured them myself. This may be different on older vans, but to be sure, check before you order! The magic bolt specs are : 4 @ 10.9M12-1.75x140mm (fastenal part number 0122037) and 2 @ 10.9HC14-2.0x140mm (fastenal part number 0122050) The shipped price including taxes to my US address was $43.27
So you don't have a lathe? No problem, Metal Supermarket will cut to your specs, and you can drill the holes by hand if you have to but at the least use a drill press to be sure the holes are straight.
Rear suspension. Again lots of research here. I had read tons on this and in the end I am really happy with my result. I ended up ordering from SDTrucksprings.com and went with a 3/1 Leaf Spring for a 1982 to 1994 S10 Pickup. Price for the pair shipped was $213.04 I had them in a week.
http://www.sdtrucksprings.com/index.php ... ts_id=1430
So that's it for parts.
There are a couple of things left on the table, say shocks and upper ball joints, but I haven't done those yet and it seems to drive just fine. I intend on swapping the upper ball joints to the underside of the control arm, replace the front shocks with longer stiffer items, and am going to relocate my rear shocks upward on the axle.
-
MountainManJoe
- I have my van tatooed on my cheeks
- Posts: 3101
- Joined: Fri Aug 08, 2008 12:55 pm
- Location: The Pacific North Wet
- Has thanked: 44 times
- Been thanked: 24 times
Re: DIY lift kit 2003 Safari
So the front is all body lift? No suspension changes? What is your current height?
-
Marktainium
Topic author - I am merely driving my van
- Posts: 20
- Joined: Thu Mar 08, 2012 9:14 pm
Re: DIY lift kit 2003 Safari
Step by step, sort of, or how I did it anyway...
First off, make sure all your tire pressures are the same and measure the ride height all around. I measured at the wheel arch directly in line with the center of each wheel. Write these numbers down. This is for bragging rights later.
So now you have your parts... I always start a job with the hardest part first. That way when your tired and dirty the easy part is kind of, well easier?!?
I started by lifting the front end up off of the ground and safely supported on jackstands. I removed the front wheels then removed in this order, the front signal lights, the grill, the bumper, air filter box and MAF assembly. I also unbolted the Fan shroud and removed the lower plastic that holds the power steering oil cooler lines. The upper fan shroud is bolted to the rad support with 3 bolts and has 2 bolts on either side bolted straight down into the lower fan shroud. When you unbolt the lower plastic there are 2 small bolts from underneath and 2 re-useable plastic clips from the front on either side. When the plastic is loose you move it towards the passenger side of the van to allow the cooler lines to come out of the plastic. Mine were slightly melted into the plastic so they needed a little finesse to get them out. The goal here is to allow the lower fan shroud to hang down and to ultimately allow you to remove it for trimming. I removed the fan shrouds after I installed the subframe spacers but you could do this now. Don't forget the bolts that go between the bumper and the fender and the lower bumper support rod. Be methodical and these parts come off easy. I did this alone but an extra set of hands when removing the bumper would be easier.
Next I lowered the van without the front wheels on it to a height that would still allow me to get under the van to access the sub-frame mounts as well as use the jack to raise the body (area under the radiator). It's important here to place the jackstands under the subframe in a way that evenly supports the subframe and allows you to get to the subframe bolts. I used 4 smaller style jackstands here. the rear 2 I put under the transmission crossmember and the front 2 were right up at the front. As you lower the van onto the stands the idea is to have the stands evenly support the subframe. Sorry I didn't take pics here but if you lay under there you'll see what I mean. This is all done with the vans rear wheels secured with chocks. You don't want the van to move at all.
You should not have the parking brake applied at this point. Remove the 2 bolts, (13mm head), that hold the parking brake cable bracket to the floor of the van. This is under the drivers area and inboard of the subframe. You will see a bracket on the subframe that will hit the cable if you don't remove it when you do the next step.
Take your trusty sturdy jack, preferrable a nice solid oversize trolley jack and position it under the radiator support. (this is where that lower plastic piece wrapped under to support the lower fan shroud). In the middle of course unless you have 2 jacks, which I didn't, but if I did I would have done one on either side to have better control. Don't lift it yet. Undo the 6 subframe bolts. 5 of mine came out easily, 1 did not. The front right one started to move then slowed down. This is with an impact gun. In my experience and in this case stop. From the front corner of the rad support I could see into the area where the nut was. They are a J clip style nut, (I think), and I could see the metal tearing around the clip. I WD40'd it and reversed the direction of my gun. If a bolt slows down while coming out it's usually because it's getting hot and pushing rust through threads. So when it binds up coming out, go back in a bit, with lots of lube, and take another run at it. I did this a few times and it came out. The alternative is a broken clip, or nut that was welded on the inside of the frame coming off and spinning around with you having no choice but to cut holes into your frame to access and cut off a broken nut. Not fun...but I digress...
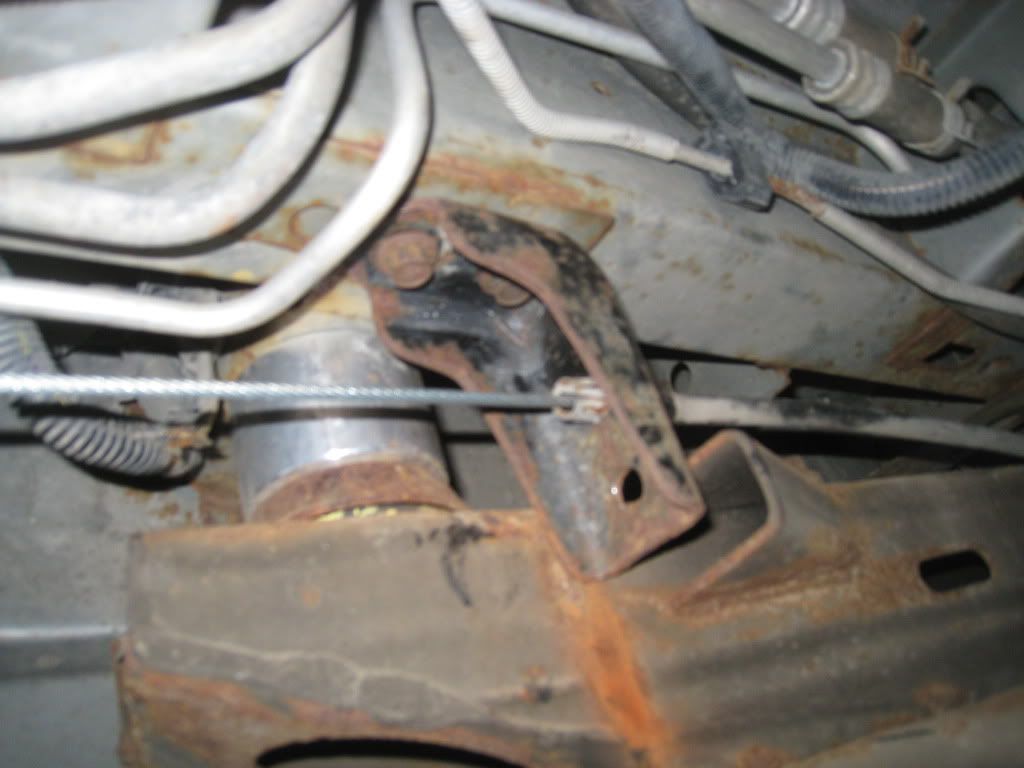
All 6 bolts out? Great! Get your stylish aluminum spacers and magic bolts ready! Use lots of neverseize on your bolts, you'll thank you one day, trust me... Jack up the body of the van slowly paying attention that the subframe stays put and the body doesn't shift around. This went really well for me. I did the passenger side first and when the body was just high enough to slip a spacer in I did so. dont tighten the bolts but start them by hand. The drivers side was a bit tougher as you are extending the steering joint. (as far as I could tell) I found it to be a bit tighter and had to push up slightly with my knee on the rocker of the van to get the rear spacer in. Once they are all in and started I tightened the middle ones first then the front and then the rear bolts. Tighten to really tight. Lower the jack(s) and re set the jacks under the subframe. I lifted it back up just to make it easier plus you dont really want the weight of the van on the rad support.
to be continued....
First off, make sure all your tire pressures are the same and measure the ride height all around. I measured at the wheel arch directly in line with the center of each wheel. Write these numbers down. This is for bragging rights later.
So now you have your parts... I always start a job with the hardest part first. That way when your tired and dirty the easy part is kind of, well easier?!?
I started by lifting the front end up off of the ground and safely supported on jackstands. I removed the front wheels then removed in this order, the front signal lights, the grill, the bumper, air filter box and MAF assembly. I also unbolted the Fan shroud and removed the lower plastic that holds the power steering oil cooler lines. The upper fan shroud is bolted to the rad support with 3 bolts and has 2 bolts on either side bolted straight down into the lower fan shroud. When you unbolt the lower plastic there are 2 small bolts from underneath and 2 re-useable plastic clips from the front on either side. When the plastic is loose you move it towards the passenger side of the van to allow the cooler lines to come out of the plastic. Mine were slightly melted into the plastic so they needed a little finesse to get them out. The goal here is to allow the lower fan shroud to hang down and to ultimately allow you to remove it for trimming. I removed the fan shrouds after I installed the subframe spacers but you could do this now. Don't forget the bolts that go between the bumper and the fender and the lower bumper support rod. Be methodical and these parts come off easy. I did this alone but an extra set of hands when removing the bumper would be easier.
Next I lowered the van without the front wheels on it to a height that would still allow me to get under the van to access the sub-frame mounts as well as use the jack to raise the body (area under the radiator). It's important here to place the jackstands under the subframe in a way that evenly supports the subframe and allows you to get to the subframe bolts. I used 4 smaller style jackstands here. the rear 2 I put under the transmission crossmember and the front 2 were right up at the front. As you lower the van onto the stands the idea is to have the stands evenly support the subframe. Sorry I didn't take pics here but if you lay under there you'll see what I mean. This is all done with the vans rear wheels secured with chocks. You don't want the van to move at all.
You should not have the parking brake applied at this point. Remove the 2 bolts, (13mm head), that hold the parking brake cable bracket to the floor of the van. This is under the drivers area and inboard of the subframe. You will see a bracket on the subframe that will hit the cable if you don't remove it when you do the next step.
Take your trusty sturdy jack, preferrable a nice solid oversize trolley jack and position it under the radiator support. (this is where that lower plastic piece wrapped under to support the lower fan shroud). In the middle of course unless you have 2 jacks, which I didn't, but if I did I would have done one on either side to have better control. Don't lift it yet. Undo the 6 subframe bolts. 5 of mine came out easily, 1 did not. The front right one started to move then slowed down. This is with an impact gun. In my experience and in this case stop. From the front corner of the rad support I could see into the area where the nut was. They are a J clip style nut, (I think), and I could see the metal tearing around the clip. I WD40'd it and reversed the direction of my gun. If a bolt slows down while coming out it's usually because it's getting hot and pushing rust through threads. So when it binds up coming out, go back in a bit, with lots of lube, and take another run at it. I did this a few times and it came out. The alternative is a broken clip, or nut that was welded on the inside of the frame coming off and spinning around with you having no choice but to cut holes into your frame to access and cut off a broken nut. Not fun...but I digress...
All 6 bolts out? Great! Get your stylish aluminum spacers and magic bolts ready! Use lots of neverseize on your bolts, you'll thank you one day, trust me... Jack up the body of the van slowly paying attention that the subframe stays put and the body doesn't shift around. This went really well for me. I did the passenger side first and when the body was just high enough to slip a spacer in I did so. dont tighten the bolts but start them by hand. The drivers side was a bit tougher as you are extending the steering joint. (as far as I could tell) I found it to be a bit tighter and had to push up slightly with my knee on the rocker of the van to get the rear spacer in. Once they are all in and started I tightened the middle ones first then the front and then the rear bolts. Tighten to really tight. Lower the jack(s) and re set the jacks under the subframe. I lifted it back up just to make it easier plus you dont really want the weight of the van on the rad support.
to be continued....
Last edited by Marktainium on Mon May 14, 2012 10:31 pm, edited 1 time in total.