Page 1 of 2
Engine Driven Compressor
Posted: Fri Jan 23, 2009 6:28 pm
by SSAstro
Who on here converted the a/c compressor over to an edc to use for air tools i want to try it on my 96 for the suspension but i can't find the write up on it anymore any help would be great
Re: Engine Driven Compressor
Posted: Fri Jan 23, 2009 6:32 pm
by potskie
It was the nut case who built the really freaken tall green van.

Re: Engine Driven Compressor
Posted: Fri Jan 23, 2009 7:03 pm
by LiftedAWDAstro
Don't know who you are talking about pots!
Re: Engine Driven Compressor
Posted: Sat Jan 24, 2009 7:59 pm
by SSAstro
oh that guy some help please i need it right now
Re: Engine Driven Compressor
Posted: Sat Jan 24, 2009 8:26 pm
by d3athm3talh3ad
here's an article on it, there may be easier ways though...it's a real popular mod for the 4 wheeling crowd...
http://jeep.off-road.com/jeep/article/a ... ?id=261434
Re: Engine Driven Compressor
Posted: Sun Jan 25, 2009 4:41 am
by SSAstro
see what i need to know is oiling and everything else cause i want to try and use the stock compressor like he did
Re: Engine Driven Compressor
Posted: Sun Jan 25, 2009 7:42 am
by LiftedAWDAstro
Here is a list of stuff you will need:
1. Oiler - get an adjustable one so you can dial in the correct oil flow
2. Coalescing filter - used to remove the oil and water from the compressor
3. Pressure switch - I used an adjustable one so I could get 140 PSI max
4. Check valve - Used to keep the air from relieving through the compressor when it isn't running
5. Tank - this is obvious

6. Pressure relief valve - to keep from blowing things up as the stock compressor will build over 400 PSI
7. Hose, fittings, 3 or 4-way manifold, air chucks, hose clamps, etc.
To get started you will need to evacuate the refrigerant that is in the system. Do this through a recycler - it's the right thing to do isn't it?

Then you will need to remove the condenser in the front of the radiator. Then remove the accumulator which is the large aluminum cylinder that sits right next to the heat and A/C box on the passenger side. You will find 2 hoses that go into the compressor. The one that is attached to the accumulator is the input line. The other line that is on the driver side is the outlet line. Take these lines and cut the metal fittings off and you will use barbed fittings and clamps to connect to the oiler and the check valve.
In the following pic, you will see the black oiler. There is a small inlet filter to keep dust and dirt out. The outlet of the oiler is connected directly to the inlet hose of the compressor. In the oiler I used a mix of 50% marvel mystery oil and 50% 5W-30 oil. You could use air tool oil as well. The reason for the MMO is to allow the oiler to draw oil when it is freezing out! This will take care of the inlet side.
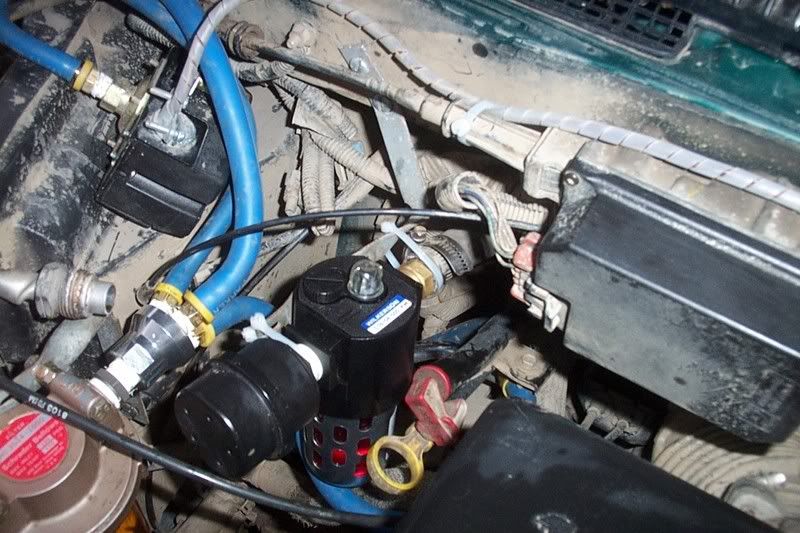
In the next pic you will see the horizontal hose right next to the air box that connects to the blue air hose. That black hose is the outlet of the compressor. If you follow that line towards the compressor you may find a small aluminum canister, no idea what it is so I left it there! LOL The connection between the black compressor line and the blue air line is where I had to install the check valve. If you don't install the check valve, the system will drain back through the compressor.
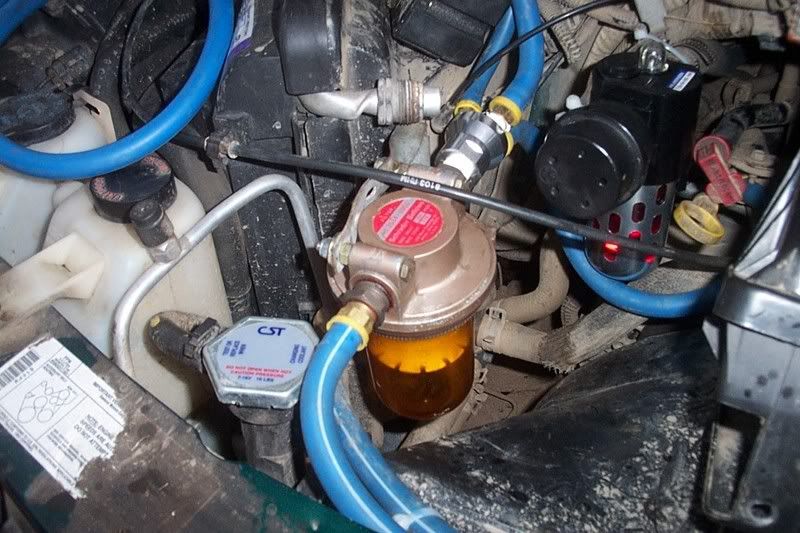
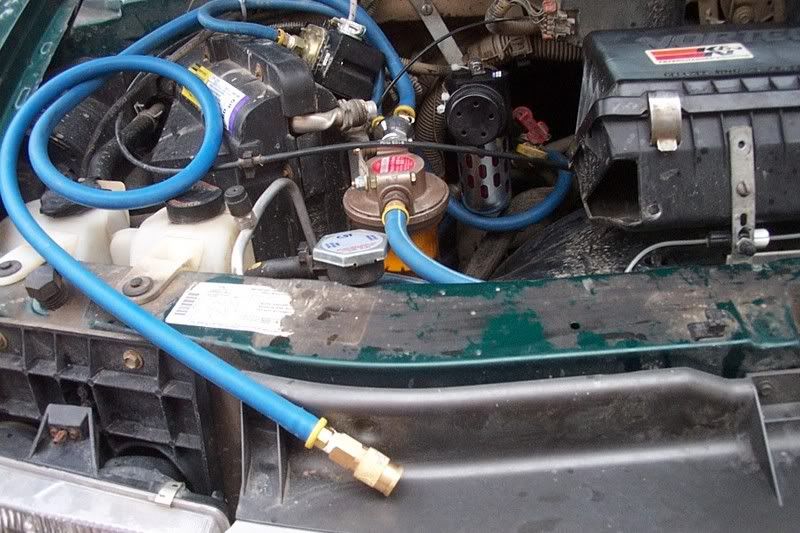
The next pic shows the original coalescing filter I used. Run a line from the check valve to the inlet of the filter. The outlet of the filter will have the 3 or 4-way manifold. I used a 3-way "Y" manifold. One line runs to the rear where the tank is mounted. I used the tank as the location for the pressure relief valve. A second line runs to the adjustable pressure switch. I used a standard household water pump pressure switch that has an adjustable range of about 125 to 150 PSI. The third port is for the air chuck under the hood.
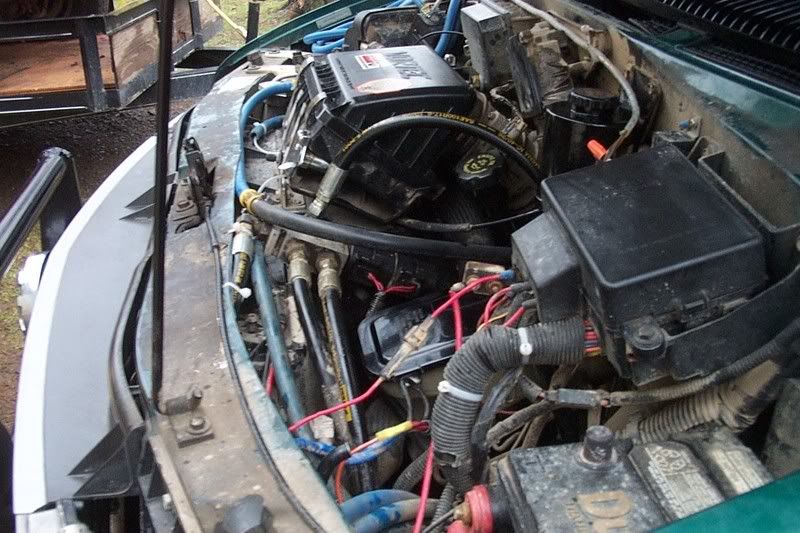
Now for the electrical. On my 98 there is a fuse box under the hood that holds the A/C compressor relay. I left that intact. What I did do though is to pull apart the fuse box and find what wire is the control wire for the A/C relay. I then cut that wire and taped it up. I now put in a toggle switch and ran power from a fused supply under the dash. The load side of the toggle switch went to the pressure switch. The other side of the pressure switch goes to the A/C relay control wire we just found. Now when you want air you turn on the OBA toggle and if the pressure is under the cut-in pressure the compressor will run.
Once you get everything plumbed in, check all hose connections for tightness.
Now FILL the oiler!!!!! This is the most important step as you will seize up the compressor if you don't do this! Double check the routing of the hoses to be sure they are away from manifolds and other hot items!
Re: Engine Driven Compressor
Posted: Sun Jan 25, 2009 7:55 am
by SSAstro
ok i got a little lost here do i put the oiler in on the inlet or outlet side basically all i have to do is run the pressure swich thats already in my tank right to the clutch how long does it take to fill the tank. now in theory one the clutch turns off won't it stop pumping air until the switch says other i'm just trying to figure out the pressure relief valve as opposed to using a sanden or york what do they pump
Re: Engine Driven Compressor
Posted: Sun Jan 25, 2009 8:12 am
by SSAstro
i got it i just finally figured everything out so right now i'm looking at spending just under 100.00 for everything. now how reliable is this going to be as far as use life i mean i have a spare compressor so if this one goes out but how much did you use your setup
Re: Engine Driven Compressor
Posted: Sun Jan 25, 2009 8:52 am
by astrozam
Thanks for posting the pics and install info Dean, I'm sure they'll help someone out sometime down the road.

Re: Engine Driven Compressor
Posted: Sun Jan 25, 2009 8:57 am
by SSAstro
i think he posted it on the old board but i wasn't sure. i kind of stay on this board now too much drama on the other one

if you know what i mean
Re: Engine Driven Compressor
Posted: Sun Jan 25, 2009 10:42 am
by lockdoc
I used the compressor on the van discussed above just yesterday to air up the tires and it still works nice. It is used somewhat often as it also powers the airhorn which I use fairly frequently.
I don't remember the size of the tank at the moment but it fills up in about a minute or so.
Re: Engine Driven Compressor
Posted: Sun Jan 25, 2009 11:51 am
by SSAstro
now when i wire the clutch to my switch which wire is which i know one is hot all the time the other is the switch
Re: Engine Driven Compressor
Posted: Sun Jan 25, 2009 12:11 pm
by LiftedAWDAstro
That system was first installed in late 2004. It has been in use ever since. All that needs to be done is fill the oiler reservoir every so often and empty out the coalescing filter. I ended up going with a different coalescing filter as the original froze and cracked the poly housing. The new coalescing filter has an automatic drain valve that I plumbed into a catch bottle. I didn't want it draining oil directly onto the ground or into a stream we were crossing!
The tank is a 2.5 gallon mounted underneath where the spare tire was.
As for wiring directly to the clutch, I can't help you there. I wired it into the relay as posted.
Re: Engine Driven Compressor
Posted: Sun Jan 25, 2009 12:30 pm
by GnarliSafari
Little off topic, but did you ever finish the onboard welder in the SPB, Lifted? With all that under the hood did you look like the old lady at the airport doing everything she could to get her suitcase closed right before the flight?